Middlewares customization
Page summary:Middlewares alter the request or response flow at application or API levels. This documentation distinguishes global versus route middlewares and illustrates custom implementations with generation patterns.
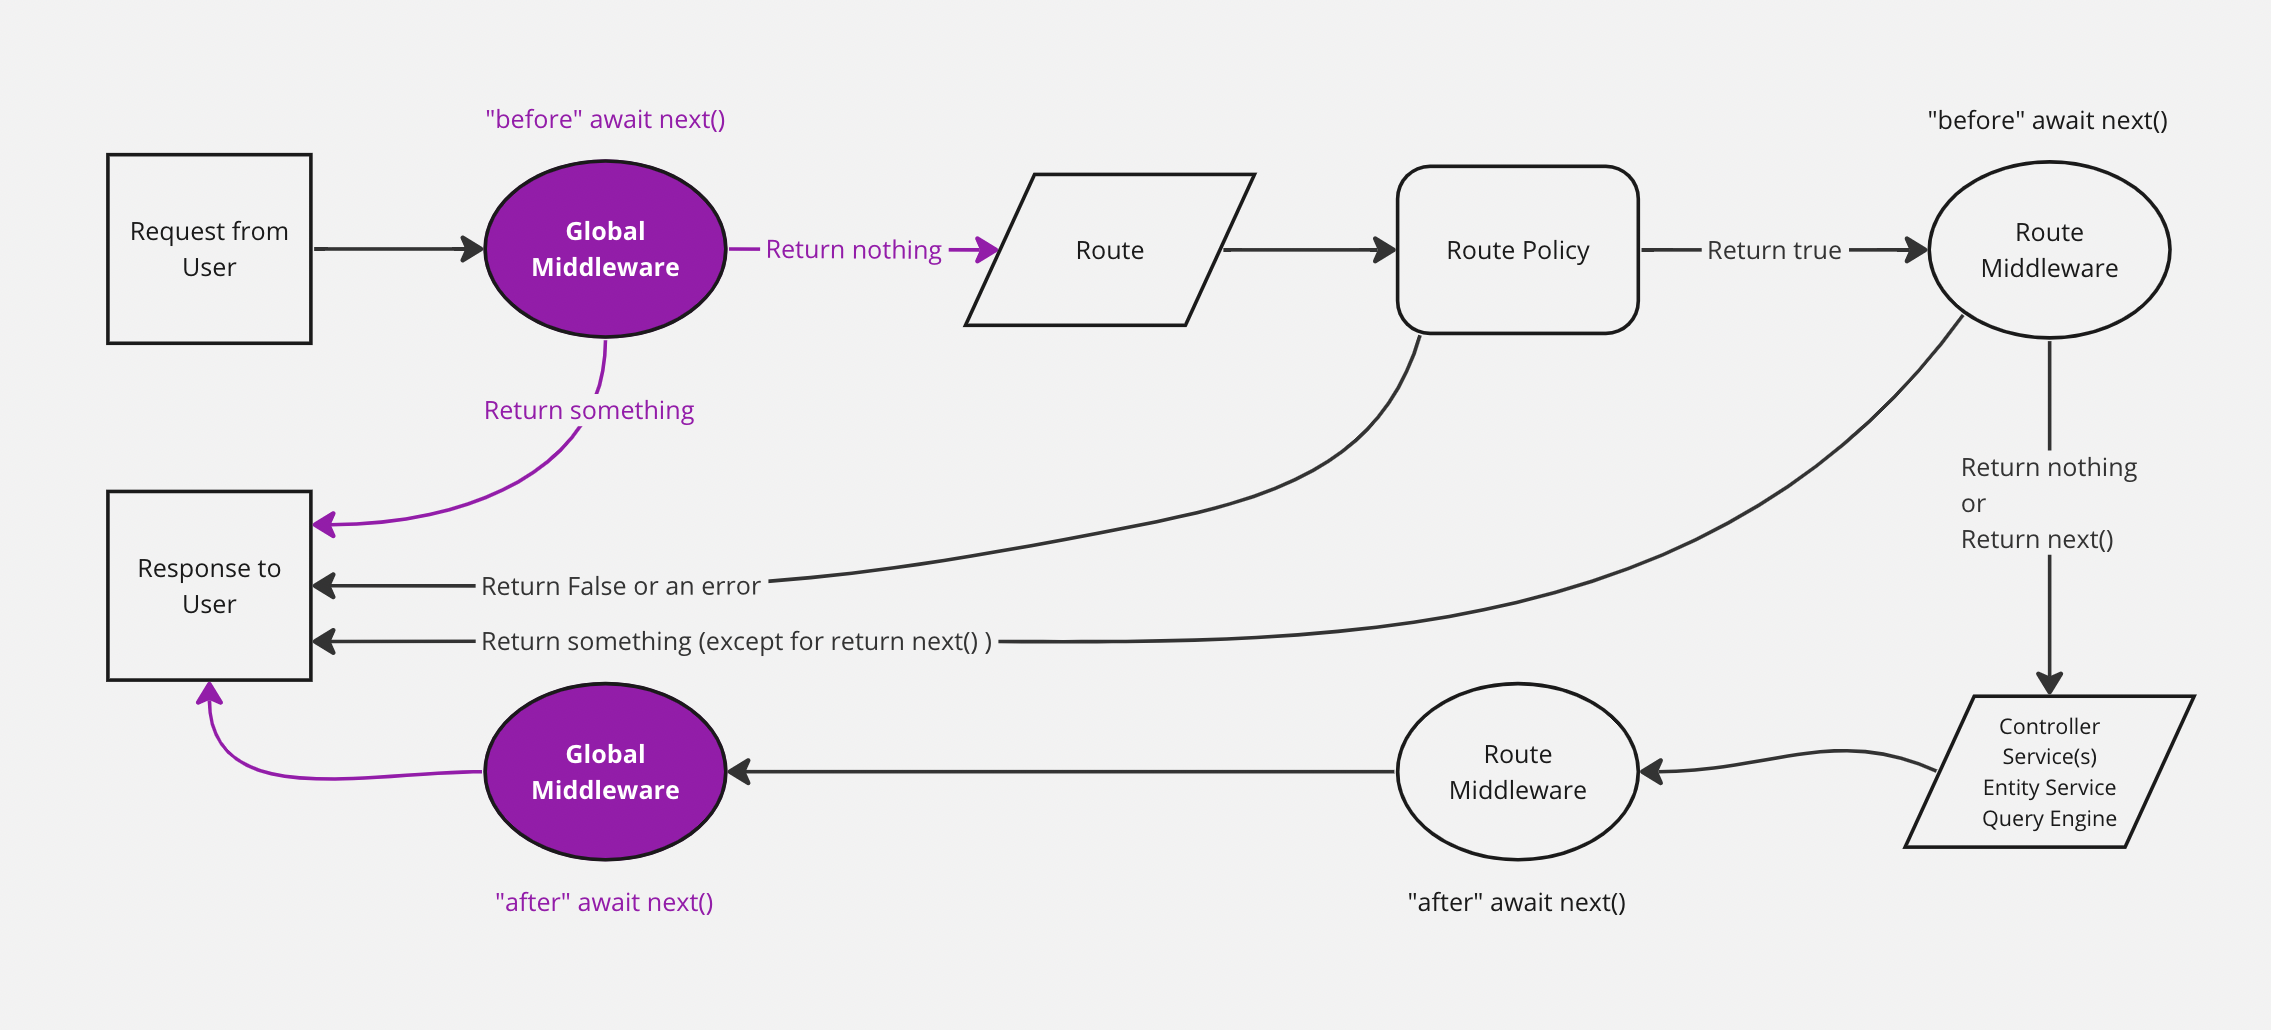
In Strapi, 3 middleware concepts coexist:
-
Global middlewares are configured and enabled for the entire Strapi server application. These middlewares can be applied at the application level or at the API level.
The present documentation describes how to implement them.
Plugins can also add global middlewares (see Server API documentation). -
Route middlewares have a more limited scope and are configured and used as middlewares at the route level. They are described in the routes documentation.
-
Document Service middlewares apply to the Document Service API and have their own implementation and related lifecycle hooks.
Implementation
A new application-level or API-level middleware can be implemented:
- with the interactive CLI command
strapi generate - or manually by creating a JavaScript file in the appropriate folder (see project structure):
./src/middlewares/for application-level middlewares./src/api/[api-name]/middlewares/for API-level middlewares./src/plugins/[plugin-name]/middlewares/for plugin middlewares
Middlewares working with the REST API are functions like the following:
- JavaScript
- TypeScript
module.exports = (config, { strapi })=> {
  return (context, next) => {};
};
export default (config, { strapi })=> {
  return (context, next) => {};
};
Globally scoped custom middlewares should be added to the middlewares configuration file or Strapi won't load them.
API level and plugin middlewares can be added into the specific router that they are relevant to like the following:
module.exports = {
  routes: [
    {
      method: "GET",
      path: "/[collection-name]",
      handler: "[controller].find",
      config: {
        middlewares: ["[middleware-name]"],
        // See the usage section below for middleware naming conventions
      },
    },
  ],
};
Example of a custom timer middleware
- JavaScript
- TypeScript
module.exports = () => {
  return async (ctx, next) => {
    const start = Date.now();

    await next();

    const delta = Math.ceil(Date.now() - start);
    ctx.set('X-Response-Time', delta + 'ms');
  };
};
export default () => {
  return async (ctx, next) => {
    const start = Date.now();

    await next();

    const delta = Math.ceil(Date.now() - start);
    ctx.set('X-Response-Time', delta + 'ms');
  };
};
The GraphQL plugin also allows implementing custom middlewares, with a different syntax.
Run yarn strapi middlewares:list to list all registered middlewares and double‑check naming when wiring them in routers.
Usage
Middlewares are called different ways depending on their scope:
- use
global::middleware-namefor application-level middlewares - use
api::api-name.middleware-namefor API-level middlewares - use
plugin::plugin-name.middleware-namefor plugin middlewares
To list all the registered middlewares, run yarn strapi middlewares:list.
Restricting content access with an "is-owner policy"
It is often required that the author of an entry is the only user allowed to edit or delete the entry. In previous versions of Strapi, this was known as an "is-owner policy". With Strapi v4, the recommended way to achieve this behavior is to use a middleware.
Proper implementation largely depends on your project's needs and custom code, but the most basic implementation could be achieved with the following procedure:
- From your project's folder, create a middleware with the Strapi CLI generator, by running the
yarn strapi generate(ornpm run strapi generate) command in the terminal. - Select
middlewarefrom the list, using keyboard arrows, and press Enter. - Give the middleware a name, for instance
isOwner. - Choose
Add middleware to an existing APIfrom the list. - Select which API you want the middleware to apply.
- Replace the code in the
/src/api/[your-api-name]/middlewares/isOwner.jsfile with the following, replacingapi::restaurant.restaurantin line 22 with the identifier corresponding to the API you choose at step 5 (e.g.,api::blog-post.blog-postif your API name isblog-post):
  "use strict";

  /**
   * `isOwner` middleware
   */

  module.exports = (config, { strapi }) => {
    // Add your own logic here.
    return async (ctx, next) => {
      const user = ctx.state.user;
      const entryId = ctx.params.id ? ctx.params.id : undefined;
      let entry = {};

      /**
       * Gets all information about a given entry,
       * populating every relations to ensure
       * the response includes author-related information
       */
      if (entryId) {
        entry = await strapi.documents('api::restaurant.restaurant').findOne(
          entryId,
          { populate: "*" }
        );
      }

      /**
       * Compares user id and entry author id
       * to decide whether the request can be fulfilled
       * by going forward in the Strapi backend server
       */
      if (user.id !== entry.author.id) {
        return ctx.unauthorized("This action is unauthorized.");
      } else {
        return next();
      }
    };
  };
- Ensure the middleware is configured to apply on some routes. In the
configobject found in thesrc/api/[your-api–name]/routes/[your-content-type-name].jsfile, define the action keys (find,findOne,create,update,delete, etc.) for which you would like the middleware to apply, and declare theisOwnermiddleware for these routes.
For instance, if you wish to allow GET requests (mapping to thefindandfindOneactions) and POST requests (i.e., thecreateaction) to any user for therestaurantcontent-type in therestaurantAPI, but would like to restrict PUT (i.e.,updateaction) and DELETE requests only to the user who created the entry, you could use the following code in thesrc/api/restaurant/routes/restaurant.jsfile:
/**
 * restaurant router
 */

const { createCoreRouter } = require("@strapi/strapi").factories;

module.exports = createCoreRouter("api::restaurant.restaurant", {
  config: {
    update: {
      middlewares: ["api::restaurant.is-owner"],
    },
    delete: {
      middlewares: ["api::restaurant.is-owner"],
    },
  },
});
You can find more information about route middlewares in the routes documentation.
Route-level middlewares are a good place to centralize population logic and prevent accidental over-fetching. See Building High-Performance Strapi Applications on the Strapi blog for patterns and examples.