Page summary:The Email feature sends transactional messages through local SMTP or external providers like SendGrid. Setup guidance in this documentation covers provider configuration and extending delivery via controllers or hooks.
The Email feature enables Strapi applications to send emails from a server or an external provider.
Configuration
Most configuration options for the Email feature are handled via your Strapi project's code. The admin panel provides a read-only view of the current configuration, connection status, and provider capabilities, and lets users send a test email.
- The email provider refers to the package that Strapi calls to send an email (e.g. official providers such as Sendgrid or community packages such as
@strapi/provider-email-nodemailer). Providers implement the logic for sending mail when Strapi invokes them. - The provider host (or server) refers to the connection details (e.g. an SMTP hostname, port, or REST API endpoint) that the provider exposes. Some providers hide these details behind an API key, while others require you to supply host-related options in your configuration.
The Email feature only handles outbound delivery. Receiving or parsing incoming messages is outside the scope of the built-in plugin and must be implemented with your email provider's inbound webhooks or a custom integration.
Admin panel settings
Path to configure the feature: Settings > Email feature > Configuration

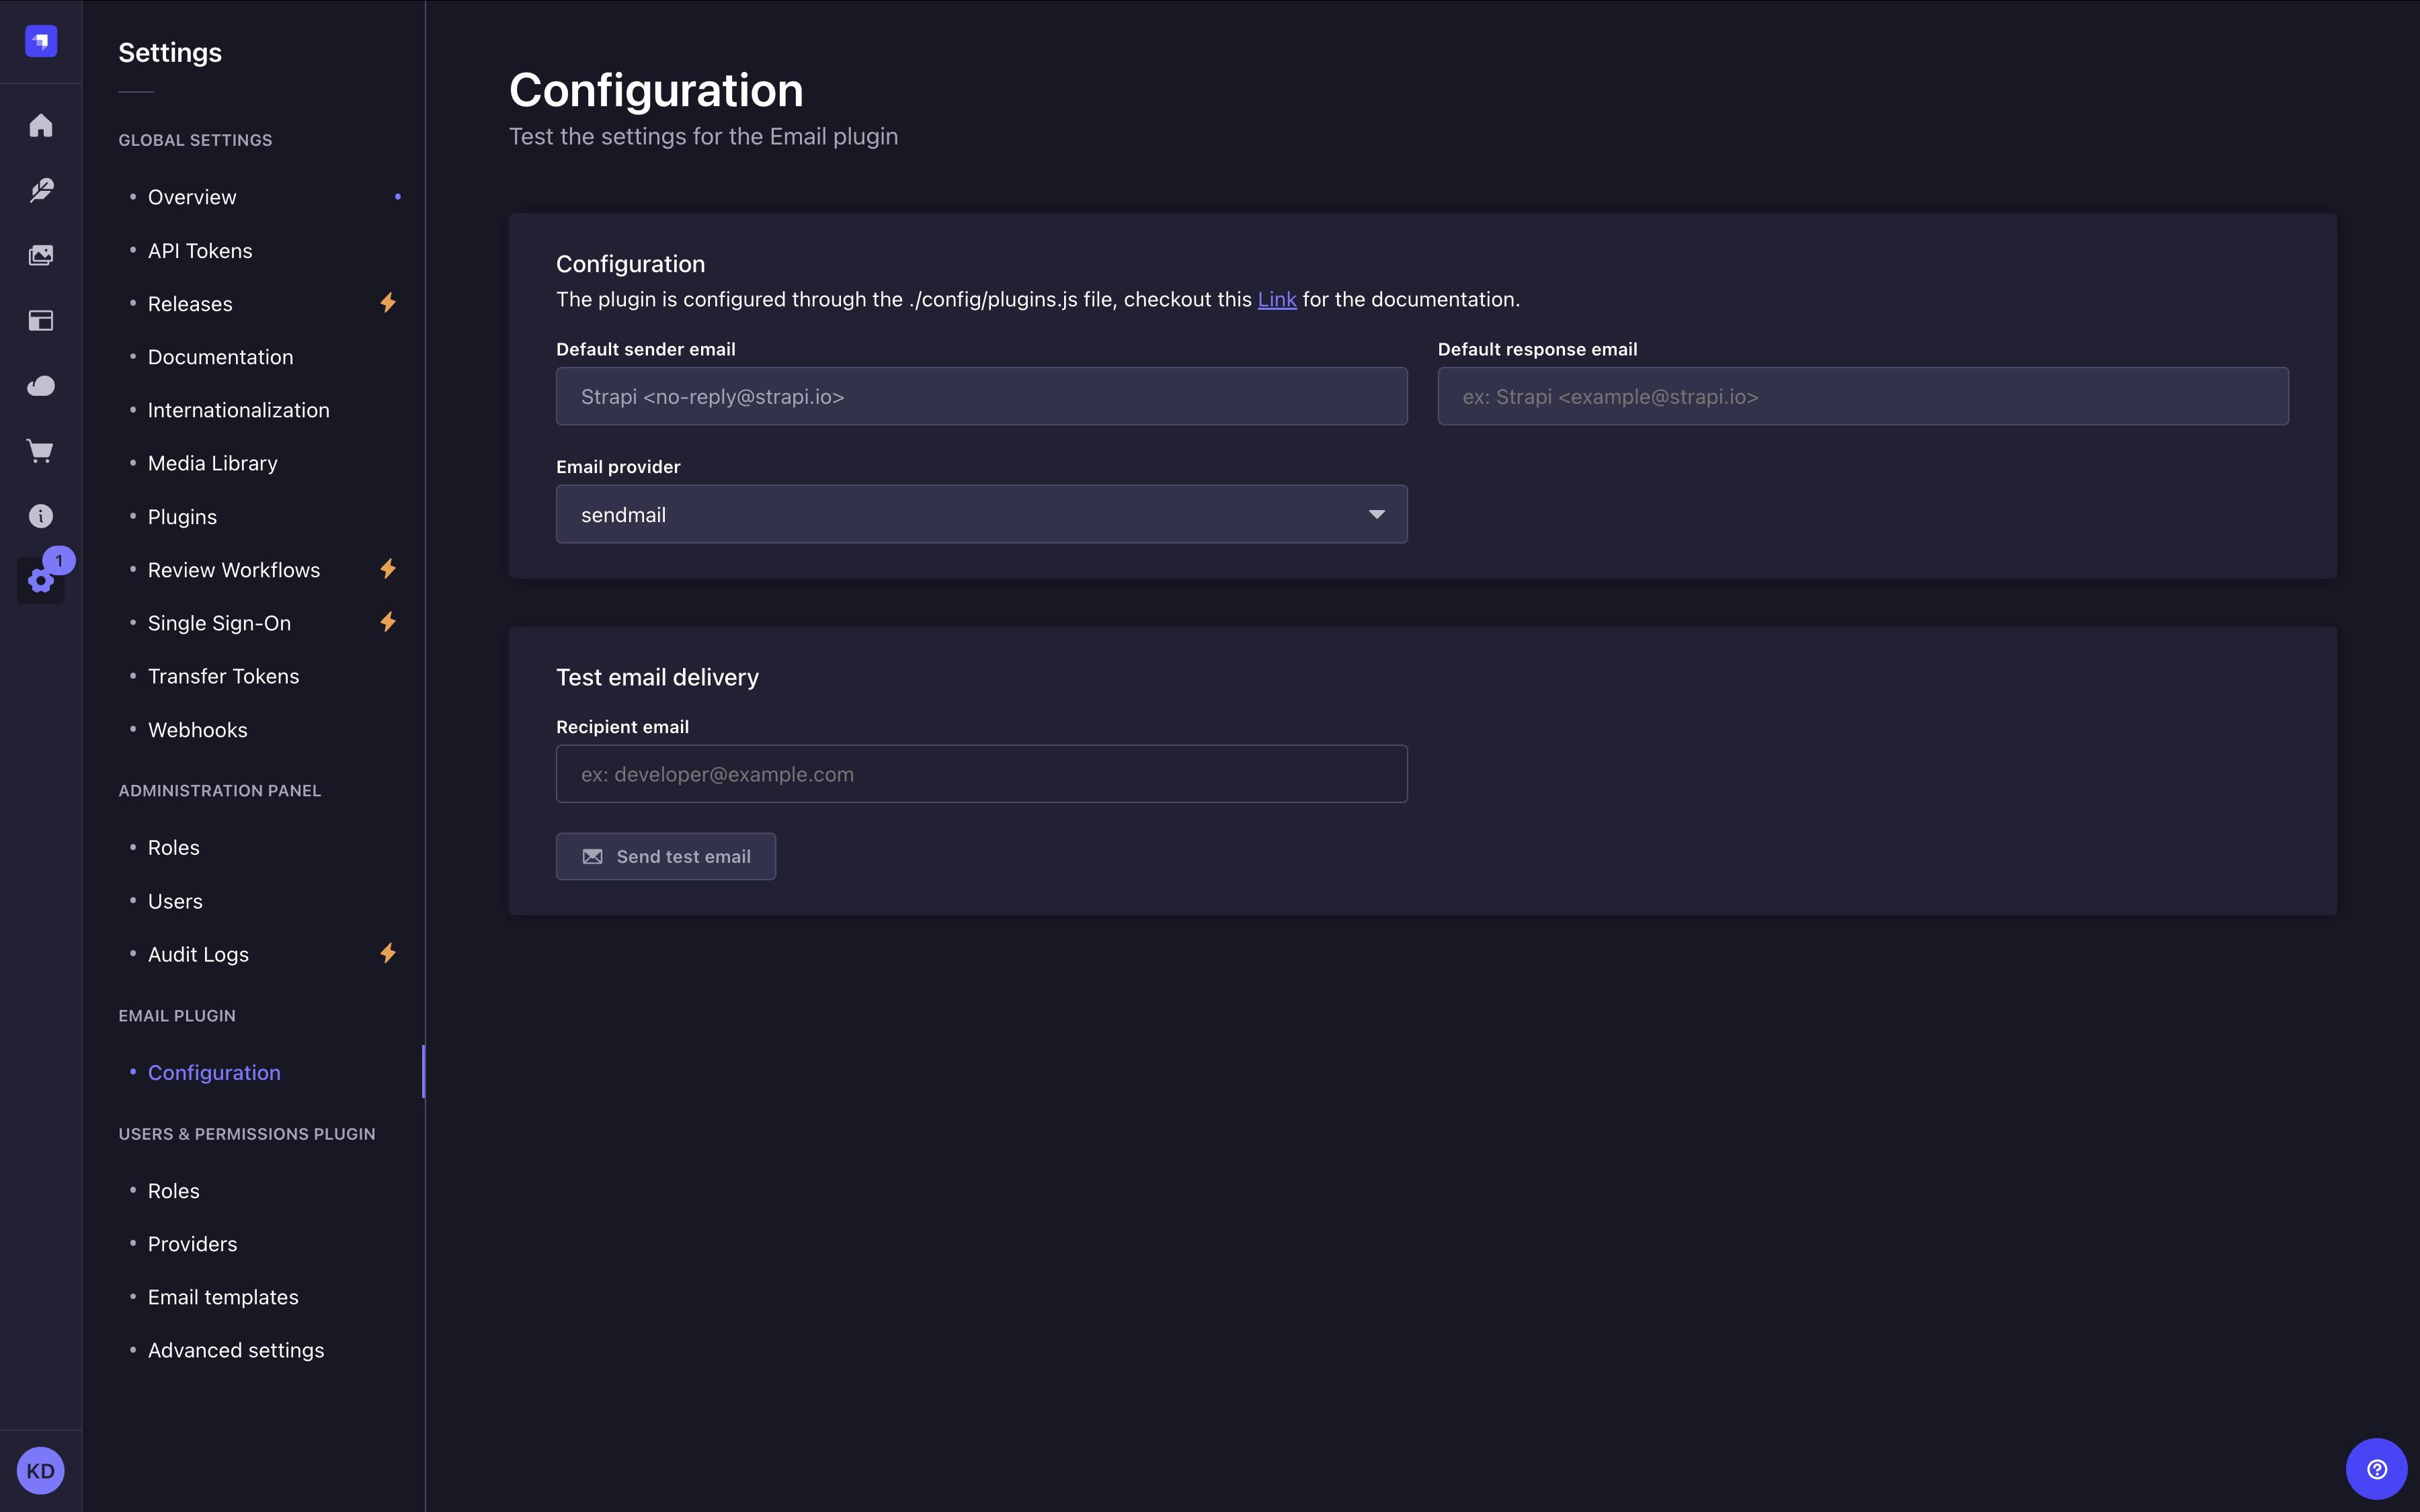
The Configuration interface is read-only for most fields. It displays the current provider configuration and lets users test connectivity.
The following information is shown in the Configuration panel:
- Default sender email and, if the configured
defaultFromaddress includes a display name, Default sender name. - Default response email and, if the configured
defaultReplyToaddress includes a display name, Default reply-to name. - Email provider: the provider currently in use.
If the active provider supports SMTP connection verification (for example, the Nodemailer provider), a Connection status field is also shown with a Test connection button. Clicking it verifies the SMTP connection without sending a message. The button displays a Connected or Error badge depending on the result.
A Provider capabilities card appears below the main configuration when the active provider exposes SMTP metadata. It shows the SMTP server address, encryption protocol (TLS, STARTTLS, or None), authentication type and user, pool status (Idle or Active, when connection pooling is enabled), and badges for enabled features such as DKIM, OAuth2, rate limiting, and connection pool.
The only user-editable field on this page is the Recipient email field under Test email delivery. A Send test email button sends a test message to that address.
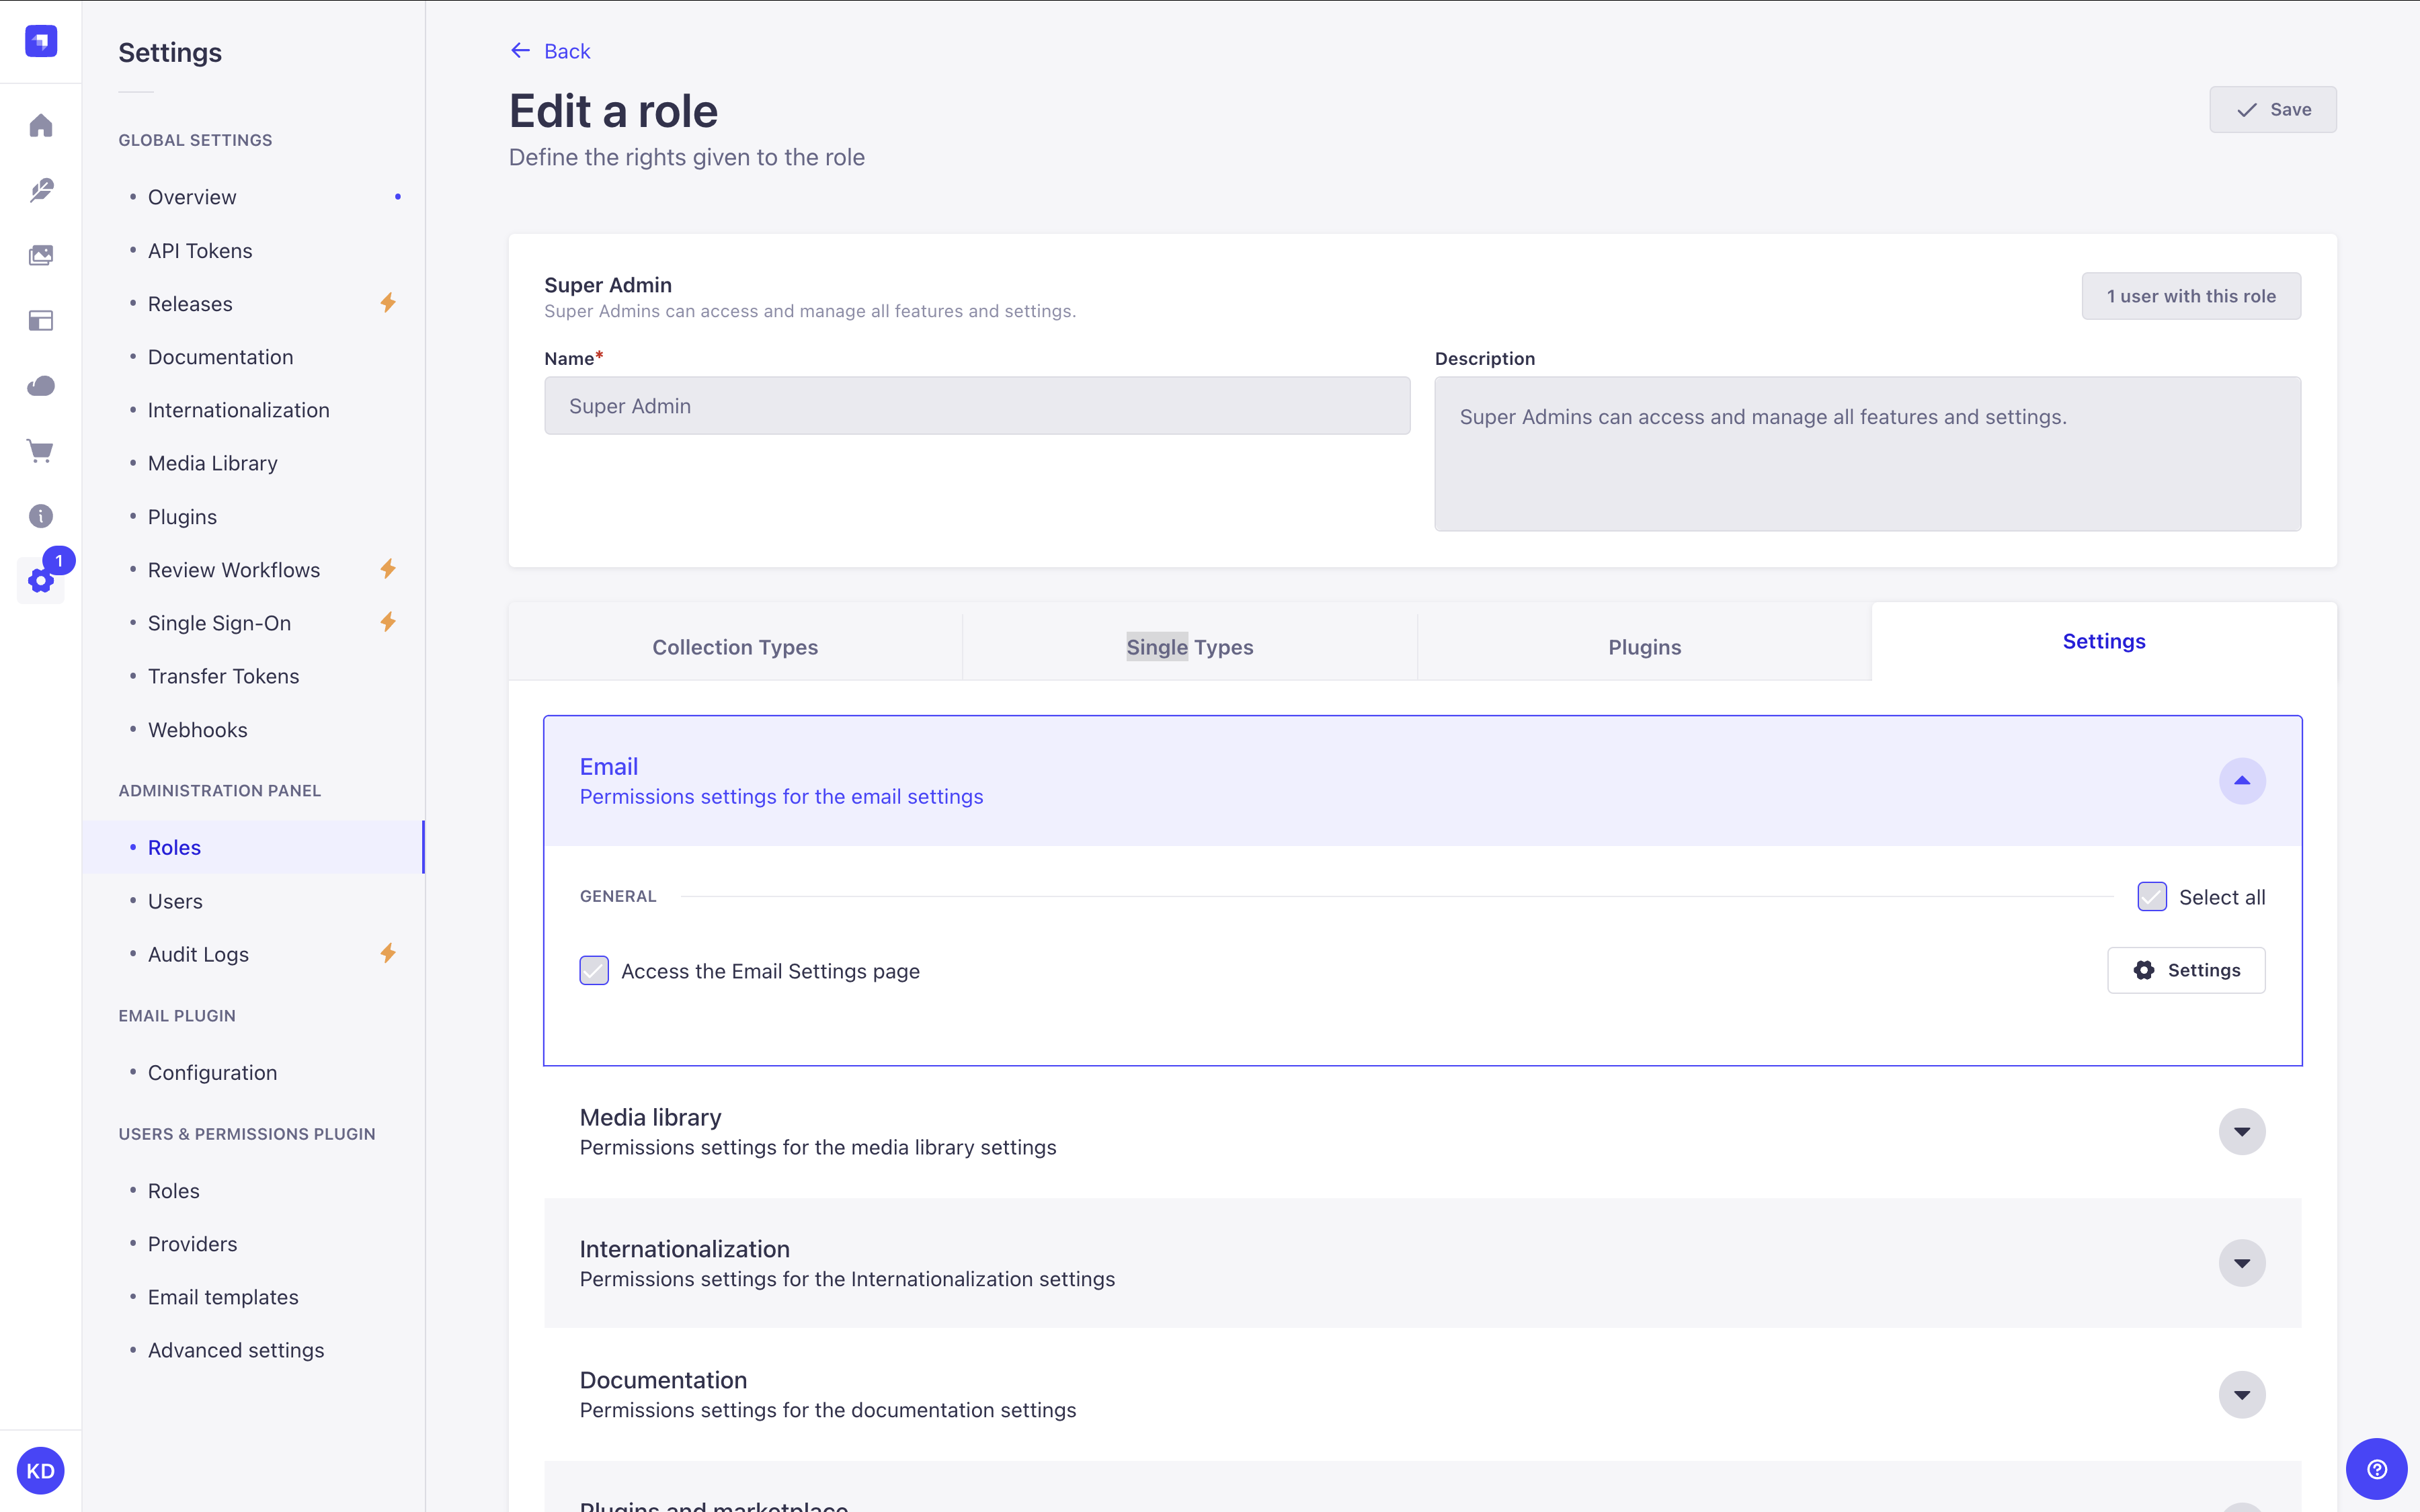
This page is only visible if the current role has the "Access the Email Settings page" permission enabled (see RBAC feature documentation for more information):
Code-based configuration
The Email feature requires a provider and a provider configuration in the config/plugins.js|ts file. See providers for detailed installation and configuration instructions.
Sendmail is the default email provider in the Strapi Email feature. It uses Nodemailer internally for mail delivery. It provides functionality for the local development environment but is not production-ready in the default configuration. For production stage applications you need to further configure Sendmail or change providers.
For most production setups that use a dedicated SMTP relay, consider switching to @strapi/provider-email-nodemailer (set provider to "nodemailer" in your email plugin config). See the dedicated Nodemailer configuration documentation for details.
In non-production environments, Strapi logs a one-time warning when the sendmail provider is active, suggesting this switch.
Email configuration options
Plugins configuration are defined in the config/plugins.js file or config/plugins.ts file. Please refer to providers for detailed provider-specific installation and configuration instructions.
| Option | Type | Description | Default Value | Notes |
|---|---|---|---|---|
provider | string | The email provider to use. | sendmail | Required |
providerOptions | object | The email provider options. | {} | Optional |
providerOptions.apiKey | string | The API key for the email provider. | '' | Optional |
settings | object | The email settings. | {} | Optional |
settings.defaultFrom | string | The default email address to use as the sender. | '' | Optional |
settings.defaultReplyTo | string | The default email address to use as the reply-to address. | '' | Optional |
ratelimit | object | The email rate limit settings. | {} | Optional |
ratelimit.enabled | boolean | Whether to enable rate limiting. | true | Optional |
ratelimit.interval | string | The interval for rate limiting in minutes. | 5 | Optional |
ratelimit.max | number | The maximum number of requests allowed during the interval. | 5 | Optional |
ratelimit.delayAfter | number | The number of requests allowed before rate limiting is applied. | 1 | Optional |
ratelimit.timeWait | number | Time to wait before responding to a request (in milliseconds). | 1 | Optional |
ratelimit.prefixKey | string | The prefix for the rate limit key. | ${userEmail} | Optional |
ratelimit.whitelist | array(string) | Array of IP addresses to whitelist from rate limiting. | [] | Optional |
ratelimit.store | object | Rate limiting storage location and for more information please see the koa2-ratelimit documentation. | MemoryStore | Optional |
Providers
The Email feature can be extended via the installation and configuration of additional providers.
Providers add an extension to the core capabilities of the plugin, for example to use Amazon SES for emails instead of Sendmail.
There are both official providers maintained by Strapi — discoverable via the Marketplace — and many community maintained providers available via npm.
Installing providers
New providers can be installed using npm or yarn using the following format @strapi/provider-<plugin>-<provider> --save.
For example, to install the Sendgrid provider:
- Yarn
- NPM
yarn add @strapi/provider-email-sendgrid
npm install @strapi/provider-email-sendgrid --save
Configuring providers
Newly installed providers are enabled and configured in the /config/plugins file. If this file does not exist you must create it.
-
Each provider will have different configuration settings available. Review the respective entry for that provider in the Marketplace or npm to learn more.
-
For production scenarios with the Nodemailer provider (OAuth2, connection pooling, DKIM signing, rate limiting), see the dedicated documentation.
The following is an example configuration for the Sendgrid provider:
- JavaScript
- TypeScript
module.exports = ({ env }) => ({
  // ...
  email: {
    config: {
      provider: 'sendgrid', // For community providers pass the full package name (e.g. provider: 'strapi-provider-email-mandrill')
      providerOptions: {
        apiKey: env('SENDGRID_API_KEY'),
        // region: 'eu', // Optional: set to 'eu' for EU data residency (default: 'global')
      },
      settings: {
        defaultFrom: 'juliasedefdjian@strapi.io',
        defaultReplyTo: 'juliasedefdjian@strapi.io',
        testAddress: 'juliasedefdjian@strapi.io',
      },
    },
  },
  // ...
});
export default ({ env }) => ({
  // ...
  email: {
    config: {
      provider: 'sendgrid', // For community providers pass the full package name (e.g. provider: 'strapi-provider-email-mandrill')
      providerOptions: {
        apiKey: env('SENDGRID_API_KEY'),
        // region: 'eu', // Optional: set to 'eu' for EU data residency (default: 'global')
      },
      settings: {
        defaultFrom: 'juliasedefdjian@strapi.io',
        defaultReplyTo: 'juliasedefdjian@strapi.io',
        testAddress: 'juliasedefdjian@strapi.io',
      },
    },
  },
  // ...
});
If you use a SendGrid API key created on the EU portal (app.eu.sendgrid.com), set region: 'eu' in providerOptions. EU API keys only work against the EU endpoint (https://api.eu.sendgrid.com); without this option, email delivery will fail with an Unauthorized error.
- When using a different provider per environment, specify the correct configuration in
/config/env/${yourEnvironment}/plugins.js|ts(see Environments). - Only one email provider will be active at a time. If the email provider setting isn't picked up by Strapi, verify the
plugins.js|tsfile is in the correct folder. - When testing the new email provider with those two email templates created during strapi setup, the shipper email on the template defaults to
no-reply@strapi.ioand needs to be updated according to your email provider, otherwise it will fail the test (see Configure templates locally). - For best deliverability, configure SPF/DKIM with your email provider and ensure the
defaultFromdomain aligns with the domain you verified with the provider.
Per-environment configuration
When configuring your provider you might want to change the configuration based on the NODE_ENV environment variable or use environment specific credentials.
You can set a specific configuration in the /config/env/{env}/plugins.js|ts configuration file and it will be used to overwrite the default configuration.
Some providers expose SMTP-style connection details instead of (or in addition to) an API key. Add those values in providerOptions so Strapi can reach the provider host. For instance, the community Nodemailer provider expects the host, port, and authentication credentials:
- JavaScript
- TypeScript
module.exports = ({ env }) => ({
  email: {
    config: {
      provider: 'nodemailer',
      providerOptions: {
        host: env('SMTP_HOST'),
        port: env.int('SMTP_PORT', 587),
        secure: false, // Use `true` for port 465
        auth: {
          user: env('SMTP_USERNAME'),
          pass: env('SMTP_PASSWORD'),
        },
      },
      settings: {
        defaultFrom: 'no-reply@example.com',
        defaultReplyTo: 'support@example.com',
      },
    },
  },
});
export default ({ env }) => ({
  email: {
    config: {
      provider: 'nodemailer',
      providerOptions: {
        host: env('SMTP_HOST'),
        port: 587,
        secure: false, // Use `true` for port 465
        auth: {
          user: env('SMTP_USERNAME'),
          pass: env('SMTP_PASSWORD'),
        },
      },
      settings: {
        defaultFrom: 'no-reply@example.com',
        defaultReplyTo: 'support@example.com',
      },
    },
  },
});
If your provider gives you a single URL instead of host and port values, pass that URL (for example https://api.eu.mailgun.net) in providerOptions using the key the package expects.
Building a custom provider
To build your own provider, publish it to npm, or use it locally in your project, see the dedicated documentation:
Usage
The Email feature uses the Strapi global API, meaning it can be called from anywhere inside a Strapi application, either from the back-end server itself through a controller or service, or from the admin panel, for example in response to an event (using lifecycle hooks).
Sending emails with a controller or service
The Email feature has an email service that contains 2 functions to send emails:
send()directly contains the email contents,sendTemplatedEmail()consumes data from the Content Manager to populate emails, streamlining programmatic emails.
Using the send() function
To trigger an email in response to a user action add the send() function to a controller or service. The send function has the following properties:
| Property | Type | Description |
|---|---|---|
from | string (email address) | Sender address. If not specified, uses defaultFrom from plugins.js. |
to | string (email address) | Recipient address. Required. |
cc | string (email address) | Carbon copy recipients. Optional. |
bcc | string (email address) | Blind carbon copy recipients. Optional. |
replyTo | string (email address) | Reply-to address. If not specified, uses defaultReplyTo from plugins.js. |
subject | string | Email subject. Required. |
text | string | Plain-text body. Either text or html is required. |
html | string | HTML body. Either text or html is required. |
attachments | object[] | Array of attachment objects. |
headers | object | Custom SMTP headers, for example { 'X-Custom-Header': 'value' }. |
priority | 'high' | 'normal' | 'low' | Email priority flag. |
inReplyTo | string | Message-ID of the email being replied to. Used for conversation threading. |
references | string | string[] | Message-ID list this email references. Used for conversation threading. |
envelope | object | Custom SMTP envelope with from and to fields. Useful for bounce handling. |
list | object | RFC 2369 List-* headers. Enables one-click unsubscribe in Gmail and Outlook for newsletters. |
icalEvent | object | Calendar event invitation in iCalendar format. Attach with { method, content }. |
dsn | object | Delivery Status Notification settings. Requests bounce or delivery confirmation reports. |
The Nodemailer provider uses an explicit allowlist for all send() fields. Unknown properties are silently dropped. For the complete list of supported fields — including dkim, amp, raw, auth (per-message OAuth2), and others — see the provider README on npm.
The following code example can be used in a controller or a service:
await strapi.plugins['email'].services.email.send({
  to: 'valid email address',
  from: 'your verified email address', //e.g. single sender verification in SendGrid
  cc: 'valid email address',
  bcc: 'valid email address',
  replyTo: 'valid email address',
  subject: 'The Strapi Email feature worked successfully',
  text: 'Hello world!',
  html: 'Hello world!',
}),
Using the sendTemplatedEmail() function
The sendTemplatedEmail() function is used to compose emails from a template. The function compiles the email from the available properties and then sends the email.
To use the sendTemplatedEmail() function, define the emailTemplate object and add the function to a controller or service. The function calls the emailTemplate object, and can optionally call the emailOptions and data objects:
| Parameter | Description | Type | Default |
|---|---|---|---|
emailOptions Optional | Contains email addressing properties: to, from, replyTo, cc, and bcc | object | |
emailTemplate | Contains email content properties: subject, text, and html using Lodash string templates | object | |
data Optional | Contains the data used to compile the templates | object |
The following code example can be used in a controller or a service:
const emailTemplate = {
  subject: 'Welcome <%= user.firstname %>',
  text: `Welcome to mywebsite.fr!
    Your account is now linked with: <%= user.email %>.`,
  html: `<h1>Welcome to mywebsite.fr!</h1>
    <p>Your account is now linked with: <%= user.email %>.<p>`,
};

await strapi.plugins['email'].services.email.sendTemplatedEmail(
  {
    to: user.email,
    // from: is not specified, the defaultFrom is used.
  },
    emailTemplate,
  {
    user: _.pick(user, ['username', 'email', 'firstname', 'lastname']),
  }
);
Sending emails from a lifecycle hook
To trigger an email based on administrator actions in the admin panel use lifecycle hooks and the send() function.
The following example illustrates how to send an email each time a new content entry is added in the Content Manager use the afterCreate lifecycle hook:
- JavaScript
- TypeScript
module.exports = {
    async afterCreate(event) {    // Connected to "Save" button in admin panel
        const { result } = event;

        try{
            await strapi.plugin('email').service('email').send({ // you could also do: await strapi.service('plugin:email.email').send({
              to: 'valid email address',
              from: 'your verified email address', // e.g. single sender verification in SendGrid
              cc: 'valid email address',
              bcc: 'valid email address',
              replyTo: 'valid email address',
              subject: 'The Strapi Email feature worked successfully',
              text: '${fieldName}', // Replace with a valid field ID
              html: 'Hello world!',

            })
        } catch(err) {
            console.log(err);
        }
    }
}
export default {
  async afterCreate(event) {    // Connected to "Save" button in admin panel
    const { result } = event;

    try{
      await strapi.plugins['email'].services.email.send({
        to: 'valid email address',
        from: 'your verified email address', // e.g. single sender verification in SendGrid
        cc: 'valid email address',
        bcc: 'valid email address',
        replyTo: 'valid email address',
        subject: 'The Strapi Email feature worked successfully',
        text: '${fieldName}', // Replace with a valid field ID
        html: 'Hello world!',
      })
    } catch(err) {
      console.log(err);
    }
  }
}