# Account billing details
Source: //cloud/account/account-billing
# Account billing & invoices
Through the *Profile* page, accessible by clicking on your profile picture on the top right hand corner of the interface then clicking on **Profile**, you can access the [ *Billing*](#account-billing) and [ *Invoices*](#account-invoices) tabs.
## Account billing
The *Billing* tab displays and enables you to modify the billing details and payment method set for the account.
The *Payment method* section of the *Billing* tab allows you to manage the credit cards that can be used for the Strapi Cloud projects. The *Billing details* section requires to be filled in, at least for the mandatory fields, as this information will be the default billing details for all Strapi Cloud projects related to your account.
### Adding a new credit card
1. In the *Payment method* section of the *Billing* tab, click on the **Add card** button.
2. Fill in the following fields:
| Field name | Description |
| --- | --- |
| Card Number | Write the number of the credit card to add as payment method. |
| Expires | Write the expiration date of the credit card. |
| CVC | Write the 3-numbers code displayed at the back of the credit card. |
3. Click on the **Save** button.
:::tip
The first credit card to be added as payment method for the account will by default be the primary one. It is however possible to define another credit card as primary by clicking on the icon, then **Switch as primary**.
:::
### Deleting a credit card
To remove a credit card from the list of payment methods for the account:
1. Click on the icon of the credit card you wish to delete.
2. Click **Remove card**. The card is immediately deleted.
:::note
You cannot delete the primary card as at least one credit card must be available as payment method, and the primary card is by default that one. If the credit card you wish to delete is currently the primary card, you must first define another credit card as primary, then delete it.
:::
## Account invoices
The *Invoices* tab displays the complete list of invoices for all your Strapi Cloud projects.
:::strapi Invoices are also available per project.
In the *Settings > Invoices* tab of any project, you will find the invoices for that project only. Feel free to check the [dedicated documentation](/cloud/projects/settings#invoices).
:::
# Profile settings
Source: //cloud/account/account-settings
# Profile settings
The *Profile* page enables you to manage your account details and preferences. It is accessible by clicking on your profile picture, on the top right hand corner of the interface, and **Profile**.
There are 3 tabs available in the *Profile* interface: [*General*](#general), *Billing* and Invoices (the last 2 are documented in the [Account billing details](/cloud/account/account-billing) section of this documentation).
## General
The *General* tab enables you to edit the following details for your account profile:
- Details: to see the name associated with your account.
- Connected accounts: to manage Google, GitHub and GitLab accounts connected with your Strapi Cloud account (see [Managing connected accounts](#managing-connected-accounts)).
- Delete account: to permanently delete your Strapi Cloud account (see [Deleting Strapi Cloud account](#deleting-strapi-cloud-account)).
### Managing connected accounts
You can connect a Google, GitLab and GitHub account to your Strapi Cloud account. The _Connected accounts_ section lists accounts that are currently connected to your Strapi Cloud account. From there you can also connect a new Google, GitLab and GitHub account if one is not already connected.
To connect a new Google, GitLab or GitHub account to your Strapi Cloud account, click on the **Connect account** button and follow the next steps on the corresponding website.
You can also click on the three dots button of a connected account and click on the "Manage on" button to manage your GitHub, GitLab or Google account directly on the corresponding website.
### Deleting Strapi Cloud account
You can delete your Strapi Cloud account, but it will be permanent and irreversible. All associated projects and their data will be deleted as well and the subscriptions for the projects will automatically be canceled.
1. In the *Delete account* section of the *General* tab, click on the **Delete account** button.
2. In the dialog, type `DELETE` in the textbox.
3. Confirm the deletion of your account by clicking on the **Delete** button.
# Database
Source: //cloud/advanced/database
# Database
Strapi Cloud provides a pre-configured PostgreSQL database by default. However, you can also configure it to utilize an external SQL database, if needed.
:::prerequisites
- A local Strapi project running on `v4.8.2+`.
- Credentials for an external database.
- If using an existing database, the schema must match the Strapi project schema.
:::
:::caution
While it's possible to use an external database with Strapi Cloud, you should do it while keeping in mind the following considerations:
- Strapi Cloud already provides a managed database that is optimized for Strapi.
- Using an external database may result in unexpected behavior and/or performance issues (e.g., network latency may impact performance). For performance reasons, it's recommended to host your external database close to the region where your Strapi Cloud project is hosted. You can find where your Strapi Cloud project is hosted in your Project Settings (see [Project Settings > General > Selected Region](/cloud/projects/settings#general)).
- Strapi can't provide security or support with external databases used with Strapi Cloud.
:::
## Configuration
The project `./config/database.js` or `./config/database.ts` file must match the configuration found in the [environment variables in database configurations](https://docs.strapi.io/cms/configurations/database#environment-variables-in-database-configurations) section.
Before pushing changes, add environment variables to the Strapi Cloud project:
1. Log into Strapi Cloud and click on the corresponding project on the Projects page.
2. Click on the **Settings** tab and choose **Variables** in the left menu.
3. Add the following environment variables:
| Variable | Value | Details |
| ---------------------------------- | ---------------- |----------|
| `DATABASE_CLIENT` | your_db | Should be one of `mysql`, `postgres`, or `sqlite`. |
| `DATABASE_HOST` | your_db_host | The URL or IP address of your database host |
| `DATABASE_PORT` | your_db_port | The port to access your database |
| `DATABASE_NAME` | your_db_name | The name of your database |
| `DATABASE_USERNAME` | your_db_username | The username to access your database |
| `DATABASE_PASSWORD` | your_db_password | The password associated to this username |
| `DATABASE_SSL_REJECT_UNAUTHORIZED` | false | Whether unauthorized connections should be rejected |
| `DATABASE_SCHEMA` | public | - |
4. Click **Save**.
:::caution
To ensure a smooth deployment, it is recommended to not change the names of the environment variables.
:::
## Deployment
To deploy the project and utilize the external database, push the changes from earlier. This will trigger a rebuild and new deployment of the Strapi Cloud project.
Once the application finishes building, the project will use the external database.
## Reverting to the default database
To revert back to the default database, remove the previously added environment variables related to the external database from the Strapi Cloud project dashboard, and save. For the changes to take effect, you must redeploy the Strapi Cloud project.
# Email Provider
Source: //cloud/advanced/email
# Email Provider
Strapi Cloud comes with a basic email provider out of the box. However, it can also be configured to utilize another email provider, if needed.
:::caution
Please be advised that Strapi is unable to provide support for third-party email providers.
:::
:::prerequisites
- A local Strapi project running on `v4.8.2+`.
- Credentials for another email provider (see
:::caution
The file structure must match the above path exactly, or the configuration will not be applied to Strapi Cloud.
:::
Each provider will have different configuration settings available. Review the respective entry for that provider in the
:::tip
Before pushing the above changes to GitHub, add environment variables to the Strapi Cloud project to prevent triggering a rebuild and new deployment of the project before the changes are complete.
:::
### Strapi Cloud Configuration
1. Log into Strapi Cloud and click on the corresponding project on the Projects page.
2. Click on the **Settings** tab and choose **Variables** in the left menu.
3. Add the required environment variables specific to the email provider.
4. Click **Save**.
**Example:**
## Deployment
To deploy the project and utilize another party email provider, push the changes from earlier. This will trigger a rebuild and new deployment of the Strapi Cloud project.
Once the application finishes building, the project will use the new email provider.
:::strapi Custom Provider
If you want to create a custom email provider, please refer to the [Email providers](/cms/features/email#providers) documentation in the CMS Documentation.
:::
# Upload Provider
Source: //cloud/advanced/upload
# Upload Provider
Strapi Cloud comes with a local upload provider out of the box. However, it can also be configured to utilize a third-party upload provider, if needed.
:::caution
Please be advised that Strapi is unable to provide support for third-party upload providers.
:::
:::prerequisites
- A local Strapi project running on `v4.8.2+`.
- Credentials for a third-party upload provider (see
:::caution
The file structure must match the above path exactly, or the configuration will not be applied to Strapi Cloud.
:::
Each provider will have different configuration settings available. Review the respective entry for that provider in the
### Configure the Security Middleware
Due to the default settings in the Strapi Security Middleware you will need to modify the `contentSecurityPolicy` settings to properly see thumbnail previews in the Media Library.
To do this in your Strapi project:
1. Navigate to `./config/middleware.js` or `./config/middleware.ts` in your Strapi project.
2. Replace the default `strapi::security` string with the object provided by the upload provider.
**Example:**
:::tip
Before pushing the above changes to GitHub, add environment variables to the Strapi Cloud project to prevent triggering a rebuild and new deployment of the project before the changes are complete.
:::
### Strapi Cloud Configuration
1. Log into Strapi Cloud and click on the corresponding project on the Projects page.
2. Click on the **Settings** tab and choose **Variables** in the left menu.
3. Add the required environment variables specific to the upload provider.
4. Click **Save**.
**Example:**
## Deployment
To deploy the project and utilize the third-party upload provider, push the changes from earlier. This will trigger a rebuild and new deployment of the Strapi Cloud project.
Once the application finishes building, the project will use the new upload provider.
:::strapi Custom Provider
If you want to create a custom upload provider, please refer to the [Providers](/cms/features/media-library#providers) documentation in the CMS Documentation.
:::
# Command Line Interface (CLI)
Source: //cloud/cli/cloud-cli
# Command Line Interface (CLI)
Strapi Cloud comes with a Command Line Interface (CLI) which allows you to log in and out, and to deploy a local project without it having to be hosted on a remote git repository. The CLI works with both the `yarn` and `npm` package managers.
:::note
It is recommended to install Strapi locally only, which requires prefixing all of the following `strapi` commands with the package manager used for the project setup (e.g `npm run strapi help` or `yarn strapi help`) or a dedicated node package executor (e.g. `npx strapi help`).
:::
## strapi login
**Alias:** `strapi cloud:login`
Log in Strapi Cloud.
```bash
strapi login
```
This command automatically opens a browser window to first ask you to confirm that the codes displayed in both the browser window and the terminal are the same. Then you will be able to log into Strapi Cloud via Google, GitHub or GitLab. Once the browser window confirms successful login, it can be safely closed.
If the browser window doesn't automatically open, the terminal will display a clickable link as well as the code to enter manually.
## strapi deploy
**Alias:** `strapi cloud:deploy`
Deploy a new local project (< 100MB) in Strapi Cloud.
```bash
strapi deploy
```
This command must be used after the `login` one. It deploys a local Strapi project on Strapi Cloud, without having to host it on a remote git repository beforehand. The terminal will inform you when the project is successfully deployed on Strapi Cloud.
Deploying a Strapi project through the CLI creates a project on the Free plan.
Once the project is first deployed on Strapi Cloud with the CLI, the `deploy` command can be reused to trigger a new deployment of the same project.
:::note
Once you deployed your project, if you visit the Strapi Cloud dashboard, you may see some limitations as well as impacts due to creating a Strapi Cloud project that is not in a remote repository and which was deployed with the CLI.
- Some areas in the dashboard that are usually reserved to display information about the git provider will be blank.
- Some buttons, such as the **Trigger deploy** button, will be greyed out and unclickable since, unless you have [connected a git repository to your Strapi Cloud project](/cloud/getting-started/deployment-cli#automatically-deploying-subsequent-changes).
:::
## strapi link
**Alias:** `strapi cloud:link`
Links project in the current folder to an existing project in Strapi Cloud.
```bash
strapi link
```
This command connects your local project in the current directory with an existing project on your Strapi Cloud account. You will be prompted to select the project you wish to link from a list of available projects hosted on Strapi Cloud.
## strapi projects
**Alias:** `strapi cloud:projects`
Lists all Strapi Cloud projects associated with your account.
```bash
strapi projects
```
This command retrieves and displays a list of all projects hosted on your Strapi Cloud account.
## strapi logout
**Alias:** `strapi cloud:logout`
Log out of Strapi Cloud.
```bash
strapi logout
```
This command logs you out of Strapi Cloud. Once the `logout` command is run, a browser page will open and the terminal will display a confirmation message that you were successfully logged out. You will not be able to use the `deploy` command anymore.
# Caching & Performance
Source: //cloud/getting-started/caching
# Caching & Performance
For Strapi Cloud applications with large amounts of cacheable content, such as images, videos, and other static assets, enabling CDN (Content Delivery Network) caching via the
# Strapi Cloud fundamentals
Source: //cloud/getting-started/cloud-fundamentals
# Strapi Cloud fundamentals
Before going any further into this Strapi Cloud documentation, we recommend you to acknowledge the main concepts below. They will help you to understand how Strapi Cloud works, and ensure a smooth Strapi Cloud experience.
- **Hosting Platform** Strapi Cloud is a hosting platform that allows to deploy already existing Strapi projects created with Strapi CMS (Content Management System). Strapi Cloud is *not* the SaaS (Software as a Service) version of Strapi CMS. Feel free to refer to the [CMS documentation](https://docs.strapi.io/cms/intro) to learn more about Strapi CMS.
- **Strapi Cloud Pricing Plans** As a Strapi Cloud user you have the choice between 4 plans: Free, Essential, Pro and Scale. Depending on the plan, you have access to different functionalities, support and customization options (see [Pricing page](https://strapi.io/pricing-cloud) for more details). In this Strapi Cloud documentation, the , , and badges can be displayed below a section's title to indicate that the feature is only available starting from the corresponding paid plan. If no badge is shown, the feature is available on the Free plan.
- **Types of Strapi Cloud users** There can be 2 types of users on a Strapi Cloud project: owners and maintainers. The owner is the one who has created the project and has therefore access to all features and options for the project. Maintainers are users who have been invited to contribute to an already created project by its owner. Maintainers, as documented in the [Collaboration](/cloud/projects/collaboration) page, cannot view and access all features and options from the Strapi Cloud dashboard.
- **Support** The level of support provided by the Strapi Support team depends on the Strapi Cloud plan you subscribed for. The Free plan does not include access to support. The Essential and Pro plans include Basic support while the Scale plan includes Standard support. Please refer to the [dedicated support article](https://support.strapi.io/support/solutions/articles/67000680833-what-is-supported-by-the-strapi-team#Not-Supported) for all details regarding support levels.
# with Cloud dashboard
Source: //cloud/getting-started/deployment
# Project deployment with the Cloud dashboard
This is a step-by-step guide for deploying your project on Strapi Cloud for the first time, using the Cloud dashboard.
:::prerequisites
Before you can deploy your Strapi application on Strapi Cloud using the Cloud dashboard, you need to have the following prerequisites:
* Strapi version `4.8.2` or higher
* Project database must be compatible with PostgreSQL. Strapi does not support and does not recommend using any external databases, though it's possible to configure one (see [advanced database configuration](/cloud/advanced/database)).
* Project(s) source code hosted on
5. Set up your Strapi Cloud project.
5.a. Fill in the following information:
| Setting name | Instructions |
|--------------|---------------------------------------------------------------------------------------------------------|
| Display name | Write the name of your Strapi app, this is fetched from the repository name but can be edited. It is automatically converted to slug format (`my-strapi-app`). |
| Git branch | Choose from the drop-down the default branch to use for this deployment. This uses the default branch of the repository. |
| Deploy on push | Check the box to automatically deploy the latest changes from the selected branch. When disabled, you will need to manually deploy the latest changes. |
| Region | Choose the geographic location of the servers where your Strapi application is hosted. Selected region can either be US (East), Europe (West), Asia (Southeast) or Oceania. |
:::note
The Git branch and "Deploy on push" settings can be modified afterwards through the project's setting, however the hosting region can only be chosen during the creation of the project (see [Project Settings](/cloud/projects/settings)).
:::
5.b. (optional) Click on **Show advanced settings** to fill in the following options:
| Setting name | Instructions |
|--------------|---------------------------------------------------------------------------------------------------------|
| Base directory | Write the name of the directory where your Strapi app is located in the repository. This is useful if you have multiple Strapi apps in the same repository or if you have a monorepo. |
| Environment variables | Click on **Add variable** to add environment variables used to configure your Strapi app (see [Environment variables](/cms/configurations/environment/) for more information). You can also add environment variables to your Strapi application by adding a `.env` file to the root of your Strapi app directory. The environment variables defined in the `.env` file will be used by Strapi Cloud. |
| Node version | Choose a Node version from the drop-down. Default Node version will automatically be chosen to best match the version of your Strapi project. If you manually choose a version that doesn't match with your Strapi project, the build will fail but the explanation will be displayed in the build logs. |
:::strapi Using Environment Variables
You can use environment variable to connect your project to an external database rather than the default one used by Strapi Cloud (see [database configuration](/cms/configurations/database#environment-variables-in-database-configurations) for more details). If you would like to revert and use Strapi's default database again, you have to remove your `DATABASE_` environment variables (no automatic migration implied).
You can also set up here a custom email provider. Sendgrid is set as the default one for the Strapi applications hosted on Strapi Cloud (see [providers configuration](/cms/features/email#providers) for more details).
:::
## Setting up billing details
:::strapi No billing step for the Free plan
If you chose the free plan, this billing step will be skipped as you will not be asked to share your credit card details at the creation of the project.
To upgrade your project to a paid plan, you will need to fill in your billing information in the **Billing** section of your Profile.
Skip to step 5 of the section below to finalise the creation of your project.
:::
1. Click on the **Continue to billing** button. You will directly be redirected to the second and final project deployment interface. There you can review all your new project setup information, enter payment & billing details and receive your invoice.
2. Review your project: make sure the plan and setup information are correct. If needed, click the **Edit** button to be redirected to the first interface of the project creation and fix any mistake.
3. In the Payment section, fill in at least all mandatory elements for *Payment method* and *Billing information*.
4. Check your invoice which informs you of what should be paid now and the following month. Optionally, you can enter a *Discount code* if you have one.
5. Click on the **Create project** button to finalize the deployment of your new Strapi Cloud project. An initial deployment will automatically be triggered and you will be redirected to the *Projects* page.
:::caution
Create your Admin user after the initial deployment is complete. Do not share your application URL with anyone until you have created your Admin user.
:::
## What to do next?
Now that you have deployed your project via the Cloud dashboard, we encourage you to explore the following ideas to have an even more complete Strapi Cloud experience:
- Invite other users to [collaborate on your project](/cloud/projects/collaboration).
- Check out the [deployments management documentation](/cloud/projects/deploys) to learn how to trigger new deployments for your project.
# with Cloud CLI
Source: //cloud/getting-started/deployment-cli
# Project deployment with the Command Line Interface (CLI)
This is a step-by-step guide for deploying your project on Strapi Cloud for the first time, using the Command Line Interface.
:::prerequisites
Before you can deploy your Strapi application on Strapi Cloud using the Command Line Interface, you need to have the following prerequisites:
- Have a Google, GitHub or GitLab account.
- Have an already created Strapi project (see [Installing from CLI in the CMS Documentation](/cms/installation/cli)), stored locally. The project must be less than 100MB.
- Have available storage in your hard drive where the temporary folder of your operating system is stored.
:::
## Logging in to Strapi Cloud
1. Open your terminal.
2. Navigate to the folder of your Strapi project, stored locally on your computer.
3. Enter the following command to log into Strapi Cloud:
4. In the browser window that opens automatically, confirm that the code displayed is the same as the one written in the terminal message.
5. Still in the browser window, choose whether to login via Google, GitHub or GitLab. The window should confirm the successful login soon after.
## Deploying your project
1. From your terminal, still from the folder of your Strapi project, enter the following command to deploy the project:
2. Follow the progression bar in the terminal until confirmation that the project was successfully deployed with Strapi Cloud.
Deploying the project will create a new Strapi Cloud project on the Free plan.
### Automatically deploying subsequent changes
By default, when creating and deploying a project with the Cloud CLI, you need to manually deploy again all subsequent changes by running the corresponding `deploy` command everytime you make a change.
Another option is to enable automatic deployment through a git repository. To do so:
1. Host your code on a git repository, such as or .
2. Connect your Strapi Cloud project to the repository (see the _Connected repository_ setting in [Projects Settings > General](/cloud/projects/settings#general)).
3. Still in _Projects Settings > General_ tab, tick the box for the "Deploy the project on every commit pushed to this branch" setting. From now on, a new deployment to Strapi Cloud will be triggered any time a commit is pushed to the connected git repository.
:::note
Automatic deployment is compatible with all other deployment methods, so once a git repository is connected, you can trigger a new deployment to Strapi Cloud [from the Cloud dashboard](/cloud/projects/deploys), [from the CLI](/cloud/cli/cloud-cli#strapi-deploy), or by pushing new commits to your connected repository.
:::
## ⏩ What to do next?
Now that you have deployed your project via the Command Line Interface, we encourage you to explore the following ideas to have an even more complete Strapi Cloud experience:
- Visit the Cloud dashboard to follow [insightful metrics and information](/cloud/projects/overview) on your Strapi project.
- Check out the full [Command Line Interface documentation](/cloud/cli/cloud-cli) to learn about the other commands available.
# Project deployment
Source: //cloud/getting-started/deployment-options
# Project deployment with Strapi Cloud
You have 2 options to deploy your project with Strapi Cloud:
- either with the user interface (UI), meaning that you will perform all the actions directly on the Strapi Cloud dashboard,
- or using the Cloud Comment Line Interface (CLI), meaning that you will only interact with a terminal.
The guides below will guide you through all the steps for each of the deployment options.
# Welcome to the Strapi Cloud Documentation!
Source: //cloud/getting-started/intro
# Welcome to the Strapi Cloud Documentation!
The Strapi Cloud documentation contains all information related to the setup, deployment, update and customization of your Strapi Cloud account and applications.
:::strapi What is Strapi Cloud?
built on top of Strapi, the open-source headless CMS.
:::
:::prerequisites
The typical workflow, which is recommended by the Strapi team, is:
1. Create your Strapi application locally (v4.8.2 or later).
2. Optionally, extend the application with plugins or custom code.
3. Version the application's codebase through your git provider (GitHub or GitLab).
4. Deploy the application with Strapi Cloud.
:::
The Strapi Cloud documentation is organised in topics in a order that should correspond to your journey with the product. The following cards, on which you can click, will redirect you to the main topics and steps.
:::strapi Welcome to the Strapi community!
Strapi Cloud is built on top of Strapi, an open-source, community-oriented project. The Strapi team has at heart to share their vision and build the future of Strapi with the Strapi community. This is why the is open: as all insights are very important and will help steer the project in the right direction. Any community member is most welcome to share ideas and opinions there.
You can also join , the , and the and benefit from the years of experience, knowledge, and contributions by the Strapi community as a whole.
:::
# Information on billing & usage
Source: //cloud/getting-started/usage-billing
# Information on billing & usage
This page contains general information related to the usage and billing of your Strapi Cloud account and projects.
Strapi Cloud offers 1 Free plan and 3 paid plans: Essential, Pro and Scale (see [Pricing page](https://strapi.io/pricing-cloud)). The table below summarizes Strapi Cloud usage-based pricing plans, for general features and usage:
| Feature | Free | Essential | Pro | Scale |
| -------------------------------- | ----- | --------- | --- | ----- |
| **Database Entries** | 500 | Unlimited* | Unlimited* | Unlimited* |
| **Asset Storage** | 10GB | 50GB | 250GB | 1,000GB |
| **Asset Bandwidth (per month)** | 10GB | 50GB | 500GB | 1,000GB |
| **API Requests (per month)** | 10,000 | 100,000 | 1,000,000 | 10,000,000 |
| | | | | |
| **Backups** | N/A | N/A | Weekly | Daily |
| **Custom domains** | N/A | Included | Included | Included |
| **Environments** | N/A | N/A | 0 included (up to 99 extra) | 1 included (up to 99 extra) |
| **Emails (per month)** | 100 | Unlimited* | Unlimited* | Unlimited* |
:::strapi Additional information on usage and features
- General features & usage:
- Database entries are the number of entries in your database.
- Asset storage is the amount of storage used by your assets.
- Asset bandwidth is the amount of bandwidth used by your assets.
- API requests are the number of requests made to your APIs. This includes requests to the GraphQL and REST APIs, excluding requests for file and media assets counted towards CDN bandwidth and storage.
- Cloud specific feature:
- Backups refers to the automatic backups of Strapi Cloud projects (see [Backups documentation](/cloud/projects/settings#backups) for more information on the feature).
- Custom domains refer to the ability to define a custom domain for your Strapi Cloud (see [Custom domains](/cloud/projects/settings#connecting-a-custom-domain)).
- Environments refers to the number of environments included in the plan on top of the default production environment (see [Environments](/cloud/projects/settings#environments) documentation for more information on the feature).
:::
:::info Scale-to-zero and cold start on the Free plan
On the Free plan, projects automatically scale down to zero after a short period of inactivity. When the application is accessed again—either through the frontend or via an API request—it may take a few seconds (up to a minute) before a response is returned.
Upgrading to a paid plan disables scaling to zero and cold starts, resulting in instant response times at all times.
:::
## Environments management
Environments are isolated instances of your Strapi Cloud project. All projects have a default production environment, but other additional environments can be configured for projects on a Pro or Scale plan, from the *Environments* tab of a project's settings (see [Environments](/cloud/projects/settings#environments)). There is no limit to the number of additional environments that can be configured for a Strapi Cloud project.
The usage limits of additional environments are the same as for the project's production environment (e.g. an additional environment on the Pro plan will be limited at 250GB for asset storage, and overages will be charged the same way as for the production environment). Note however that the asset bandwidth and API calls are project-based, not environment-based, so these usage limits do not change even with additional environments.
## Billing
Billing is based on the usage of your Strapi Cloud account and projects. You will be billed monthly for the usage of your account and applications. You can view your usage and billing information in the section of your Strapi Cloud account.
### Overages
:::caution
Overages are not allowed on the Free plan.
:::
If you exceed the limits of your plan for API Requests, Asset Bandwidth, or Asset Storage, you will be charged for the corresponding overages.
For example, if you exceed the 500GB limit in asset bandwidth of the Pro plan, you will be charged for the excess bandwidth at the end of the current billing period or on project deletion. Overages are not prorated and are charged in full.
Overages are charged according to the following rates:
| Feature | Rate |
| --- | --- |
| **API Requests** | $1.50 / 25k requests |
| **Asset Bandwidth** | $30.00 / 100GB |
| **Asset Storage** | $0.60 / GB per month |
### Project suspension
Projects may end up in a **Suspended** state for various reasons, including: not paying the invoice, exceeding the limits of your free plan, or violating the .
If your project is suspended, you will no longer be able to access the application or trigger new deployments. You will also be unable to access the Strapi admin panel.
You can view the status of your project in the section of your Strapi Cloud account and you will be notified by email.
:::warning
If you do not resolve the issue within 30 days, your suspended project will be deleted and all data will be permanently lost. To avoid this situation, you will be sent a first email when your project becomes suspended, then another email every 5 days until one week left, to remind you to solve the issue. The last week before the deletion of the project, you will be sent 3 more emails: 6 days, 3 days and 1 day before your project is finally deleted.
:::
#### Project suspension for exceeding the Free plan limits
When a project hosted with the Free plan exceeds either the API requests or the Asset Bandwidth limits, it will be suspended until the monthly allowance resets at the beginning of the following month.
While the project is suspended:
- Users cannot trigger new deployments
- Access to the application is blocked
- Users cannot make changes to the project’s settings
To reactivate the project immediately, users can upgrade to a paid plan.
#### Project suspension after subscription cancellation
If you don't pay the invoice, the subscription of your project will automatically be canceled and the project will be suspended. You can reactivate the subscription through the billing modal (see [Edit subscription](/cloud/account/account-billing#account-billing)).
1. Log into the billing modal and go to the *Subscription details* of the subscription associated with the suspended project. You should see a warning message confirming that the subscription was canceled for the following reason: "Not Paid".
2. Go back to the homepage of the billing modal, listing subscriptions and billing options.
3. Go to *Payment methods* and add a new, working card to pay the invoice. As soon as the invoice is paid, your project will automatically be reactivated.
#### Project suspension for other reasons
If your project was suspended for reasons other than unpaid invoice leading to subscription cancellation, you may not have the possibility to reactivate your project yourself. You should receive an email with instructions on how to resolve the issue. If you do not receive the email notification, please contact [Strapi Support](mailto:support@strapi.io).
# Collaboration
Source: //cloud/projects/collaboration
# Collaboration on projects
Projects are created by a user via their Strapi Cloud account. Strapi Cloud users can share their projects to anyone else, so these new users can have access to the project dashboard and collaborate on that project, without the project owner to ever have to share their credentials.
Users invited to collaborate on a project, called maintainers, do not have the same permissions as the project owner. Contrary to the project owner, maintainers:
- Cannot share the project themselves to someone else
- Cannot delete the project from the project settings
- Cannot access the *Billing* section of project settings
## Sharing a project
To invite a new maintainer to collaborate on a project:
1. From the *Projects* page, click on the project of your choice to be redirected to its dashboard.
2. Click on the **Share** button located in the dashboard's header.
3. In the *Share [project name]* dialog, type the email address of the person to invite in the textbox. A dropdown indicating "Invite [email address]" should appear.
4. Click on the dropdown: the email address should be displayed in a purple box right below the textbox.
5. (optional) Repeat steps 3 and 4 to invite more people. Email addresses can only entered one by one but invites can be sent to several email addresses at the same time.
6. Click on the **Send** button.
New maintainers will be sent an email containing a link to click on to join the project. Once a project is shared, avatars representing the maintainers will be displayed in the project dashboard's header, next to the **Share** button, to see how many maintainers collaborate on that project and who they are.
:::tip
Avatars use GitHub, Google or GitLab profile pictures, but for pending users only initials will be displayed until the activation of the maintainer account. You can hover over an avatar to display the full name of the maintainer.
:::
## Managing maintainers
From the *Share [project name]* dialog accessible by clicking on the **Share** button of a project dashboard, projects owners can view the full list of maintainers who have been invited to collaborate on the project. From there, it is possible to see the current status of each maintainer and to manage them.
Maintainers whose full name is displayed are users who did activate their account following the invitation email. If however there are maintainers in the list whose email address is displayed, it means they haven't activated their accounts and can't access the project dashboard yet. In that case, a status should be indicated right next to the email address to explain the issue:
- Pending: the invitation email has been sent but the maintainer hasn't acted on it yet.
- Expired: the email has been sent over 72 hours ago and the invitation expired.
For Expired statuses, it is possible to send another invitation email by clicking on the **Manage** button, then **Resend invite**.
### Revoking maintainers
To revoke a maintainer's access to the project dashboard:
1. Click on the **Share** button in the project dashboard's header.
2. In the list of *People with access*, find the maintainer whose access to revoke and click on the **Manage** button.
3. Click on the **Revoke** button.
4. In the confirmation dialog, click again on the **Revoke** button.
The revoked maintainer will completely stop having access to the project dashboard.
:::note
Maintainers whose access to the project has been revoked do not receive any email or notification.
:::
# Deployments management
Source: //cloud/projects/deploys
# Deployments management
The creation of a new Strapi Cloud project automatically trigger the deployment of that project. After that, deployments can be:
- manually triggered whenever needed, [from the Cloud dashboard](#triggering-a-new-deployment) or [from the CLI](/cloud/cli/cloud-cli#strapi-deploy),
- or automatically triggered everytime a new commit is pushed to the branch, if the Strapi Cloud project is connected to a git repository and the "deploy on push" option is enabled (see [Project settings](/cloud/projects/settings#modifying-git-repository--branch)).
Ongoing deployments can also be [manually canceled](#cancelling-a-deployment) if needed.
## Triggering a new deployment
To manually trigger a new deployment for your project, click on the **Trigger deployment** button always displayed in the right corner of a project dashboard's header. This action will add a new card in the *Deployments* tab, where you can monitor the status and view the deployment logs live (see [Deploy history and logs](/cloud/projects/deploys-history)).
## Cancelling a deployment
If for any reason you want to cancel an ongoing and unfinished deployment:
1. Go to the *Deployment details* page of the latest triggered deployment (see [Accessing log details](/cloud/projects/deploys-history#accessing-deployment-details--logs)).
2. Click on the **Cancel deployment** button in the top right corner. The status of the deployment will automatically change to *Canceled*.
:::tip
You can also cancel a deployment from the *Deployments* tab which lists the deployments history. The card of ongoing deployment with the *Building* status will display a  button for cancelling the deployment.
:::
# Deployment history & logs
Source: //cloud/projects/deploys-history
# Deployment history and logs {#deploy-history-and-logs}
For each Strapi Cloud project, you can access the history of all deployments that occurred and their details including build and deployment logs. This information is available in the *Deployments* tab.
## Viewing the deployment history {#viewing-deploy-history}
In the *Deployments* tab is displayed a chronological list of cards with the details of all historical deployments for your project.
, with a direct link to your git provider, and commit message
- Deployment status:
- *Deploying*
- *Done*
- *Canceled*
- *Build failed*
- *Deployment failed*
- Last deployment time (when the deployment was triggered and the duration)
- Branch
## Accessing deployment details & logs
From the *Deployments* tab, you can hover a deployment card to make the  **Show details** button appear. Clicking on this button will redirect you to the *Deployment details* page which contains the deployment's detailed logs.
, with a direct link to your git provider, and commit message used for this deployment
- *Status*, which can be *Building*, *Deploying*, *Done*, *Canceled*, *Build failed*, or *Deployment failed*
- *Source*: the branch and commit message for this deployment
- *Duration*: the amount of time the deployment took and when it occurred
# Notifications
Source: //cloud/projects/notifications
# Notifications
The Notification center can be opened by clicking the bell icon in the top navigation of the Cloud dashboard.
It displays a list of the latest notifications for all your existing projects. Clicking on a notification card from the list will redirect you to the *Log details* page of the corresponding deployment (more information in [Deploy history & logs](/cloud/projects/deploys-history#accessing-deployment-details--logs)).
The following notifications can be listed in the Notifications center:
- *deployment completed*: when a deployment is successfully done.
- *Build failed*: when a deployment fails during the build stage.
- *deployment failed*: when a deployment fails during the deployment stage.
- *deployment triggered*: when a deployment is triggered by a new push to the connected repository. This notification is however not sent when the deployment is triggered manually.
:::note
All notifications older than 30 days are automatically removed from the Notification center.
:::
# Projects overview
Source: //cloud/projects/overview
# Projects overview
The *Projects* page displays a list of all your Strapi Cloud projects. From here you can manage your projects and access the corresponding applications.
Each project card displays the following information:
* the project name
* the last successful deployment’s date of the Production environment
* the current status of the project:
* *Disconnected*, if the project repository is not connected to Strapi Cloud
* *Suspended*, if the project has been suspended (refer to [Project suspension](/cloud/getting-started/usage-billing#project-suspension) to reactivate the project)
* *Incompatible version*, if the project is using a Strapi version that is not compatible with Strapi Cloud
Each project card also displays a menu icon to access the following options:
* **Visit App**: to be redirected to the application
* **Go to Deployments**: to be redirected to the [*Deployment*](/cloud/projects/deploys) page
* **Go to Settings**: to be redirected to the [*Settings*](/cloud/projects/settings) page
## Accessing a project's dashboard
From the *Projects* page, click on any project card to access its dashboard. It displays the project and environment details and gives access to the deployment history and all available settings.
From the dashboard's header of a chosen project, you can:
- use the **Share** button to invite users to collaborate on the project (see [Collaboration](/cloud/projects/collaboration)) and see the icons of those who have already been invited ,
- use the **Settings** button to access the settings of the project and its existing environments ,
- choose which environment to visualise for the project or add a new environment ,
- trigger a new deployment (see [Deployments management](/cloud/projects/deploys)) and visit your application .
Your project's dashboard also displays:
- the *Deployments* and *Runtime logs* tabs, to see the deployments history (more details in [Deploy history and logs](/cloud/projects/deploys-history)) and the runtime logs of the project (see [dedicated documentation page](/cloud/projects/runtime-logs))
- the project and environment details in a box on the right of the interface , including:
- the number of API calls,
- the current usage for asset bandwidth and storage,
- the name of the branch and a **Manage** button to be redirect to the branch settings (see [Modifying git repository & branch](/cloud/projects/settings#modifying-git-repository--branch)),
- the name of the base directory,
- the Strapi version number,
- the Strapi app's url.
# Runtime logs
Source: //cloud/projects/runtime-logs
# Runtime logs
From a chosen project's dashboard, the *Runtime logs* tab displays the live logs of the project.
:::note
- The *Runtime logs* are only accessible once the project is successfully deployed.
- Runtime logs are not live for projects on the Free plan and are reset each time the application is scaled to zero due to inactivity.
:::
# Project settings
Source: //cloud/projects/settings
# Project settings
From a chosen project's dashboard, the **Settings** button, located in the header, enables you to manage the configurations and settings for your Strapi Cloud project and its environments.
The settings' menu on the left side of the interface is separated into 2 categories: the settings for the entire project and the settings specific to any configured environment for the project.
## Project-level settings
There are 5 tabs available for the project's settings:
- [*General*](#general),
- [*Environments*](#environments),
- [*Billing & Usage*](#billing--usage),
- [Plans](#plans),
- and [Invoices](#invoices).
### General
The *General* tab for the project-level settings enables you to check and update the following options for the project:
- *Basic information*, to see:
- the name of your Strapi Cloud project — used to identify the project on the Cloud Dashboard, Strapi CLI, and deployment URLs — and change it (see [Renaming project](#renaming-project)).
- the chosen hosting region for your Strapi Cloud project, meaning the geographical location of the servers where the project and its data and resources are stored. The hosting region is set at project creation (see [Project creation](/cloud/getting-started/deployment)) and cannot be modified afterwards.
- the app's internal name for the project, which can be useful for debug & support purposes.
- *Strapi CMS license key*: to enable and use some CMS features directly on your Cloud project (see [Pricing page](https://strapi.io/pricing-self-hosted) to purchase a license).
- *Connected Git repository*: to change the repository and branch used for your project (see [Modifying git repository & branch](#modifying-git-repository--branch)). Also allows to enable/disable the "deploy on push" option.
- *Delete project*: to permanently delete your Strapi Cloud project (see [Deleting Strapi Cloud project](#deleting-strapi-cloud-project)).
#### Renaming project
The project name is set at project creation (see [Project creation](/cloud/getting-started/deployment)) and can be modified afterwards via the project's settings.
1. In the *Basic information* section of the *General* tab, click on the edit button.
2. In the dialog, write the new project name of your choice in the *Project name* textbox.
3. Click on the **Rename** button to confirm the project name modification.
#### Adding a CMS license key {#adding-cms-license-key}
A CMS license key can be added and connected to a Strapi Cloud project to be able to use some features of Strapi CMS. The CMS features that will be accessible via the license key depend on the type of license that was purchased: please refer to the for more information and/or to purchase a license.
:::note
If you don't see the *Strapi CMS license key* section, it probably means that your subscription is a legacy one and does not support custom CMS licenses. It means that you already have one that is automatically included on your project.
:::
1. In the *Strapi CMS license key* section, click on the **Add license** button.
2. In the dialog, paste your license key in the field.
3. Click on **Save**.
To remove the Strapi CMS license from your Strapi Cloud project, you can click on the **Unlink license** button. This will also remove access and usage to the CMS features included in the previously added license.
#### Modifying git repository & branch
The GitHub or GitLab repository, branch and base directory for a Strapi Cloud project are by default chosen at the creation of the project (see [Creating a project](/cloud/getting-started/deployment)). After the project's creation, via the project's settings, it is possible to update the project's repository or switch to another git provider.
:::caution
Updating the git repository could result in the loss of the project and its data, for instance if the wrong repository is selected or if the data schema between the old and new repository doesn't match.
:::
1. In the *Connected git repository* section of the *General* tab, click on the **Update repository** button. You will be redirected to another interface.
2. (optional) If you wish to not only update the repository but switch to another git provider, click on the **Switch Git provider** button at the top right corner of the interface. You will be redirected to the chosen git provider's authorization settings before getting back to the *Update repository* interface.
3. In the *Update repository* section, fill in the 2 available settings:
| Setting name | Instructions |
| --------------- | ------------------------------------------------------------------------ |
| Account | Choose an account from the drop-down list. |
| Repository | Choose a repository from the drop-down list. |
4. In the *Select Git branches* section, fill in the available settings for any of your environments. Note that the branch can be edited per environment via its own settings, see [General (environment)](#environments).
| Setting name | Instructions |
| --------------- | ------------------------------------------------------------------------ |
| Branch | Choose a branch from the drop-down list. |
| Base directory | Write the path of the base directory in the textbox. |
| Auto-deploy | Tick the box to automatically trigger a new deployment whenever a new commit is pushed to the selected branch. Untick it to disable the option. |
5. Click on the **Update repository** button at the bottom of the *Update repository* interface.
6. In the *Update repository* dialog, confirm your changes by clicking on the **Confirm** button.
#### Deleting Strapi Cloud project
You can delete any Strapi Cloud project, but it will be permanent and irreversible. Associated domains, deployments and data will be deleted as well and the subscription for the project will automatically be canceled.
1. In the *Delete project* section of the *General* tab, click on the **Delete project** button.
2. In the dialog, select the reason why you are deleting your project. If selecting "Other" or "Missing feature", a textbox will appear to let you write additional information.
3. Confirm the deletion of your project by clicking on the **Delete project** button at the bottom of the dialog.
### Environments {#environments}
The *Environments* tab allows to see all configured environments for the Strapi Cloud project, as well as to create new ones. Production is the default environment, which cannot be deleted. Other environments can be created (depending on the subscription plan for your project) to work more safely on isolated instances of your Strapi Cloud project (e.g. a staging environment where tests can be made before being available on production).
:::tip
Clicking on the **Manage** button for any environment will redirect you to the environment's own general settings, where it is possible to change the Node version, edit the git branches and delete or reset the environment. Please [refer to the dedicated documentation](#environments) for more information.
:::
:::tip
A new environment can also be added from the [project dashboard](/cloud/projects/overview#accessing-a-projects-dashboard).
:::
To create a new environment:
1. Click on the **Add a new environment** button.
2. In the dialog that opens, you can see the price for the new environment and the date of the next invoice.
3. Fill in the available settings:
| Setting name | Instructions |
| ---------------- | ------------------------------------------------------------------------ |
| Environment name | (mandatory) Write a name for your project's new environment. |
| Git branch | (mandatory) Select the right branch for your new environment. |
| Base directory | Write the name of the base directory of your new environment. |
| Import variables | Tick the box to import variable names from an existing environment. Values will not be imported, and all variables will remain blank. |
| Auto-deploy | Tick the box to automatically trigger a new deployment whenever a new commit is pushed to the selected branch. Untick it to disable the option. |
4. Click on the **Add environment** button to create your project's new environment. A new deployment will automatically be triggered.
:::caution
If the creation of a new environment fails but you are still charged, try creating the environment again. This time, the environment creation should be successful and you will not be charged a second time. This behaviour is an known issue that should be fixed in the upcoming weeks.
:::
### Billing & Usage
The *Billing & Usage* displays your next estimated payment, all information on the current subscription plan and a detailed summary of the project's and its environments' usage. It also allows you to add new environments (please [refer to the documentation in the Environments section](#environments)) for your project.
Through this tab, you also have the possibility to:
- click the **Change** button to be redirected to the *Plans* tab, where you can change you subscription plan ([see related documentation](#plans)),
- click the **Edit** button in order to set a new payment method (see [related documentation](/cloud/account/account-billing)).
:::note
You can attach a dedicated card to your project by choosing the payment method directly from this page. In that way, you can manage your subscriptions with different cards.
:::
:::tip
In the Usage section of the *Billing & Usage* tab, you can see the current monthly usage of your project compared to the maximum usage allowed by your project's subscription. Use the arrows in the top right corner to see the project's usage for any chosen month.
Note also that if your usage indicates that another subscription plan would fit better for your project, a message will be displayed in the *Billing & Usage* tab to advise which plan you could switch to.
:::
### Plans
The *Plans* tab displays an overview of the available Strapi Cloud plans and allows you to upgrade or downgrade from your current plan to another.
:::info
Strapi recently launched [new Cloud plans](https://strapi.io/pricing-cloud). For now, you can [downgrade](#downgrading-to-another-plan) or [upgrade](#upgrading-to-another-plan) to another plan directly from the Cloud dashboard, under the **Settings** > **Plans** section.
If your project was created before the new plans were released, it may be on a *legacy* plan—deprecated but still supported. You can sidegrade to a new plan if desired (see [downgrade section](#downgrading-to-another-plan)).
:::
#### Upgrading to another plan
Strapi Cloud plan upgrades to another, higher plan are immediate and can be managed for each project via the project settings.
:::note
When using the Free plan, the buttons to upgrade to another plan are greyed out and unusable until you have filled in your billing information. Please refer to [Account billing details](/cloud/account/account-billing) for more information.
:::
To upgrade your current plan to a higher one:
1. In the *Plans* tab of your project's settings, click on the **Upgrade** button of the plan you want to upgrade to.
2. In the window that opens, check the payment details that indicate how much you will have to pay immediately after confirming the upgrade, and the available options.
a. (optional) Click the **Edit** button to select another payment method.
b. (optional) Click **I have a discount code**, enter your discount code in the field, and click on the **Apply** button.
3. Click on the **Upgrade to [plan name]** button to confirm the upgrade of your Strapi project to another plan.
#### Downgrading to another plan
Strapi Cloud plan downgrades can be managed for each project via the project settings. Downgrades are however not immediately effective: the higher plan will still remain active until the end of the current month (e.g. if you downgrade from the Scale plan to the Pro plan on June 18th, your project will remain on the Scale plan until the end of the month: on July 1st, the Pro plan will be effective for the project).
:::caution
Make sure to check the usage of your Strapi Cloud project before downgrading: if your current usage exceeds the limits of the lower plan, you are taking the risk of getting charged for the overages. You may also lose access to some features: for example, downgrading to the Essential plan which doesn't include the Backups feature, would make you lose all your project's backups. Please refer to [Information on billing & usage](/cloud/getting-started/usage-billing) for more information.
Note also that you cannot downgrade if you have additional environments (i.e. extra environments that have been purchased, not the default or included environments). For instance, if you wish to downgrade from the Pro plan to the Essential plan, you first need to delete all additional environments that have been configured (see [Resetting & Deleting environment](#resetting--deleting-environment)), for the **Downgrade** button to be displayed and available again.
:::
To downgrade your current plan to a lower one:
1. In the *Plans* tab of your project's settings, click on the **Downgrade** button of the plan you want to downgrade to.
2. In the window that opens, check the information related to downgrading.
3. Click on the **Downgrade** button to confirm the downgrade of your Strapi project's plan.
:::tip
Downgrades are effective from the 1st of the following month. Before that date, you can click on the **Cancel downgrade** button to remain on the current plan.
:::
### Invoices
The *Invoices* tab displays the full list of invoices for your Strapi Cloud project as well as their status.
:::strapi Invoices are also available in your profile settings.
In the *Profile > Invoices* tab, you will find the complete list of invoices for all your projects. Feel free to check the [dedicated documentation](/cloud/account/account-billing#account-invoices).
:::
No invoice is issued for the Free plan.
## Environment-level settings
In the project's environments' settings, you first need to select the environment whose settings you would like to configure, using the dropdown. Depending on the chosen environment, there are 3 to 4 tabs available:
- [*Configuration*](#configuration),
- [*Backups*](#backups), which are only available for the production environment,
- [*Domains*](#domains),
- and [*Variables*](#variables).
### Configuration
The *Configuration* tab for the environment-level settings enables you to check and update the following options for the project:
- *Basic information*, to see:
- the name of your Strapi Cloud project's environment. The environment name is set when it is created and cannot be modified afterwards.
- the Node version of the environment: to change the Node version of the project (see [Modifying Node version](#modifying-node-version)).
- the app's internal name for the environment, which can be useful for debug & support purposes.
- *Connected branch*: to change the branch of the GitHub repository used for your environment (see [Editing Git branch](#editing-git-branch)). Also allows to enable/disable the "deploy on push" option.
- *Danger zone*: to reset or permanently delete your Strapi Cloud project's environment (see [Resetting & Deleting environment](#resetting--deleting-environment)).
#### Modifying Node version
The environment's Node version is based on the one chosen at the creation of the project (see [Creating a project](/cloud/getting-started/deployment)), through the advanced settings. It is possible to switch to another Node version afterwards, for any environment.
1. In the *Basic information* section of the *Configuration* tab, click on the *Node version*'s edit button.
2. Using the *Node version* drop-down in the dialog, click on the version of your choice.
3. Click on the **Save** button.
4. Trigger a new deployment in the environment for which you changed the Node version. If the deployment fails, it is because the Node version doesn't match the version of your Strapi project. You will have to switch to the other Node version and re-deploy your project again.
#### Editing Git branch
2. In the *Edit branch* dialog, edit the available settings. Note that the branch can be edited for all environments at the same time via the project's settings, see [General](#general).
| Setting name | Instructions |
| --------------- | ------------------------------------------------------------------------ |
| Selected branch | (mandatory) Choose a branch from the drop-down list. |
| Base directory | Write the path of the base directory in the textbox. |
| Deploy the project on every commit pushed to this branch | Tick the box to automatically trigger a new deployment whenever a new commit is pushed to the selected branch. Untick it to disable the option. |
3. Click on the **Save** button.
#### Resetting & Deleting environment
You can reset or delete any additional environment of your Strapi Cloud project, but it will be permanent and irreversible. The default, production environment, can however not be neither reset nor deleted.
##### Resetting an environment
Resetting an environment deletes all environments data and resets the variables to their default. To do so:
1. In the *Danger zone* section of the *Configuration* tab, click on the **Reset environment** button.
2. In the dialog that opens, click on the **Continue** button to confirm the environment reset.
3. Fill in the available fields to reset the environment:
| Setting name | Instructions |
| --------------- | ------------------------------------------------------------------------ |
| Environment name | (mandatory) Write a name for your project's new environment. |
| Git branch | (mandatory) Choose a branch from the drop-down list. |
| Base directory | Write the path of the base directory in the textbox. |
| Import variables | Tick the box to import variable names from an existing environment. Values will not be imported, and all variables will remain blank. |
| Auto-deploy | Deploy the project on every commit pushed to this branch | Tick the box to automatically trigger a new deployment whenever a new commit is pushed to the selected branch. Untick it to disable the option. |
4. Click on the **Reset** button.
##### Deleting an environment
1. In the *Danger zone* section of the *Configuration* tab, click on the **Delete environment** button.
2. Write in the textbox your *Environment name*.
3. Click on the **Delete environment** button to confirm the deletion.
### Backups {#backups}
The *Backups* tab informs you of the status and date of the latest backup of your Strapi Cloud projects. The databases associated with all existing Strapi Cloud projects are indeed automatically backed up (weekly for Pro plans and daily for Scale plans). Backups are retained for a 28-day period. Additionally, you can create a single manual backup.
:::note Notes
- The backup feature is not available for Strapi Cloud projects using the Free or Essential plans. You will need to upgrade to either the Pro or Scale plan to have your project automatically backed up and to have access to manual backups.
- The manual backup option should become available shortly after project's first succesful deployment.
- The backup feature is only available for the default, production environment. Other additional environment's settings will not show the *Backups* tab.
:::
:::tip
For projects created before the release of the Backup feature in October 2023, the first backup will automatically be triggered with the next deployment of the project.
:::
#### Creating a manual backup
To create a manual backup, in the *Backups* section, click on the **Create backup** button.
The manual backup should start immediately, and restoration or creation of other backups will be disabled until backup is complete.
:::caution
When creating a new manual backup, any existing manual backup will be deleted. You can only have one manual backup at a time.
:::
#### Restoring a backup
If you need to restore a backup of your project:
1. In the *Backups* section, click on the **Restore backup** button.
2. In the dialog, choose one of the available backups (automatic or manual) of your project in the *Choose backup* drop-down.
3. Click on the **Restore** button of the dialog. Once the restoration is finished, your project will be back to the state it was at the time of the chosen backup. You will be able to see the restoration timestamp and the backup restored in the *Backups* tab.
4. The timestamp of the last completed restoration will be displayed to help you track when the project was last restored.
### Domains
The *Domains* tab enables you to manage domains and connect new ones.
All existing domains for your Strapi Cloud project are listed in the *Domains* tab. For each domain, you can:
- see its current status:
- Active: the domain is currently confirmed and active
- Pending: the domain transfer is being processed, waiting for DNS changes to propagate
- Failed: the domain change request did not complete as an error occured
- click the edit button to access the settings of the domain
- click the delete button to delete the domain
#### Connecting a custom domain
Default domain names are made of 2 randomly generated words followed by a hash. They can be replaced by any custom domain of your choice.
1. Click the **Connect new domain** button.
2. In the window that opens, fill in the following fields:
| Setting name | Instructions |
| ------------------------- | ------------------------------------------------------------------------- |
| Domain name | Type the new domain name (e.g. *custom-domain-name.com*) |
| Hostname | Type the hostname (i.e. address end-users enter in web browser, or call through APIs). |
| Target | Type the target (i.e. actual address where users are redirected when entering hostname). |
| Set as default domain | Tick the box to make the new domain the default one. |
3. Click on the **Save** button.
:::caution Custom domains and assets
When using custom domains, these domains do not apply to the URLs of uploaded assets. Uploaded assets keep the Strapi Cloud project-based URL.
This means that, if your custom domain is hosted at `https://my-custom-domain.com` and your Strapi Cloud project name is `my-strapi-cloud-instance`, API calls will still return URLs such as `https://my-strapi-cloud-instance.media.strapiapp.com/example.png`.
:::
:::note
Custom domains are not available on the Free plan. Downgrading to the Free plan will result in the application domain's being restored to the default one.
:::
### Variables
Environment variables (more information in the [CMS Documentation](/cms/configurations/environment)) are used to configure the environment of your Strapi application, such as the database connection.
In the *Variables* tab are listed both the default and custom environment variables for your Strapi Cloud project. Each variable is composed of a *Name* and a *Value*.
#### Managing environment variables
Hovering on an environment variable, either default or custom, displays the following available options:
- **Show value** to replace the `*` characters with the actual value of a variable.
- **Copy to clipboard** to copy the value of a variable.
- **Actions** to access the Edit and Delete buttons.
- When editing a default variable, the *Name* cannot be modified and the *Value* can only be automatically generated using the Generate value button. Don't forget to **Save** at the end.
- When editing a custom variable, both the *Name* and *Value* can be modified by writing something new or by using the Generate value button. Don't forget to **Save** at the end.
- When deleting a variable, you will be asked to click on a **Confirm** button to confirm the deletion.
:::tip
Use the search bar to find more quickly an environment variable in the list!
:::
#### Creating custom environment variables
Custom environment variables can be created for the Strapi Cloud project. Make sure to redeploy your project after creating or editing an environment variable.
1. In the *Custom environment variables* section, click on the **Add variable** button.
2. Write the *Name* and *Value* of the new environment variable in the same-named fields. Alternatively, you can click on the icon to generate automatically the name and value.
3. (optional) Click on **Add another** to directly create one or more other custom environment variables.
4. Click on the **Save** button to confirm the creation of the custom environment variables.
# Admin panel customization
Source: //cms/admin-panel-customization
# Admin panel customization
The **front-end part of Strapi** is called the admin panel. The admin panel presents a graphical user interface to help you structure and manage the content that will be accessible through the Content API. To get an overview of the admin panel, please refer to the [Getting Started > Admin panel](/cms/features/admin-panel) page.
From a developer point of view, Strapi's admin panel is a React-based single-page application that encapsulates all the features and installed plugins of a Strapi application.
Admin panel customization is done by tweaking the code of the `src/admin/app` file or other files included in the `src/admin` folder (see [project structure](/cms/project-structure)). By doing so, you can:
- Customize some parts of the admin panel to better reflect your brand identity (logos, favicon) or your language,
- Replace some other parts of the admin panel, such as the Rich text editor and the bundler,
- Extend the theme or the admin panel to add new features or customize the existing user interface.
## General considerations
:::prerequisites
Before updating code to customize the admin panel:
- Rename the default `app.example.tsx|js` file into `app.ts|js`.
- Create a new `extensions` folder in `/src/admin/`.
- If you want to see your changes applied live while developing, ensure the admin panel server is running (it's usually done with the `yarn develop` or `npm run develop` command if you have not changed the default [host, port, and path](/cms/configurations/admin-panel#admin-panel-server) of the admin panel).
:::
Most basic admin panel customizations will be done in the `/src/admin/app` file, which includes a `config` object.
Any file used by the `config` object (e.g., a custom logo) should be placed in a `/src/admin/extensions/` folder and imported inside `/src/admin/app.js`.
This will replace the folder's content located at `./build`. Visit
## Basic example
The following is an example of a basic customization of the admin panel:
:::strapi Detailed examples in the codebase
* You can see the full translation keys, for instance to change the welcome message, [on GitHub](https://github.com/strapi/strapi/blob/develop/packages/core/admin/admin/src/translations).
* Light and dark colors are also found [on GitHub](https://github.com/strapi/design-system/tree/main/packages/design-system/src/themes).
:::
# Admin panel bundlers
Source: //cms/admin-panel-customization/bundlers
Strapi's [admin panel](/cms/admin-panel-customization) is a React-based single-page application that encapsulates all the features and installed plugins of a Strapi application. 2 different bundlers can be used with your Strapi 5 application, [Vite](#vite) (the default one) and [webpack](#webpack). Both bundlers can be configured to suit your needs.
:::info
For simplification, the following documentation mentions the `strapi develop` command, but in practice you will probably use its alias by running either `yarn develop` or `npm run develop` depending on your package manager of choice.
:::
## Vite
In Strapi 5,
## Webpack
In Strapi 5, the default bundler is Vite. To use
# Admin panel extension
Source: //cms/admin-panel-customization/extension
# Admin panel extension
Strapi's [admin panel](/cms/admin-panel-customization) is a React-based single-page application that encapsulates all the features and installed plugins of a Strapi application. If the [customization options](/cms/admin-panel-customization#available-customizations) provided by Strapi are not enough for your use case, you will need to extend Strapi's admin panel.
Extending Strapi's admin panel means leveraging its React foundation to adapt and enhance the interface and features according to the specific needs of your project, which might imply creating new components or adding new types of fields.
There are 2 use cases where you might want to extend the admin panel:
- As a Strapi plugin developer, you want to develop a Strapi plugin that extends the admin panel **everytime it's installed in any Strapi application**.
👉 This can be done by taking advantage of the [Admin Panel API for plugins](/cms/plugins-development/admin-panel-api).
- As a Strapi developer, you want to develop a unique solution for a Strapi user who only needs to extend a specific instance of a Strapi application.
👉 This can be done by directly updating the `/src/admin/app` file, which can import any file located in `/src/admin/extensions`.
:::strapi Additional resources
* If you're searching for ways of replacing the default Rich text editor, please refer to the [corresponding page](/cms/admin-panel-customization/wysiwyg-editor).
* The also provide extensive additional information on developing for Strapi's admin panel.
:::
# Favicon
Source: //cms/admin-panel-customization/favicon
# Favicon
Strapi's [admin panel](/cms/admin-panel-customization) displays its branding on various places, including the [logo](/cms/admin-panel-customization/logos) and the favicon. Replacing these images allows you to match the interface and application to your identity.
To replace the favicon:
1. Create a `/src/admin/extensions/` folder if the folder does not already exist.
2. Upload your favicon into `/src/admin/extensions/`.
3. Replace the existing **favicon.png|ico** file at the Strapi application root with a custom `favicon.png|ico` file.
4. Update `/src/admin/app.[tsx|js]` with the following:
```js title="./src/admin/app.js"
import favicon from "./extensions/favicon.png";
export default {
config: {
// replace favicon with a custom icon
head: {
favicon: favicon,
},
},
};
```
5. Rebuild, launch and revisit your Strapi app by running `yarn build && yarn develop` in the terminal.
:::tip
This same process may be used to replace the login logo (i.e. `AuthLogo`) and menu logo (i.e. `MenuLogo`) (see [logos customization documentation](/cms/admin-panel-customization/logos)).
:::
:::caution
Make sure that the cached favicon is cleared. It can be cached in your web browser and also with your domain management tool like Cloudflare's CDN.
:::
# Homepage customization
Source: //cms/admin-panel-customization/homepage
# Homepage customization
:::note The API requires Strapi 5.13+
The `app.widgets.register` API only works with Strapi 5.13 and above. Trying to call the API with older versions of Strapi will crash the admin panel.
Plugin developers who want to register widgets should either:
- set `^5.13.0` as their `@strapi/strapi` peerDependency in their plugin `package.json`. This peer dependency powers the Marketplace's compatibility check.
- or check if the API exists before calling it:
```js
if ('widgets' in app) {
// proceed with the registration
}
```
The peerDependency approach is recommended if the whole purpose of the plugin is to register widgets. The second approach makes more sense if a plugin wants to add a widget but most of its functionality is elsewhere.
:::
#### Widget API reference
The `app.widgets.register()` method can take either a single widget configuration object or an array of configuration objects. Each widget configuration object can accept the following properties:
| Property | Type | Description | Required |
|-------------|------------------------|-------------------------------------------------------|----------|
| `icon` | `React.ComponentType` | Icon component to display beside the widget title | Yes |
| `title` | `MessageDescriptor` | Title for the widget with translation support | Yes |
| `component` | `() => Promise
:::tip
For simplicity, the example below uses data fetching directly inside a useEffect hook. While this works for demonstration purposes, it may not reflect best practices in production.
For more robust solutions, consider alternative approaches recommended in the [React documentation](https://react.dev/learn/build-a-react-app-from-scratch#data-fetching). If you're looking to integrate a data fetching library, we recommend using [TanStackQuery](https://tanstack.com/query/v3/).
:::
**Data management**:

The green box above represents the area where the user’s React component (from `widget.component` in the [API](#widget-api-reference)) is rendered. You can render whatever you like inside of this box. Everything outside that box is, however, rendered by Strapi. This ensures overall design consistency within the admin panel. The `icon`, `title`, and `link` (optional) properties provided in the API are used to display the widget.
#### Widget helper components reference
Strapi provides several helper components to maintain a consistent user experience across widgets:
| Component | Description | Usage |
|------------------|-----------------------------------------------------|--------------------------------------|
| `Widget.Loading` | Displays a loading spinner and message | When data is being fetched |
| `Widget.Error` | Displays an error state | When an error occurs |
| `Widget.NoData` | Displays when no data is available | When the widget has no data to show |
| `Widget.NoPermissions` | Displays when user lacks required permissions | When the user cannot access the widget |
These components help maintain a consistent look and feel across different widgets.
You could render these components without children to get the default wording: `
))}
);
};
```
The following file defines a custom controller that counts all content-types:
```js title="src/plugins/content-metrics/server/src/controllers/metrics.js"
'use strict';
module.exports = ({ strapi }) => ({
async getContentCounts(ctx) {
try {
// Get all content types
const contentTypes = Object.keys(strapi.contentTypes)
.filter(uid => uid.startsWith('api::'))
.reduce((acc, uid) => {
const contentType = strapi.contentTypes[uid];
acc[contentType.info.displayName || uid] = 0;
return acc;
}, {});
// Count entities for each content type
for (const [name, _] of Object.entries(contentTypes)) {
const uid = Object.keys(strapi.contentTypes)
.find(key =>
strapi.contentTypes[key].info.displayName === name || key === name
);
if (uid) {
// Using the count() method from the Document Service API
const count = await strapi.documents(uid).count();
contentTypes[name] = count;
}
}
ctx.body = contentTypes;
} catch (err) {
ctx.throw(500, err);
}
}
});
```
The following file ensures that the metrics controller is reachable at a custom `/count` route:
```js title="src/plugins/content-metrics/server/src/routes/index.js"
'content-api': {
type: 'content-api',
routes: [
{
method: 'GET',
path: '/count',
handler: 'metrics.getContentCounts',
config: {
policies: [],
},
},
],
},
};
```
))}
);
};
```
The following file defines a custom controller that counts all content-types:
```js title="src/plugins/content-metrics/server/src/controllers/metrics.js"
'use strict';
module.exports = ({ strapi }) => ({
async getContentCounts(ctx) {
try {
// Get all content types
const contentTypes = Object.keys(strapi.contentTypes)
.filter(uid => uid.startsWith('api::'))
.reduce((acc, uid) => {
const contentType = strapi.contentTypes[uid];
acc[contentType.info.displayName || uid] = 0;
return acc;
}, {});
// Count entities for each content type using Document Service
for (const [name, _] of Object.entries(contentTypes)) {
const uid = Object.keys(strapi.contentTypes)
.find(key =>
strapi.contentTypes[key].info.displayName === name || key === name
);
if (uid) {
// Using the count() method from Document Service instead of strapi.db.query
const count = await strapi.documents(uid).count();
contentTypes[name] = count;
}
}
ctx.body = contentTypes;
} catch (err) {
ctx.throw(500, err);
}
}
});
```
The following file ensures that the metrics controller is reachable at a custom `/count` route:
```js title="src/plugins/content-metrics/server/src/routes/index.js"
'content-api': {
type: 'content-api',
routes: [
{
method: 'GET',
path: '/count',
handler: 'metrics.getContentCounts',
config: {
policies: [],
},
},
],
},
};
```
# Locales & translations
Source: //cms/admin-panel-customization/locales-translations
# Locales & translations
Strapi's [admin panel](/cms/admin-panel-customization) always ships with English translations, but can display additional languages. You can also override any text that appears in the interface.
The present page shows how to define your own locales and extend Strapi or plugin translations from the project codebase.
## Defining locales
To update the list of available locales in the admin panel, use the `config.locales` array:
:::note Notes
- The `en` locale cannot be removed from the build as it is both the fallback (i.e. if a translation is not found in a locale, the `en` will be used) and the default locale (i.e. used when a user opens the administration panel for the first time).
- The full list of available locales is accessible on
A plugin's key/value pairs are declared independently in the plugin's files at `/admin/src/translations/[language-name].json`. These key/value pairs can similarly be extended in the `config.translations` key by prefixing the key with the plugin's name (i.e. `[plugin name].[key]: 'value'`) as in the following example:
If more translations files should be added, place them in the `/src/admin/extensions/translations` folder.
# Logos
Source: //cms/admin-panel-customization/logos
# Logos
Strapi's [admin panel](/cms/admin-panel-customization) displays its branding on both the login screen and in the main navigation. Replacing these images allows you to match the interface to your identity. The present page shows how to override the two logo files via the admin panel configuration. If you prefer uploading them directly in the UI, see [Customizing the logo](/cms/features/admin-panel#customizing-the-logo).
The Strapi admin panel displays a logo in 2 different locations, represented by 2 different keys in the admin panel configuration:
| Location in the UI | Configuration key to update |
| ---------------------- | --------------------------- |
| On the login page | `config.auth.logo` |
| In the main navigation | `config.menu.logo` |
:::note
Logos uploaded via the admin panel supersede any logo set through the configuration files.
:::
### Logos location in the admin panel
The logo handled by `config.auth.logo` logo is only shown on the login screen:

The logo handled by `config.menu.logo` logo is located in the main navigation at the top left corner of the admin panel:

### Updating logos
To update the logos, put image files in the `/src/admin/extensions` folder, import these files in `src/admin/app` and update the corresponding keys as in the following example:
:::note
There is no size limit for image files set through the configuration files.
:::
# Theme extension
Source: //cms/admin-panel-customization/theme-extension
# Theme extension
Strapi's [admin panel](/cms/admin-panel-customization) can be displayed either in light or dark mode (see [profile setup](/cms/getting-started/setting-up-admin-panel#setting-up-your-administrator-profile)), and both can be extended through custom theme settings.
To extend the theme, use either:
- the `config.theme.light` key for the Light mode
- the `config.theme.dark` key for the Dark mode
:::strapi Strapi Design System
The default defines various theme-related keys (shadows, colors…) that can be updated through the `config.theme.light` and `config.theme.dark` keys in `./admin/src/app.js`. The is fully customizable and has a dedicated documentation.
:::
# Customizing the rich text editor
Source: //cms/admin-panel-customization/wysiwyg-editor
# Change the default rich text editor
Strapi's [admin panel](/cms/admin-panel-customization) comes with a built-in rich text editor. To change the default editor, several options are at your disposal:
- You can install a third-party plugin, such as one for CKEditor, by visiting
# Strapi Client
Source: //cms/api/client
# Strapi Client
The Strapi Client library simplifies interactions with your Strapi back end, providing a way to fetch, create, update, and delete content. This guide walks you through setting up the Strapi Client, configuring authentication, and using its key features effectively.
## Getting Started
:::prerequisites
- A Strapi project has been created and is running. If you haven't set one up yet, follow the [Quick Start Guide](/cms/quick-start) to create one.
- You know the URL of the Content API of your Strapi instance (e.g., `http://localhost:1337/api`).
:::
### Installation
To use the Strapi Client in your project, install it as a dependency using your preferred package manager:
### Basic configuration
To start interacting with your Strapi back end, initialize the Strapi Client and set the base API URL:
```js
const client = strapi({ baseURL: 'http://localhost:1337/api' });
```
If you're using the Strapi Client in a browser environment, you can include it using a `
```
### Authentication
The Strapi Client supports different authentication strategies to access protected resources in your Strapi back end.
If your Strapi instance uses API tokens, configure the Strapi Client as follows:
```js
const client = strapi({
baseURL: 'http://localhost:1337/api',
auth: 'your-api-token-here',
});
```
This allows your requests to include the necessary authentication credentials automatically.
## API Reference
The Strapi Client provides the following key properties and methods for interacting with your Strapi back end:
| Parameter | Description |
| ----------| -------------------------------------------------------------------------------------------- |
| `baseURL` | The base API URL of your Strapi back end. |
| `fetch()` | A utility method for making generic API requests similar to the native fetch API. |
| `collection()` | Manages collection-type resources (e.g., blog posts, products). |
| `single()` | Manages single-type resources (e.g., homepage settings, global configurations). |
### General purpose fetch
The Strapi Client provides access to the underlying JavaScript `fetch` function to make direct API requests. The request is always relative to the base URL provided during client initialization:
```js
const result = await client.fetch('articles', { method: 'GET' });
```
### Working with collection types
Collection types in Strapi are entities with multiple entries (e.g., a blog with many posts). The Strapi Client provides a `collection()` method to interact with these resources, with the following methods available:
| Parameter | Description |
| ----------| -------------------------------------------------------------------------------------------- |
| `find(queryParams?)` | Fetch multiple documents with optional filtering, sorting, or pagination. |
| `findOne(documentID, queryParams?)` | Retrieve a single document by its unique ID. |
| `create(data, queryParams?)` | Create a new document in the collection. |
| `update(documentID, data, queryParams?)` | Update an existing document. |
| `delete(documentID, queryParams?)` | Update an existing document. |
**Usage examples:**
```js
const articles = client.collection('articles');
// Fetch all english articles sorted by title
const allArticles = await articles.find({
locale: 'en',
sort: 'title',
});
// Fetch a single article
const singleArticle = await articles.findOne('article-document-id');
// Create a new article
const newArticle = await articles.create({ title: 'New Article', content: '...' });
// Update an existing article
const updatedArticle = await articles.update('article-document-id', { title: 'Updated Title' });
// Delete an article
await articles.delete('article-id');
```
### Working with single types
Single types in Strapi represent unique content entries that exist only once (e.g., the homepage settings or site-wide configurations). The Strapi Client provides a `single()` method to interact with these resources, with the following methods available:
| Parameter | Description |
| ----------| -------------------------------------------------------------------------------------------- |
| `find(queryParams?)` | Fetch the document. |
| `update(documentID, data, queryParams?)` | Update the document. |
| `delete(queryParams?) ` | Remove the document. |
**Usage examples:**
```js
const homepage = client.single('homepage');
// Fetch the default homepage content
const defaultHomepage = await homepage.find();
// Fetch the Spanish version of the homepage
const spanishHomepage = await homepage.find({ locale: 'es' });
// Update the homepage draft content
const updatedHomepage = await homepage.update(
{ title: 'Updated Homepage Title' },
{ status: 'draft' }
);
// Delete the homepage content
await homepage.delete();
```
### Working with files
The Strapi Client provides access to the [Media Library](/cms/features/media-library) via the `files` property. This allows you to retrieve and manage file metadata without directly interacting with the REST API.
The following methods are available for working with files:
| Method | Description |
|--------|-------------|
| `find(params?)` | Retrieves a list of file metadata based on optional query parameters |
| `findOne(fileId)` | Retrieves the metadata for a single file by its ID |
| `update(fileId, fileInfo)` | Updates metadata for an existing file |
| `delete(fileId)` | Deletes a file by its ID |
**Usage examples:**
```js
// Initialize the client
const client = strapi({
baseURL: 'http://localhost:1337/api',
auth: 'your-api-token',
});
// Find all file metadata
const allFiles = await client.files.find();
console.log(allFiles);
// Find file metadata with filtering and sorting
const imageFiles = await client.files.find({
filters: {
mime: { $contains: 'image' }, // Only get image files
name: { $contains: 'avatar' }, // Only get files with 'avatar' in the name
},
sort: ['name:asc'], // Sort by name in ascending order
});
// Find file metadata by ID
const file = await client.files.findOne(1);
console.log(file.name); // The file name
console.log(file.url); // The file URL
console.log(file.mime); // The file MIME type
// Update file metadata
const updatedFile = await client.files.update(1, {
name: 'New file name',
alternativeText: 'Descriptive alt text for accessibility',
caption: 'A caption for the file',
});
// Delete a file by ID
const deletedFile = await client.files.delete(1);
console.log('File deleted successfully');
console.log('Deleted file ID:', deletedFile.id);
console.log('Deleted file name:', deletedFile.name);
```
:::strapi Additional information
More details about the Strapi Strapi Client might be found in the .
:::
# Content API
Source: //cms/api/content-api
# Strapi APIs to access your content
Once you've created and configured a Strapi project, created a content structure with the [Content-Type Builder](/cms/features/content-type-builder) and started adding data through the [Content Manager](/cms/features/content-manager), you likely would like to access your content.
From a front-end application, your content can be accessed through Strapi's Content API, which is exposed:
- by default through the [REST API](/cms/api/rest)
- and also through the [GraphQL API](/cms/api/graphql) if you installed the Strapi built-in [GraphQL plugin](/cms/plugins/graphql).
You can also use the [Strapi Client](/cms/api/client) library to interact with the REST API.
REST and GraphQL APIs represent the top-level layers of the Content API exposed to external applications. Strapi also provides 2 lower-level APIs:
- The [Document Service API](/cms/api/document-service) is the recommended API to interact with your application's database within the [backend server](/cms/customization) or through [plugins](/cms/plugins-development/developing-plugins). The Document Service is the layer that handles **documents**
# Documents
Source: //cms/api/document
A **document** in Strapi 5 is an API-only concept. A document represents all the different variations of content for a given entry of a content-type.
A single type contains a unique document, and a collection type can contain several documents.
When you use the admin panel, the concept of a document is never mentioned and not necessary for the end user. Users create and edit **entries** in the [Content Manager](/cms/features/content-manager). For instance, as a user, you either list the entries for a given locale, or edit the draft version of a specific entry in a given locale.
However, at the API level, the value of the fields of an entry can actually have:
- different content for the English and the French locale,
- and even different content for the draft and published version in each locale.
The bucket that includes the content of all the draft and published versions for all the locales is a document.
Manipulating documents with the [Document Service API](/cms/api/document-service) will help you create, retrieve, update, and delete documents or a specific subset of the data they contain.
The following diagrams represent all the possible variations of content depending on which features, such as [Internationalization (i18n)](/cms/features/internationalization) and [Draft & Publish](/cms/features/draft-and-publish), are enabled for a content-type:
- If the Internationalization (i18n) feature is enabled on the content-type, a document can have multiple **document locales**.
- If the Draft & Publish feature is enabled on the content-type, a document can have a **published** and a **draft** version.
:::strapi APIs to query documents data
To interact with documents or the data they represent:
- From the back-end server (for instance, from controllers, services, and the back-end part of plugins), use the [Document Service API](/cms/api/document-service).
- From the front-end part of your application, query your data using the [REST API](/cms/api/rest) or the [GraphQL API](/cms/api/graphql).
For additional information about the APIs, please refer to the [Content API introduction](/cms/api/content-api).
:::
:::info Default version in returned results
An important difference between the back-end and front-end APIs is about the default version returned when no parameter is passed:
- The Document Service API returns the draft version by default,
- while REST and GraphQL APIs return the published version by default.
:::
# Document Service API
Source: //cms/api/document-service
# Document Service API
The Document Service API is built on top of the **Query Engine API** and used to perform CRUD ([create](#create), [retrieve](#findone), [update](#update), and [delete](#delete)) operations on **documents**
## `findFirst()`
Find the first document matching the parameters.
Syntax: `findFirst(parameters: Params) => Document`
### Parameters
| Parameter | Description | Default | Type |
|-----------|-------------|---------|------|
| [`locale`](/cms/api/document-service/locale#find-first) | Locale of the documents to find. | Default locale | String or `undefined` |
| [`status`](/cms/api/document-service/status#find-first) | _If [Draft & Publish](/cms/features/draft-and-publish) is enabled for the content-type_: Publication status, can be:
`'published'` to find only published documents
`'draft'` to find only draft documents
| `'draft'` | `'published'` or `'draft'` |
| [`filters`](/cms/api/document-service/filters) | [Filters](/cms/api/document-service/filters) to use | `null` | Object |
| [`fields`](/cms/api/document-service/fields#findfirst) | [Select fields](/cms/api/document-service/fields#findfirst) to return | All fields (except those not populate by default) | Object |
| [`populate`](/cms/api/document-service/populate) | [Populate](/cms/api/document-service/populate) results with additional fields. | `null` | Object |
### Examples
#### Generic example
By default, `findFirst()` returns the draft version, in the default locale, of the first document for the passed unique identifier (collection type id or single type id):
#### Find the first document matching parameters
Pass some parameters to `findFirst()` to return the first document matching them.
If no `locale` or `status` parameters are passed, results return the draft version for the default locale:
## `findMany()`
Find documents matching the parameters.
Syntax: `findMany(parameters: Params) => Document[]`
### Parameters
| Parameter | Description | Default | Type |
|-----------|-------------|---------|------|
| [`locale`](/cms/api/document-service/locale#find-many) | Locale of the documents to find. | Default locale | String or `undefined` |
| [`status`](/cms/api/document-service/status#find-many) | _If [Draft & Publish](/cms/features/draft-and-publish) is enabled for the content-type_: Publication status, can be:
`'published'` to find only published documents
`'draft'` to find only draft documents
| `'draft'` | `'published'` or `'draft'` |
| [`filters`](/cms/api/document-service/filters) | [Filters](/cms/api/document-service/filters) to use | `null` | Object |
| [`fields`](/cms/api/document-service/fields#findmany) | [Select fields](/cms/api/document-service/fields#findmany) to return | All fields (except those not populate by default) | Object |
| [`populate`](/cms/api/document-service/populate) | [Populate](/cms/api/document-service/populate) results with additional fields. | `null` | Object |
| [`pagination`](/cms/api/document-service/sort-pagination#pagination) | [Paginate](/cms/api/document-service/sort-pagination#pagination) results |
| [`sort`](/cms/api/document-service/sort-pagination#sort) | [Sort](/cms/api/document-service/sort-pagination#sort) results | | |
### Examples
#### Generic example
When no parameter is passed, `findMany()` returns the draft version in the default locale for each document:
#### Find documents matching parameters
Available filters are detailed in the [filters](/cms/api/document-service/filters) page of the Document Service API reference.
If no `locale` or `status` parameters are passed, results return the draft version for the default locale:
## `create()`
Creates a drafted document and returns it.
Pass fields for the content to create in a `data` object.
Syntax: `create(parameters: Params) => Document`
### Parameters
| Parameter | Description | Default | Type |
|-----------|-------------|---------|------|
| [`locale`](/cms/api/document-service/locale#create) | Locale of the documents to create. | Default locale | String or `undefined` |
| [`fields`](/cms/api/document-service/fields#create) | [Select fields](/cms/api/document-service/fields#create) to return | All fields (except those not populated by default) | Object |
| [`status`](/cms/api/document-service/status#create) | _If [Draft & Publish](/cms/features/draft-and-publish) is enabled for the content-type_: Can be set to `'published'` to automatically publish the draft version of a document while creating it | -| `'published'` |
| [`populate`](/cms/api/document-service/populate) | [Populate](/cms/api/document-service/populate) results with additional fields. | `null` | Object |
### Example
If no `locale` parameter is passed, `create()` creates the draft version of the document for the default locale:
:::tip
If the [Draft & Publish](/cms/features/draft-and-publish) feature is enabled on the content-type, you can automatically publish a document while creating it (see [`status` documentation](/cms/api/document-service/status#create)).
:::
## `update()`
Updates document versions and returns them.
Syntax: `update(parameters: Params) => Promise
## `delete()`
Deletes one document, or a specific locale of it.
Syntax: `delete(parameters: Params): Promise<{ documentId: ID, entries: Number }>`
### Parameters
| Parameter | Description | Default | Type |
|-----------|-------------|---------|------|
| `documentId`| Document id | | `ID`|
| [`locale`](/cms/api/document-service/locale#delete) | Locale version of the document to delete. | `null` (deletes only the default locale) | String, `'*'`, or `null` |
| [`filters`](/cms/api/document-service/filters) | [Filters](/cms/api/document-service/filters) to use | `null` | Object |
| [`fields`](/cms/api/document-service/fields#delete) | [Select fields](/cms/api/document-service/fields#delete) to return | All fields (except those not populate by default) | Object |
| [`populate`](/cms/api/document-service/populate) | [Populate](/cms/api/document-service/populate) results with additional fields. | `null` | Object |
### Example
If no `locale` parameter is passed, `delete()` only deletes the default locale version of a document. This deletes both the draft and published versions:
## `publish()`
Publishes one or multiple locales of a document.
This method is only available if [Draft & Publish](/cms/features/draft-and-publish) is enabled on the content-type.
Syntax: `publish(parameters: Params): Promise<{ documentId: ID, entries: Number }>`
### Parameters
| Parameter | Description | Default | Type |
|-----------|-------------|---------|------|
| `documentId`| Document id | | `ID`|
| [`locale`](/cms/api/document-service/locale#publish) | Locale of the documents to publish. | Only the default locale | String, `'*'`, or `null` |
| [`filters`](/cms/api/document-service/filters) | [Filters](/cms/api/document-service/filters) to use | `null` | Object |
| [`fields`](/cms/api/document-service/fields#publish) | [Select fields](/cms/api/document-service/fields#publish) to return | All fields (except those not populate by default) | Object |
| [`populate`](/cms/api/document-service/populate) | [Populate](/cms/api/document-service/populate) results with additional fields. | `null` | Object |
### Example
If no `locale` parameter is passed, `publish()` only publishes the default locale version of the document:
## `unpublish()`
Unpublishes one or all locale versions of a document, and returns how many locale versions were unpublished.
This method is only available if [Draft & Publish](/cms/features/draft-and-publish) is enabled on the content-type.
Syntax: `unpublish(parameters: Params): Promise<{ documentId: ID, entries: Number }>`
### Parameters
| Parameter | Description | Default | Type |
|-----------|-------------|---------|------|
| `documentId`| Document id | | `ID`|
| [`locale`](/cms/api/document-service/locale#unpublish) | Locale of the documents to unpublish. | Only the default locale | String, `'*'`, or `null` |
| [`filters`](/cms/api/document-service/filters) | [Filters](/cms/api/document-service/filters) to use | `null` | Object |
| [`fields`](/cms/api/document-service/fields#unpublish) | [Select fields](/cms/api/document-service/fields#unpublish) to return | All fields (except those not populate by default) | Object |
| [`populate`](/cms/api/document-service/populate) | [Populate](/cms/api/document-service/populate) results with additional fields. | `null` | Object |
### Example
If no `locale` parameter is passed, `unpublish()` only unpublishes the default locale version of the document:
## `discardDraft()`
Discards draft data and overrides it with the published version.
This method is only available if [Draft & Publish](/cms/features/draft-and-publish) is enabled on the content-type.
Syntax: `discardDraft(parameters: Params): Promise<{ documentId: ID, entries: Number }>`
### Parameters
| Parameter | Description | Default | Type |
|-----------|-------------|---------|------|
| `documentId`| Document id | | `ID`|
| [`locale`](/cms/api/document-service/locale#discard-draft) | Locale of the documents to discard. | Only the default locale. | String, `'*'`, or `null` |
| [`filters`](/cms/api/document-service/filters) | [Filters](/cms/api/document-service/filters) to use | `null` | Object |
| [`fields`](/cms/api/document-service/fields#discarddraft) | [Select fields](/cms/api/document-service/fields#discarddraft) to return | All fields (except those not populate by default) | Object |
| [`populate`](/cms/api/document-service/populate) | [Populate](/cms/api/document-service/populate) results with additional fields. | `null` | Object |
### Example
If no `locale` parameter is passed, `discardDraft()` discards draft data and overrides it with the published version only for the default locale:
## `count()`
Count the number of documents that match the provided parameters.
Syntax: `count(parameters: Params) => number`
### Parameters
| Parameter | Description | Default | Type |
|-----------|-------------|---------|------|
| [`locale`](/cms/api/document-service/locale#count) | Locale of the documents to count | Default locale | String or `null` |
| [`status`](/cms/api/document-service/status#count) | _If [Draft & Publish](/cms/features/draft-and-publish) is enabled for the content-type_: Publication status, can be:
`'published'` to find only published documents
`'draft'` to find draft documents (will return all documents)
| `'draft'` | `'published'` or `'draft'` |
| [`filters`](/cms/api/document-service/filters) | [Filters](/cms/api/document-service/filters) to use | `null` | Object |
:::note
Since published documents necessarily also have a draft counterpart, a published document is still counted as having a draft version.
This means that counting with the `status: 'draft'` parameter still returns the total number of documents matching other parameters, even if some documents have already been published and are not displayed as "draft" or "modified" in the Content Manager anymore. There currently is no way to prevent already published documents from being counted.
:::
### Examples
#### Generic example
If no parameter is passed, the `count()` method the total number of documents for the default locale:
#### Count published documents
To count only published documents, pass `status: 'published'` along with other parameters to the `count()` method.
If no `locale` parameter is passed, documents are counted for the default locale.
#### Count documents with filters
Any [filters](/cms/api/document-service/filters) can be passed to the `count()` method.
If no `locale` and no `status` parameter is passed, draft documents (which is the total of available documents for the locale since even published documents are counted as having a draft version) are counted only for the default locale:
```js
/**
* Count number of draft documents (default if status is omitted)
* in English (default locale)
* whose name starts with 'Pizzeria'
*/
strapi.documents('api::restaurant.restaurant').count({ filters: { name: { $startsWith: "Pizzeria" }}})`
```
# Using fields with the Document Service API
Source: //cms/api/document-service/fields
# Document Service API: Selecting fields
By default the [Document Service API](/cms/api/document-service) returns all the fields of a document but does not populate any fields. This page describes how to use the `fields` parameter to return only specific fields with the query results.
:::tip
You can also use the `populate` parameter to populate relations, media fields, components, or dynamic zones (see the [`populate` parameter](/cms/api/document-service/populate) documentation).
:::
## Select fields with `findFirst()` queries {#findfirst}
To select fields to return while [finding the first document](/cms/api/document-service#findfirst) matching the parameters with the Document Service API:
## Select fields with `findMany()` queries {#findmany}
To select fields to return while [finding documents](/cms/api/document-service#findmany) with the Document Service API:
## Select fields with `create()` queries {#create}
To select fields to return while [creating documents](/cms/api/document-service#create) with the Document Service API:
## Select fields with `update()` queries {#update}
To select fields to return while [updating documents](/cms/api/document-service#update) with the Document Service API:
## Select fields with `delete()` queries {#delete}
To select fields to return while [deleting documents](/cms/api/document-service#delete) with the Document Service API:
## Select fields with `publish()` queries {#publish}
To select fields to return while [publishing documents](/cms/api/document-service#publish) with the Document Service API:
## Select fields with `unpublish()` queries {#unpublish}
To select fields to return while [unpublishing documents](/cms/api/document-service#unpublish) with the Document Service API:
## Select fields with `discardDraft()` queries {#discarddraft}
To select fields to return while [discarding draft versions of documents](/cms/api/document-service#discarddraft) with the Document Service API:
# Using filters with the Document Service API
Source: //cms/api/document-service/filters
# Document Service API: Filters
The [Document Service API](/cms/api/document-service) offers the ability to filter results.
The following operators are available:
| Operator | Description |
| -------------------------------- | ---------------------------------------- |
| [`$eq`](#eq) | Equal |
| [`$eqi`](#eqi) | Equal (case-insensitive) |
| [`$ne`](#ne) | Not equal |
| [`$nei`](#nei) | Not equal (case-insensitive) |
| [`$lt`](#lt) | Less than |
| [`$lte`](#lte) | Less than or equal to |
| [`$gt`](#gt) | Greater than |
| [`$gte`](#gte) | Greater than or equal to |
| [`$in`](#in) | Included in an array |
| [`$notIn`](#notin) | Not included in an array |
| [`$contains`](#contains) | Contains |
| [`$notContains`](#notcontains) | Does not contain |
| [`$containsi`](#containsi) | Contains (case-insensitive) |
| [`$notContainsi`](#notcontainsi) | Does not contain (case-insensitive) |
| [`$null`](#null) | Is null |
| [`$notNull`](#notnull) | Is not null |
| [`$between`](#between) | Is between |
| [`$startsWith`](#startswith) | Starts with |
| [`$startsWithi`](#startswithi) | Starts with (case-insensitive) |
| [`$endsWith`](#endswith) | Ends with |
| [`$endsWithi`](#endswithi) | Ends with (case-insensitive) |
| [`$or`](#or) | Joins the filters in an "or" expression |
| [`$and`](#and) | Joins the filters in an "and" expression |
| [`$not`](#not) | Joins the filters in an "not" expression |
## Attribute operators
### `$not`
Negates the nested condition(s).
**Example**
```js
const entries = await strapi.documents('api::article.article').findMany({
filters: {
title: {
$not: {
$contains: 'Hello World',
},
},
},
});
```
### `$eq`
Attribute equals input value.
**Example**
```js
const entries = await strapi.documents('api::article.article').findMany({
filters: {
title: {
$eq: 'Hello World',
},
},
});
```
`$eq` can be omitted:
```js
const entries = await strapi.documents('api::article.article').findMany({
filters: {
title: 'Hello World',
},
});
```
### `$eqi`
Attribute equals input value (case-insensitive).
**Example**
```js
const entries = await strapi.documents('api::article.article').findMany({
filters: {
title: {
$eqi: 'HELLO World',
},
},
});
```
### `$ne`
Attribute does not equal input value.
**Example**
```js
const entries = await strapi.documents('api::article.article').findMany({
filters: {
title: {
$ne: 'ABCD',
},
},
});
```
### `$nei`
Attribute does not equal input value (case-insensitive).
**Example**
```js
const entries = await strapi.documents('api::article.article').findMany({
filters: {
title: {
$nei: 'abcd',
},
},
});
```
### `$in`
Attribute is contained in the input list.
**Example**
```js
const entries = await strapi.documents('api::article.article').findMany({
filters: {
title: {
$in: ['Hello', 'Hola', 'Bonjour'],
},
},
});
```
`$in` can be omitted when passing an array of values:
```js
const entries = await strapi.documents('api::article.article').findMany({
filters: {
title: ['Hello', 'Hola', 'Bonjour'],
},
});
```
### `$notIn`
Attribute is not contained in the input list.
**Example**
```js
const entries = await strapi.documents('api::article.article').findMany({
filters: {
title: {
$notIn: ['Hello', 'Hola', 'Bonjour'],
},
},
});
```
### `$lt`
Attribute is less than the input value.
**Example**
```js
const entries = await strapi.documents('api::article.article').findMany({
filters: {
rating: {
$lt: 10,
},
},
});
```
### `$lte`
Attribute is less than or equal to the input value.
**Example**
```js
const entries = await strapi.documents('api::article.article').findMany({
filters: {
rating: {
$lte: 10,
},
},
});
```
### `$gt`
Attribute is greater than the input value.
**Example**
```js
const entries = await strapi.documents('api::article.article').findMany({
filters: {
rating: {
$gt: 5,
},
},
});
```
### `$gte`
Attribute is greater than or equal to the input value.
**Example**
```js
const entries = await strapi.documents('api::article.article').findMany({
filters: {
rating: {
$gte: 5,
},
},
});
```
### `$between`
Attribute is between the 2 input values, boundaries included (e.g., `$between[1, 3]` will also return `1` and `3`).
**Example**
```js
const entries = await strapi.documents('api::article.article').findMany({
filters: {
rating: {
$between: [1, 20],
},
},
});
```
### `$contains`
Attribute contains the input value (case-sensitive).
**Example**
```js
const entries = await strapi.documents('api::article.article').findMany({
filters: {
title: {
$contains: 'Hello',
},
},
});
```
### `$notContains`
Attribute does not contain the input value (case-sensitive).
**Example**
```js
const entries = await strapi.documents('api::article.article').findMany({
filters: {
title: {
$notContains: 'Hello',
},
},
});
```
### `$containsi`
Attribute contains the input value. `$containsi` is not case-sensitive, while [$contains](#contains) is.
**Example**
```js
const entries = await strapi.documents('api::article.article').findMany({
filters: {
title: {
$containsi: 'hello',
},
},
});
```
### `$notContainsi`
Attribute does not contain the input value. `$notContainsi` is not case-sensitive, while [$notContains](#notcontains) is.
**Example**
```js
const entries = await strapi.documents('api::article.article').findMany({
filters: {
title: {
$notContainsi: 'hello',
},
},
});
```
### `$startsWith`
Attribute starts with input value (case-sensitive).
**Example**
```js
const entries = await strapi.documents('api::article.article').findMany({
filters: {
title: {
$startsWith: 'ABCD',
},
},
});
```
### `$startsWithi`
Attribute starts with input value (case-insensitive).
**Example**
```js
const entries = await strapi.documents('api::article.article').findMany({
filters: {
title: {
$startsWithi: 'ABCD', // will return the same as filtering with 'abcd'
},
},
});
```
### `$endsWith`
Attribute ends with input value (case-sensitive).
**Example**
```js
const entries = await strapi.documents('api::article.article').findMany({
filters: {
title: {
$endsWith: 'ABCD',
},
},
});
```
### `$endsWithi`
Attribute ends with input value (case-insensitive).
**Example**
```js
const entries = await strapi.documents('api::article.article').findMany({
filters: {
title: {
$endsWith: 'ABCD', // will return the same as filtering with 'abcd'
},
},
},
});
```
### `$null`
Attribute is `null`.
**Example**
```js
const entries = await strapi.documents('api::article.article').findMany({
filters: {
title: {
$null: true,
},
},
});
```
### `$notNull`
Attribute is not `null`.
**Example**
```js
const entries = await strapi.documents('api::article.article').findMany({
filters: {
title: {
$notNull: true,
},
},
});
```
## Logical operators
### `$and`
All nested conditions must be `true`.
**Example**
```js
const entries = await strapi.documents('api::article.article').findMany({
filters: {
$and: [
{
title: 'Hello World',
},
{
createdAt: { $gt: '2021-11-17T14:28:25.843Z' },
},
],
},
});
```
`$and` will be used implicitly when passing an object with nested conditions:
```js
const entries = await strapi.documents('api::article.article').findMany({
filters: {
title: 'Hello World',
createdAt: { $gt: '2021-11-17T14:28:25.843Z' },
},
});
```
### `$or`
One or many nested conditions must be `true`.
**Example**
```js
const entries = await strapi.documents('api::article.article').findMany({
filters: {
$or: [
{
title: 'Hello World',
},
{
createdAt: { $gt: '2021-11-17T14:28:25.843Z' },
},
],
},
});
```
### `$not`
Negates the nested conditions.
**Example**
```js
const entries = await strapi.documents('api::article.article').findMany({
filters: {
$not: {
title: 'Hello World',
},
},
});
```
:::note
`$not` can be used as:
- a logical operator (e.g. in `filters: { $not: { // conditions… }}`)
- [an attribute operator](#not) (e.g. in `filters: { attribute-name: $not: { … } }`).
:::
:::tip
`$and`, `$or` and `$not` operators are nestable inside of another `$and`, `$or` or `$not` operator.
:::
# Using the locale parameter with the Document Service API
Source: //cms/api/document-service/locale
# Document Service API: Using the `locale` parameter
By default the [Document Service API](/cms/api/document-service) returns the default locale version of documents (which is 'en', i.e. the English version, unless another default locale has been set for the application, see [Internationalization (i18n) feature](/cms/features/internationalization)). This page describes how to use the `locale` parameter to get or manipulate data only for specific locales.
## Get a locale version with `findOne()` {#find-one}
If a `locale` is passed, the [`findOne()` method](/cms/api/document-service#findone) of the Document Service API returns the version of the document for this locale:
If no `status` parameter is passed, the `draft` version is returned by default.
## Get a locale version with `findFirst()` {#find-first}
To return a specific locale while [finding the first document](/cms/api/document-service#findfirst) matching the parameters with the Document Service API:
If no `status` parameter is passed, the `draft` version is returned by default.
## Get locale versions with `findMany()` {#find-many}
When a `locale` is passed to the [`findMany()` method](/cms/api/document-service#findmany) of the Document Service API, the response will return all documents that have this locale available.
If no `status` parameter is passed, the `draft` versions are returned by default.
Explanation:
Given the following 4 documents that have various locales:
- Document A:
- en
- `fr`
- it
- Document B:
- en
- it
- Document C:
- `fr`
- Document D:
- `fr`
- it
`findMany({ locale: 'fr' })` would only return the draft version of the documents that have a `‘fr’` locale version, that is documents A, C, and D.
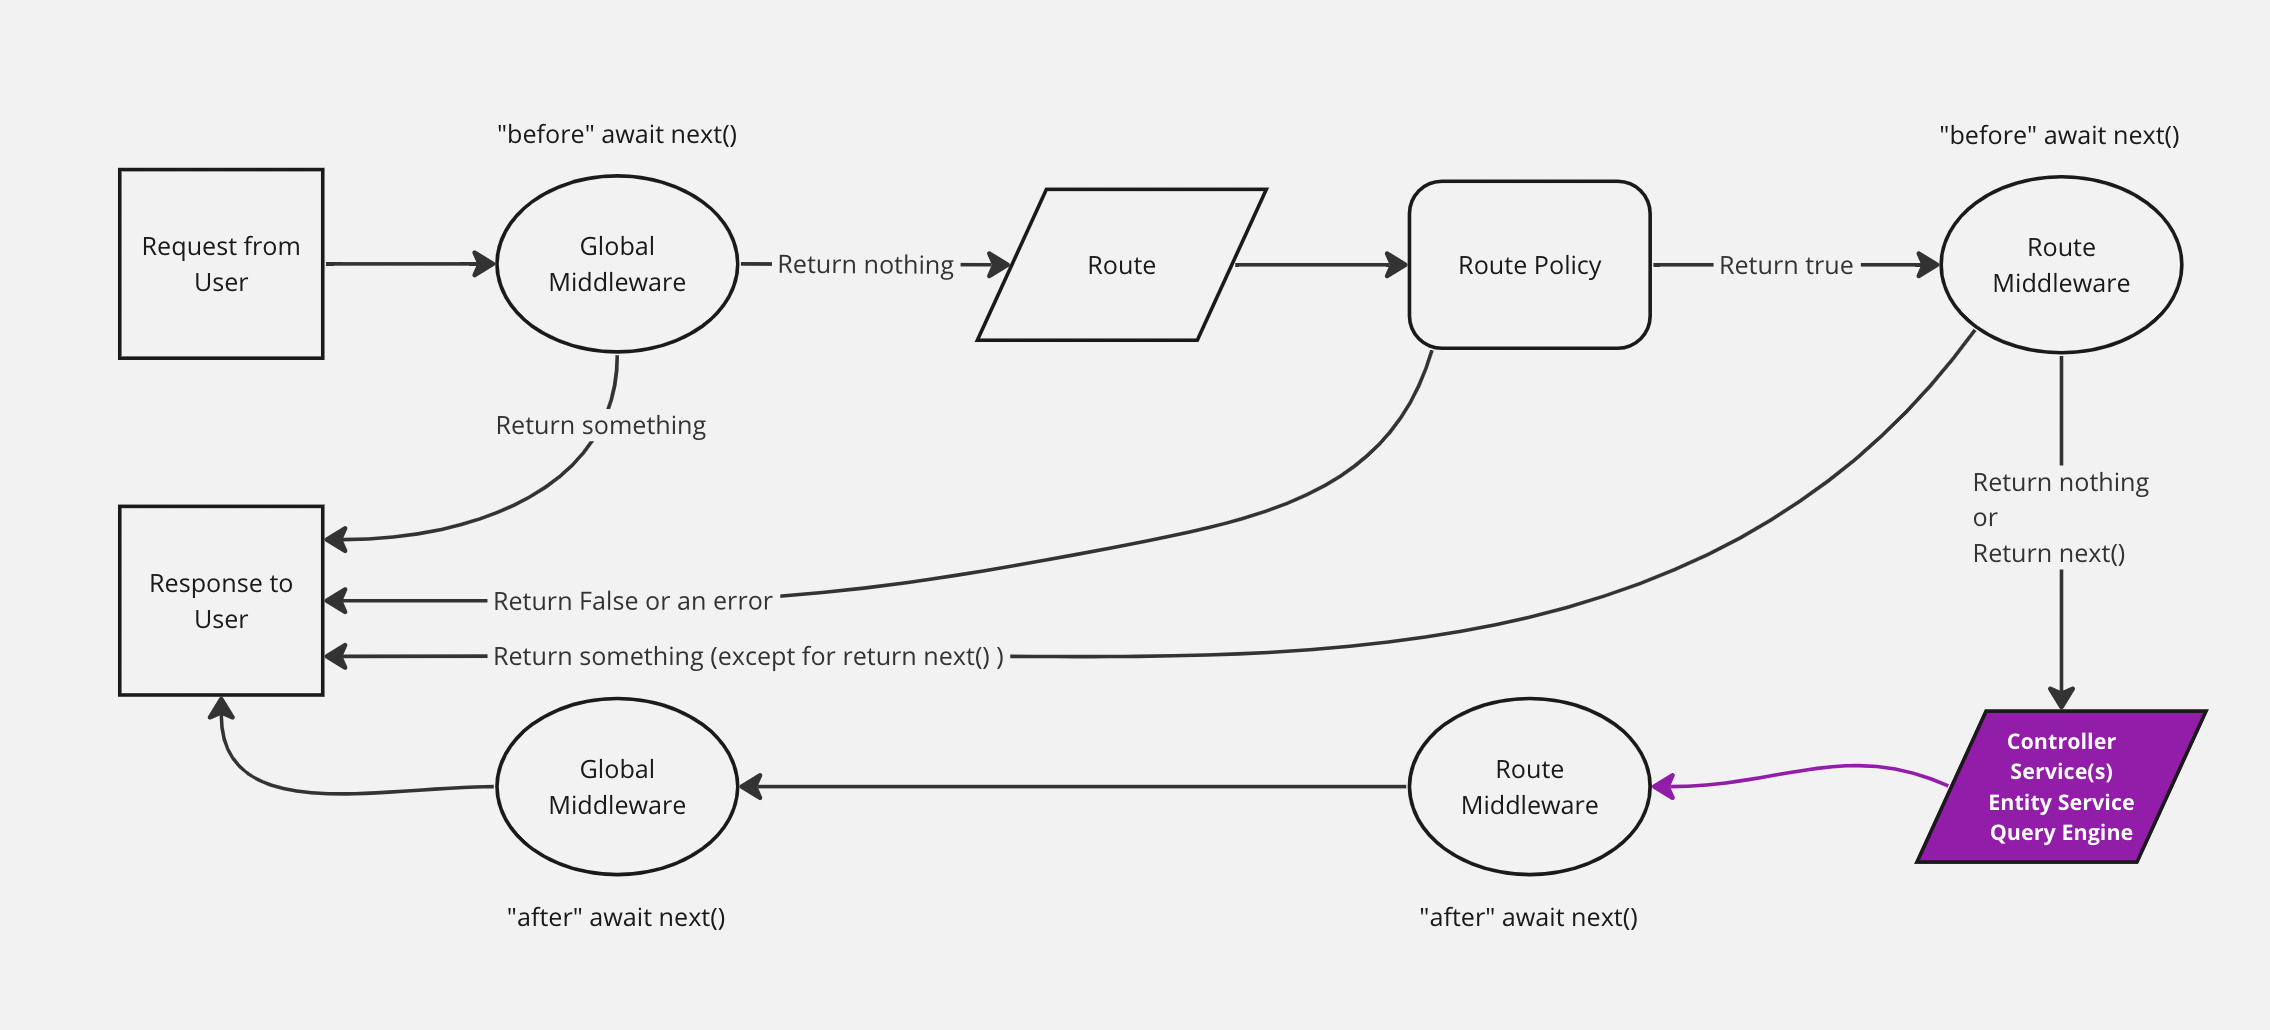
## `create()` a document for a locale {#create}
To create a document for specific locale, pass the `locale` as a parameter to the [`create` method](/cms/api/document-service#create) of the Document Service API:
## `update()` a locale version {#update}
To update only a specific locale version of a document, pass the `locale` parameter to the [`update()` method](/cms/api/document-service#update) of the Document Service API:
## `delete()` locale versions {#delete}
Use the `locale` parameter with the [`delete()` method](/cms/api/document-service#delete) of the Document Service API to delete only some locales. Unless a specific `status` parameter is passed, this deletes both the draft and published versions.
### Delete a locale version
To delete a specific locale version of a document:
### Delete all locale versions
The `*` wildcard is supported by the `locale` parameter and can be used to delete all locale versions of a document:
## `publish()` locale versions {#publish}
To publish only specific locale versions of a document with the [`publish()` method](/cms/api/document-service#publish) of the Document Service API, pass `locale` as a parameter:
### Publish a locale version
To publish a specific locale version of a document:
### Publish all locale versions
The `*` wildcard is supported by the `locale` parameter to publish all locale versions of a document:
## `unpublish()` locale versions {#unpublish}
To publish only specific locale versions of a document with the [`unpublish()` method](/cms/api/document-service#unpublish) of the Document Service API, pass `locale` as a parameter:
### Unpublish a locale version
To unpublish a specific locale version of a document, pass the `locale` as a parameter to `unpublish()`:
### Unpublish all locale versions
The `*` wildcard is supported by the `locale` parameter, to unpublish all locale versions of a document:
## `discardDraft()` for locale versions {#discard-draft}
To discard draft data only for some locales versions of a document with the [`discardDraft()` method](/cms/api/document-service#discarddraft) of the Document Service API, pass `locale` as a parameter:
### Discard draft for a locale version
To discard draft data for a specific locale version of a document and override it with data from the published version for this locale, pass the `locale` as a parameter to `discardDraft()`:
### Discard drafts for all locale versions
The `*` wildcard is supported by the `locale` parameter, to discard draft data for all locale versions of a document and replace them with the data from the published versions:
## `count()` documents for a locale {#count}
To count documents for a specific locale, pass the `locale` along with other parameters to the [`count()` method](/cms/api/document-service#count) of the Document Service API.
If no `status` parameter is passed, draft documents are counted (which is the total of available documents for the locale since even published documents are counted as having a draft version):
```js
// Count number of published documents in French
strapi.documents('api::restaurant.restaurant').count({ locale: 'fr' });
```
# Extending the Document Service behavior
Source: //cms/api/document-service/middlewares
# Document Service API: Middlewares
The [Document Service API](/cms/api/document-service) offers the ability to extend its behavior thanks to middlewares.
Document Service middlewares allow you to perform actions before and/or after a method runs.
The diagram represents a simplified version of how a request travels through the Strapi back end, with the Document Service highlighted. The backend customization introduction page includes a complete, interactive diagram.
## Registering a middleware
Syntax: `strapi.documents.use(middleware)`
### Parameters
A middleware is a function that receives a context and a next function.
Syntax: `(context, next) => ReturnType`
| Parameter | Description | Type |
|-----------|---------------------------------------|------------|
| `context` | Middleware context | `Context` |
| `next` | Call the next middleware in the stack | `function` |
#### `context`
| Parameter | Description | Type |
|---------------|--------------------------------------------------------------------------------------|---------------|
| `action` | The method that is running ([see available methods](/cms/api/document-service)) | `string` |
| `params` | The method params ([see available methods](/cms/api/document-service)) | `Object` |
| `uid` | Content type unique identifier | `string` |
| `contentType` | Content type | `ContentType` |
Examples:
The following examples show what `context` might include depending on the method called:
#### `next`
`next` is a function without parameters that calls the next middleware in the stack and return its response.
**Example**
```js
strapi.documents.use((context, next) => {
return next();
});
```
### Where to register
Generaly speaking you should register your middlewares during the Strapi registration phase.
#### Users
The middleware must be registered in the general `register()` lifecycle method:
```js title="/src/index.js|ts"
module.exports = {
register({ strapi }) {
strapi.documents.use((context, next) => {
// your logic
return next();
});
},
// bootstrap({ strapi }) {},
// destroy({ strapi }) {},
};
```
#### Plugin developers
The middleware must be registered in the plugin's `register()` lifecycle method:
```js title="/(plugin-root-folder)/strapi-server.js|ts"
module.exports = {
register({ strapi }) {
strapi.documents.use((context, next) => {
// your logic
return next();
});
},
// bootstrap({ strapi }) {},
// destroy({ strapi }) {},
};
```
## Implementing a middleware
When implementing a middleware, always return the response from `next()`.
Failing to do this will break the Strapi application.
### Examples
```js
const applyTo = ['api::article.article'];
strapi.documents.use((context, next) => {
// Only run for certain content types
if (!applyTo.includes(context.uid)) {
return next();
}
// Only run for certain actions
if (['create', 'update'].includes(context.action)) {
context.params.data.fullName = `${context.params.data.firstName} ${context.params.data.lastName}`;
}
const result = await next();
// do something with the result before returning it
return result
});
```
:::strapi Lifecycle hooks
The Document Service API triggers various database lifecycle hooks based on which method is called. For a complete reference, see [Document Service API: Lifecycle hooks](/cms/migration/v4-to-v5/breaking-changes/lifecycle-hooks-document-service#table).
:::
# Using Populate with the Document Service API
Source: //cms/api/document-service/populate
# Document Service API: Populating fields
By default the [Document Service API](/cms/api/document-service) does not populate any relations, media fields, components, or dynamic zones. This page describes how to use the `populate` parameter to populate specific fields.
:::tip
You can also use the `select` parameter to return only specific fields with the query results (see the [`select` parameter](/cms/api/document-service/fields) documentation).
:::
:::caution
If the Users & Permissions plugin is installed, the `find` permission must be enabled for the content-types that are being populated. If a role doesn't have access to a content-type it will not be populated.
:::
## Relations and media fields
Queries can accept a `populate` parameter to explicitly define which fields to populate, with the following syntax option examples.
### Populate 1 level for all relations
To populate one-level deep for all relations, use the `*` wildcard in combination with the `populate` parameter:
### Populate 1 level for specific relations
To populate specific relations one-level deep, pass the relation names in a `populate` array:
### Populate several levels deep for specific relations
To populate specific relations several levels deep, use the object format with `populate`:
## Components & Dynamic Zones
Components are populated the same way as relations:
Dynamic zones are highly dynamic content structures by essence. To populate a dynamic zone, you must define per-component populate queries using the `on` property.
## Populating with `create()`
To populate while creating documents:
## Populating with `update()`
To populate while updating documents:
## Populating with `publish()`
To populate while publishing documents (same behavior with `unpublish()` and `discardDraft()`):
# Using Sort & Pagination with the Document Service API
Source: //cms/api/document-service/sort-pagination
# Document Service API: Sorting and paginating results
The [Document Service API](/cms/api/document-service) offers the ability to sort and paginate query results.
## Sort
To sort results returned by the Document Service API, include the `sort` parameter with queries.
### Sort on a single field
To sort results based on a single field:
### Sort on multiple fields
To sort on multiple fields, pass them all in an array:
## Pagination
To paginate results, pass the `limit` and `start` parameters:
# Using Draft & Publish with the Document Service API
Source: //cms/api/document-service/status
# Document Service API: Usage with Draft & Publish
By default the [Document Service API](/cms/api/document-service) returns the draft version of a document when the [Draft & Publish](/cms/features/draft-and-publish) feature is enabled. This page describes how to use the `status` parameter to:
- return the published version of a document,
- count documents depending on their status,
- and directly publish a document while creating it or updating it.
:::note
Passing `{ status: 'draft' }` to a Document Service API query returns the same results as not passing any `status` parameter.
:::
## Get the published version with `findOne()` {#find-one}
`findOne()` queries return the draft version of a document by default.
To return the published version while [finding a specific document](/cms/api/document-service#findone) with the Document Service API, pass `status: 'published'`:
## Get the published version with `findFirst()` {#find-first}
`findFirst()` queries return the draft version of a document by default.
To return the published version while [finding the first document](/cms/api/document-service#findfirst) with the Document Service API, pass `status: 'published'`:
## Get the published version with `findMany()` {#find-many}
`findMany()` queries return the draft version of documents by default.
To return the published version while [finding documents](/cms/api/document-service#findmany) with the Document Service API, pass `status: 'published'`:
## `count()` only draft or published versions {#count}
To take into account only draft or published versions of documents while [counting documents](/cms/api/document-service#count) with the Document Service API, pass the corresponding `status` parameter:
```js
// Count draft documents (also actually includes published documents)
const draftsCount = await strapi.documents("api::restaurant.restaurant").count({
status: 'draft'
});
```
```js
// Count only published documents
const publishedCount = await strapi.documents("api::restaurant.restaurant").count({
status: 'published'
});
```
:::note
Since published documents necessarily also have a draft counterpart, a published document is still counted as having a draft version.
This means that counting with the `status: 'draft'` parameter still returns the total number of documents matching other parameters, even if some documents have already been published and are not displayed as "draft" or "modified" in the Content Manager anymore. There currently is no way to prevent already published documents from being counted.
:::
## Create a draft and publish it {#create}
To automatically publish a document while creating it, add `status: 'published'` to parameters passed to `create()`:
## Update a draft and publish it {#update}
To automatically publish a document while updating it, add `status: 'published'` to parameters passed to `update()`:
# GraphQL API
Source: //cms/api/graphql
# GraphQL API
The GraphQL API allows performing queries and mutations to interact with the [content-types](/cms/backend-customization/models#content-types) through Strapi's [GraphQL plugin](/cms/plugins/graphql). Results can be [filtered](#filters), [sorted](#sorting) and [paginated](#pagination).
:::prerequisites
To use the GraphQL API, install the [GraphQL](/cms/plugins/graphql) plugin:
:::
Once installed, the GraphQL playground is accessible at the `/graphql` URL and can be used to interactively build your queries and mutations and read documentation tailored to your content-types:
#### Fetch relations
You can ask to include relation data in your flat queries or in your
:::
### Fetch media fields
Media fields content is fetched just like other attributes.
The following example fetches the `url` attribute value for each `cover` media field attached to each document from the "Restaurants" content-type:
```graphql
{
restaurants {
images {
documentId
url
}
}
}
```
For multiple media fields, you can use flat queries or
### Fetch components
Components content is fetched just like other attributes.
The following example fetches the `label`, `start_date`, and `end_date` attributes values for each `closingPeriod` component added to each document from the "Restaurants" content-type:
```graphql
{
restaurants {
closingPeriod {
label
start_date
end_date
}
}
}
```
### Fetch dynamic zone data
Dynamic zones are union types in GraphQL so you need to use
### Fetch a document in a specific locale {#locale-fetch}
To fetch a documents
### Create a new localized document {#locale-create}
The `locale` field can be passed to create a localized document for a specific locale (for more information about mutations with GraphQL, see [the GraphQL API documentation](/cms/api/graphql#create-a-new-document)).
```graphql title="Example: Create a new restaurant for the French locale"
mutation CreateRestaurant($data: RestaurantInput!, $locale: I18NLocaleCode) {
createRestaurant(
data: {
name: "Brasserie Bonjour",
description: "Description in French goes here"
},
locale: "fr"
) {
documentId
name
description
locale
}
```
### Update a document for a specific locale {#locale-update}
A `locale` argument can be passed in the mutation to update a document for a given locale (for more information about mutations with GraphQL, see [the GraphQL API documentation](/cms/api/graphql#update-an-existing-document)).
```graphql title="Example: Update the description field of restaurant for the French locale"
mutation UpdateRestaurant($documentId: ID!, $data: RestaurantInput!, $locale: I18NLocaleCode) {
updateRestaurant(
documentId: "a1b2c3d4e5d6f7g8h9i0jkl"
data: {
description: "New description in French"
},
locale: "fr"
) {
documentId
name
description
locale
}
```
### Delete a locale for a document {#locale-delete}
Pass the `locale` argument in the mutation to delete a specific localization for a document :
```graphql
mutation DeleteRestaurant($documentId: ID!, $locale: I18NLocaleCode) {
deleteRestaurant(documentId: "xzmzdo4k0z73t9i68a7yx2kk", locale: "fr") {
documentId
}
}
```
# REST API reference
Source: //cms/api/rest
# REST API reference
The REST API allows accessing the [content-types](/cms/backend-customization/models) through API endpoints. Strapi automatically creates [API endpoints](#endpoints) when a content-type is created. [API parameters](/cms/api/rest/parameters) can be used when querying API endpoints to refine the results.
This section of the documentation is for the REST API reference. We also have [guides](/cms/api/rest/guides/intro) available for specific use cases.
:::prerequisites
All content types are private by default and need to be either made public or queries need to be authenticated with the proper permissions. See the [Quick Start Guide](/cms/quick-start#step-4-set-roles--permissions), the user guide for the [Users & Permissions feature](/cms/features/users-permissions#roles), and [API tokens configuration documentation](/cms/features/api-tokens) for more details.
:::
:::note
By default, the REST API responses only include top-level fields and does not populate any relations, media fields, components, or dynamic zones. Use the [`populate` parameter](/cms/api/rest/populate-select) to populate specific fields. Ensure that the find permission is given to the field(s) for the relation(s) you populate.
:::
:::strapi Strapi Client
The [Strapi Client](/cms/api/client) library simplifies interactions with your Strapi back end, providing a way to fetch, create, update, and delete content.
:::
## Endpoints
For each Content-Type, the following endpoints are automatically generated:
Plural API ID vs. Singular API ID:
In the following tables:
- `:singularApiId` refers to the value of the "API ID (Singular)" field of the content-type,
- and `:pluralApiId` refers to the value of the "API ID (Plural)" field of the content-type.
These values are defined when creating a content-type in the Content-Type Builder, and can be found while editing a content-type in the admin panel (see [User Guide](/cms/features/content-type-builder#creating-content-types)). For instance, by default, for an "Article" content-type:
- `:singularApiId` will be `article`
- `:pluralApiId` will be `articles`
Real-world examples of endpoints:
The following endpoint examples are taken from the
:::strapi Upload API
The Upload package (which powers the [Media Library feature](/cms/features/media-library)) has a specific API accessible through its [`/api/upload` endpoints](/cms/api/rest/upload).
:::
:::note
[Components](/cms/backend-customization/models#components-json) don't have API endpoints.
:::
## Requests
:::strapi Strapi 5 vs. Strapi v4
Strapi 5's Content API includes 2 major differences with Strapi v4:
- The response format has been flattened, which means attributes are no longer nested in a `data.attributes` object and are directly accessible at the first level of the `data` object (e.g., a content-type's "title" attribute is accessed with `data.title`).
- Strapi 5 now uses **documents**
### Get a document {#get}
Returns a document by `documentId`.
:::strapi Strapi 5 vs. Strapi v4
In Strapi 5, a specific document is reached by its `documentId`.
:::
### Create a document {#create}
Creates a document and returns its value.
If the [Internationalization (i18n) plugin](/cms/features/internationalization) is installed, it's possible to use POST requests to the REST API to [create localized documents](/cms/api/rest/locale#rest-delete).
:::note
While creating a document, you can define its relations and their order (see [Managing relations through the REST API](/cms/api/rest/relations.md) for more details).
:::
### Update a document {#update}
Partially updates a document by `id` and returns its value.
Send a `null` value to clear fields.
:::note NOTES
* Even with the [Internationalization (i18n) plugin](/cms/features/internationalization) installed, it's currently not possible to [update the locale of a document](/cms/api/rest/locale#rest-update).
* While updating a document, you can define its relations and their order (see [Managing relations through the REST API](/cms/api/rest/relations) for more details).
:::
### Delete a document {#delete}
Deletes a document.
`DELETE` requests only send a 204 HTTP status code on success and do not return any data in the response body.
# Filters
Source: //cms/api/rest/filters
# REST API: Filters
The [REST API](/cms/api/rest) offers the ability to filter results found with its ["Get entries"](/cms/api/rest#get-all) method.
Using optional Strapi features can provide some more filters:
- If the [Internationalization (i18n) plugin](/cms/features/internationalization) is enabled on a content-type, it's possible to filter by locale.
- If the [Draft & Publish](/cms/features/draft-and-publish) is enabled, it's possible to filter based on a `published` (default) or `draft` status.
:::tip
JavaScript query (built with the qs library):
## Example: Find multiple restaurants with ids 3, 6,8
You can use the `$in` filter operator with an array of values to find multiple exact values.
JavaScript query (built with the qs library):
## Complex filtering
Complex filtering is combining multiple filters using advanced methods such as combining `$and` & `$or`. This allows for more flexibility to request exactly the data needed.
JavaScript query (built with the qs library):
## Deep filtering
Deep filtering is filtering on a relation's fields.
:::note
- Relations, media fields, components, and dynamic zones are not populated by default. Use the `populate` parameter to populate these content structures (see [`populate` documentation](/cms/api/rest/populate-select#population))
- You can filter what you populate, you can also filter nested relations, but you can't use filters for polymorphic content structures (such as media fields and dynamic zones).
:::
:::caution
Querying your API with deep filters may cause performance issues. If one of your deep filtering queries is too slow, we recommend building a custom route with an optimized version of the query.
:::
JavaScript query (built with the qs library):
# REST API Guides
Source: //cms/api/rest/guides/intro
# REST API Guides
The [REST API reference](/cms/api/rest) documentation is meant to provide a quick reference for all the endpoints and parameters available.
## Guides
The following guides, officially maintained by the Strapi Documentation team, cover dedicated topics and provide detailed explanations (guides indicated with 🧠) or step-by-step instructions (guides indicated with 🛠️) for some use cases:
## Additional resources
:::strapi Want to help other users?
Some of the additional resources listed in this section have been created for Strapi v4 and might not fully work with Strapi 5. If you want to update one of the following articles for Strapi 5, feel free to for the Write for the Community program.
:::
Additional tutorials and guides can be found in the following blog posts:
# Interactive Query Builder
Source: //cms/api/rest/interactive-query-builder
# Build your query URL with Strapi's interactive tool
A wide range of parameters can be used and combined to query your content with the [REST API](/cms/api/rest), which can result in long and complex query URLs.
Strapi's codebase uses to parse and stringify nested JavaScript objects. It's recommended to use `qs` directly to generate complex query URLs instead of creating them manually.
You can use the following interactive query builder tool to generate query URLs automatically:
1. Replace the values in the _Endpoint_ and _Endpoint Query Parameters_ fields with content that fits your needs.
2. Click the **Copy to clipboard** button to copy the automatically generated _Query String URL_ which is updated as you type.
:::info Parameters usage
Please refer to the [REST API parameters table](/cms/api/rest/parameters) and read the corresponding parameters documentation pages to better understand parameters usage.
:::
:::note
The default endpoint path is prefixed with `/api/` and should be kept as-is unless you configured a different API prefix using [the `rest.prefix` API configuration option](/cms/configurations/api). For instance, to query the `books` collection type using the default API prefix, type `/api/books` in the _Endpoint_ field.
:::
:::caution Disclaimer
The `qs` library and the interactive query builder provided on this page:
- might not detect all syntax errors,
- are not aware of the parameters and values available in a Strapi project,
- and do not provide autocomplete features.
Currently, these tools are only provided to transform the JavaScript object in an inline query string URL. Using the generated query URL does not guarantee that proper results will get returned with your API.
:::
# Locale
Source: //cms/api/rest/locale
# REST API: `locale`
The [Internationalization (i18n) feature](/cms/features/internationalization) adds new abilities to the [REST API](/cms/api/rest).
:::prerequisites
To work with API content for a locale, please ensure the locale has been already [added to Strapi in the admin panel](/cms/features/internationalization#settings).
:::
The `locale` [API parameter](/cms/api/rest/parameters) can be used to work with documents only for a specified locale. `locale` takes a locale code as a value (see
### `GET` Get all documents in a specific locale {#rest-get-all}
### `GET` Get a document in a specific locale {#rest-get}
To get a specific document in a given locale, add the `locale` parameter to the query:
| Use case | Syntax format and link for more information |
| -------------------- | ---------------------------------------------------------------------------------------------- |
| In a collection type | [`GET /api/content-type-plural-name/document-id?locale=locale-code`](#get-one-collection-type) |
| In a single type | [`GET /api/content-type-singular-name?locale=locale-code`](#get-one-single-type) |
#### Collection types {#get-one-collection-type}
To get a specific document in a collection type in a given locale, add the `locale` parameter to the query, after the `documentId`:
#### Single types {#get-one-single-type}
To get a specific single type document in a given locale, add the `locale` parameter to the query, after the single type name:
### `POST` Create a new localized document for a collection type {#rest-create}
To create a localized document from scratch, send a POST request to the Content API. Depending on whether you want to create it for the default locale or for another locale, you might need to pass the `locale` parameter in the request's body
| Use case | Syntax format and link for more information |
| ----------------------------- | --------------------------------------------------------------------------------------- |
| Create for the default locale | [`POST /api/content-type-plural-name`](#rest-create-default-locale) |
| Create for a specific locale | [`POST /api/content-type-plural-name`](#rest-create-specific-locale) + pass locale in request body |
#### For the default locale {#rest-create-default-locale}
If no locale has been passed in the request body, the document is created using the default locale for the application:
#### For a specific locale {#rest-create-specific-locale}
To create a localized entry for a locale different from the default one, add the `locale` attribute to the body of the POST request:
### `PUT` Create a new, or update an existing, locale version for an existing document {#rest-update}
With `PUT` requests sent to an existing document, you can:
- create another locale version of the document,
- or update an existing locale version of the document.
Send the `PUT` request to the appropriate URL, adding the `locale=your-locale-code` parameter to the query URL and passing attributes in a `data` object in the request's body:
| Use case | Syntax format and link for more information |
| -------------------- | --------------------------------------------------------------------------------------- |
| In a collection type | [`PUT /api/content-type-plural-name/document-id?locale=locale-code`](#rest-put-collection-type) |
| In a single type | [`PUT /api/content-type-singular-name?locale=locale-code`](#rest-put-single-type) |
:::caution
When creating a localization for existing localized entries, the body of the request can only accept localized fields.
:::
:::tip
The Content-Type should have the [`createLocalization` permission](/cms/features/rbac#collection-and-single-types) enabled, otherwise the request will return a `403: Forbidden` status.
:::
:::note
It is not possible to change the locale of an existing localized entry. When updating a localized entry, if you set a `locale` attribute in the request body it will be ignored.
:::
#### In a collection type {#rest-put-collection-type}
To create a new locale for an existing document in a collection type, add the `locale` parameter to the query, after the `documentId`, and pass data to the request's body:
#### In a single type {#rest-put-single-type}
To create a new locale for an existing single type document, add the `locale` parameter to the query, after the single type name, and pass data to the request's body:
### `DELETE` Delete a locale version of a document {#rest-delete}
To delete a locale version of a document, send a `DELETE` request with the appropriate `locale` parameter.
`DELETE` requests only send a 204 HTTP status code on success and do not return any data in the response body.
#### In a collection type {#rest-delete-collection-type}
To delete only a specific locale version of a document in a collection type, add the `locale` parameter to the query after the `documentId`:
#### In a single type {#rest-delete-single-type}
To delete only a specific locale version of a single type document, add the `locale` parameter to the query after the single type name:
# Parameters
Source: //cms/api/rest/parameters
# REST API parameters
API parameters can be used with the [REST API](/cms/api/rest) to filter, sort, and paginate results and to select fields and relations to populate. Additionally, specific parameters related to optional Strapi features can be used, like the publication state and locale of a content-type.
The following API parameters are available:
| Operator | Type | Description |
| ------------------ | ------------- | ----------------------------------------------------- |
| `filters` | Object | [Filter the response](/cms/api/rest/filters) |
| `locale` | String | [Select a locale](/cms/api/rest/locale) |
| `status` | String | [Select the Draft & Publish status](/cms/api/rest/status) |
| `populate` | String or Object | [Populate relations, components, or dynamic zones](/cms/api/rest/populate-select#population) |
| `fields` | Array | [Select only specific fields to display](/cms/api/rest/populate-select#field-selection) |
| `sort` | String or Array | [Sort the response](/cms/api/rest/sort-pagination.md#sorting) |
| `pagination` | Object | [Page through entries](/cms/api/rest/sort-pagination.md#pagination) |
Query parameters use the (i.e. they are encoded using square brackets `[]`).
:::tip
A wide range of REST API parameters can be used and combined to query your content, which can result in long and complex query URLs. 👉 You can use Strapi's [interactive query builder](/cms/api/rest/interactive-query-builder) tool to build query URLs more conveniently. 🤗
:::
# Populate and Select
Source: //cms/api/rest/populate-select
# REST API: Population & Field Selection
The [REST API](/cms/api/rest) by default does not populate any relations, media fields, components, or dynamic zones. Use the [`populate` parameter](#population) to populate specific fields and the [`select` parameter](#field-selection) to return only specific fields with the query results.
:::tip
## Population
The REST API by default does not populate any type of fields, so it will not populate relations, media fields, components, or dynamic zones unless you pass a `populate` parameter to populate various field types.
The `populate` parameter can be used alone or [in combination with with multiple operators](#combining-population-with-other-operators) to have much more control over the population.
:::caution
The `find` permission must be enabled for the content-types that are being populated. If a role doesn't have access to a content-type it will not be populated (see [User Guide](/cms/features/users-permissions#editing-a-role) for additional information on how to enable `find` permissions for content-types).
:::
:::note
It's currently not possible to return just an array of ids with a request.
:::
:::strapi Populating guides
The [REST API guides](/cms/api/rest/guides/intro) section includes more detailed information about various possible use cases for the populate parameter:
- The [Understanding populate](/cms/api/rest/guides/understanding-populate) guide explains in details how populate works, with diagrams, comparisons, and real-world examples.
- The [How to populate creator fields](/cms/api/rest/guides/populate-creator-fields) guide provides step-by-step instructions on how to add `createdBy` and `updatedBy` fields to your queries responses.
:::
The following table sums up possible populate use cases and their associated parameter syntaxes, and links to sections of the Understanding populate guide which includes more detailed explanations:
| Use case | Example parameter syntax | Detailed explanations to read |
|-----------| ---------------|-----------------------|
| Populate everything, 1 level deep, including media fields, relations, components, and dynamic zones | `populate=*`| [Populate all relations and fields, 1 level deep](/cms/api/rest/guides/understanding-populate#populate-all-relations-and-fields-1-level-deep) |
| Populate one relation, 1 level deep | `populate=a-relation-name`| [Populate 1 level deep for specific relations](/cms/api/rest/guides/understanding-populate#populate-1-level-deep-for-specific-relations) |
| Populate several relations, 1 level deep | `populate[0]=relation-name&populate[1]=another-relation-name&populate[2]=yet-another-relation-name`| [Populate 1 level deep for specific relations](/cms/api/rest/guides/understanding-populate#populate-1-level-deep-for-specific-relations) |
| Populate some relations, several levels deep | `populate[root-relation-name][populate][0]=nested-relation-name`| [Populate several levels deep for specific relations](/cms/api/rest/guides/understanding-populate#populate-several-levels-deep-for-specific-relations) |
| Populate a component | `populate[0]=component-name`| [Populate components](/cms/api/rest/guides/understanding-populate#populate-components) |
| Populate a component and one of its nested components | `populate[0]=component-name&populate[1]=component-name.nested-component-name`| [Populate components](/cms/api/rest/guides/understanding-populate#populate-components) |
| Populate a dynamic zone (only its first-level elements) | `populate[0]=dynamic-zone-name`| [Populate dynamic zones](/cms/api/rest/guides/understanding-populate#populate-dynamic-zones) |
| Populate a dynamic zone and its nested elements and relations, using a precisely defined, detailed population strategy | `populate[dynamic-zone-name][on][component-category.component-name][populate][relation-name][populate][0]=field-name`| [Populate dynamic zones](/cms/api/rest/guides/understanding-populate#populate-dynamic-zones) |
:::tip
The easiest way to build complex queries with multiple-level population is to use our [interactive query builder](/cms/api/rest/interactive-query-builder) tool.
:::
### Combining Population with other operators
By utilizing the `populate` operator it is possible to combine other operators such as [field selection](/cms/api/rest/populate-select#field-selection), [filters](/cms/api/rest/filters), and [sort](/cms/api/rest/sort-pagination) in the population queries.
:::caution
The population and pagination operators cannot be combined.
:::
#### Populate with field selection
`fields` and `populate` can be combined.
#### Populate with filtering
`filters` and `populate` can be combined.
# Relations
Source: //cms/api/rest/relations
# Managing relations with API requests
Defining relations between content-types (that are designated as entities in the database layers) is connecting entities with each other.
Relations between content-types can be managed through the [admin panel](/cms/features/content-manager#relational-fields) or through [REST API](/cms/api/rest) or [Document Service API](/cms/api/document-service) requests.
Relations can be connected, disconnected or set through the Content API by passing parameters in the body of the request:
| Parameter name | Description | Type of update |
|-------------------------|-------------|----------------|
| [`connect`](#connect) | Connects new entities.
Can be used in combination with `disconnect`.
Can be used with [positional arguments](#relations-reordering) to define an order for relations. | Partial |
| [`disconnect`](#disconnect) | Disconnects entities.
Can be used in combination with `connect`. | Partial |
| [`set`](#set) | Set entities to a specific set. Using `set` will overwrite all existing connections to other entities.
Cannot be used in combination with `connect` or `disconnect`. | Full |
:::note
When [Internationalization (i18n)](/cms/features/internationalization) is enabled on the content-type, you can also pass a locale to set relations for a specific locale, as in this Document Service API example:
```js
await strapi.documents('api::restaurant.restaurant').update({
documentId: 'a1b2c3d4e5f6g7h8i9j0klm',
locale: 'fr',
data: {
category: {
connect: ['z0y2x4w6v8u1t3s5r7q9onm', 'j9k8l7m6n5o4p3q2r1s0tuv']
}
}
})
```
If no locale is passed, the default locale will be assumed.
:::
## `connect`
Using `connect` in the body of a request performs a partial update, connecting the specified relations.
`connect` accepts either a shorthand or a longhand syntax:
| Syntax type | Syntax example |
| ------------|----------------|
| shorthand | `connect: ['z0y2x4w6v8u1t3s5r7q9onm', 'j9k8l7m6n5o4p3q2r1s0tuv']` |
| longhand | ```connect: [{ documentId: 'z0y2x4w6v8u1t3s5r7q9onm' }, { documentId: 'j9k8l7m6n5o4p3q2r1s0tuv' }]``` |
You can also use the longhand syntax to [reorder relations](#relations-reordering).
`connect` can be used in combination with [`disconnect`](#disconnect).
:::caution
`connect` can not be used for media attributes
:::
### Relations reordering
Omitting the `position` argument (as in `documentId: 'srkvrr77k96o44d9v6ef1vu9'`) defaults to `position: { end: true }`. All other relations are positioned relative to another existing `id` (using `after` or `before`) or relative to the list of relations (using `start` or `end`). Operations are treated sequentially in the order defined in the `connect` array, so the resulting database record will be the following:
```js
categories: [
{ id: 'nyk7047azdgbtjqhl7btuxw' },
{ id: 'j9k8l7m6n5o4p3q2r1s0tuv' },
{ id: '6u86wkc6x3parjd4emikhmx6' },
{ id: '3r1wkvyjwv0b9b36s7hzpxl7' },
{ id: 'a1b2c3d4e5f6g7h8i9j0klm' },
{ id: 'rkyqa499i84197l29sbmwzl' },
{ id: 'srkvrr77k96o44d9v6ef1vu9' }
]
```
### Edge cases: Draft & Publish or i18n disabled
When some built-in features of Strapi 5 are disabled for a content-type, such as [Draft & Publish](/cms/features/draft-and-publish) and [Internationalization (i18)](/cms/features/internationalization), the `connect` parameter might be used differently:
**Relation from a `Category` with i18n _off_ to an `Article` with i18n _on_:**
In this situation you can select which locale you are connecting to:
```js
data: {
categories: {
connect: [
{ documentId: 'z0y2x4w6v8u1t3s5r7q9onm', locale: 'en' },
// Connect to the same document id but with a different locale 👇
{ documentId: 'z0y2x4w6v8u1t3s5r7q9onm', locale: 'fr' },
]
}
}
```
**Relation from a `Category` with Draft & Publish _off_ to an `Article` with Draft & Publish _on_:**
```js
data: {
categories: {
connect: [
{ documentId: 'z0y2x4w6v8u1t3s5r7q9onm', status: 'draft' },
// Connect to the same document id but with different publication states 👇
{ documentId: 'z0y2x4w6v8u1t3s5r7q9onm', status: 'published' },
]
}
}
```
## `disconnect`
Using `disconnect` in the body of a request performs a partial update, disconnecting the specified relations.
`disconnect` accepts either a shorthand or a longhand syntax:
| Syntax type | Syntax example |
| ------------|----------------|
| shorthand | `disconnect: ['z0y2x4w6v8u1t3s5r7q9onm', 'j9k8l7m6n5o4p3q2r1s0tuv']`
| longhand | ```disconnect: [{ documentId: 'z0y2x4w6v8u1t3s5r7q9onm' }, { documentId: 'j9k8l7m6n5o4p3q2r1s0tuv' }]``` |
`disconnect` can be used in combination with [`connect`](#connect).
## `set`
Using `set` performs a full update, replacing all existing relations with the ones specified, in the order specified.
`set` accepts a shorthand or a longhand syntax:
| Syntax type | Syntax example |
| ----------- | ------------------------------- |
| shorthand | `set: ['z0y2x4w6v8u1t3s5r7q9onm', 'j9k8l7m6n5o4p3q2r1s0tuv']` |
| longhand | ```set: [{ documentId: 'z0y2x4w6v8u1t3s5r7q9onm' }, { documentId: 'j9k8l7m6n5o4p3q2r1s0tuv' }]``` |
As `set` replaces all existing relations, it should not be used in combination with other parameters. To perform a partial update, use [`connect`](#connect) and [`disconnect`](#disconnect).
:::note Omitting set
Omitting any parameter is equivalent to using `set`. For instance, the following 3 syntaxes are all equivalent:
- `data: { categories: set: [{ documentId: 'z0y2x4w6v8u1t3s5r7q9onm' }, { documentId: 'j9k8l7m6n5o4p3q2r1s0tuv' }] }}`
- `data: { categories: set: ['z0y2x4w6v8u1t3s5r7q9onm2', 'j9k8l7m6n5o4p3q2r1s0tuv'] }}`
- `data: { categories: ['z0y2x4w6v8u1t3s5r7q9onm2', 'j9k8l7m6n5o4p3q2r1s0tuv'] }`
:::
# Sort and Pagination
Source: //cms/api/rest/sort-pagination
# REST API: Sort & Pagination
Entries that are returned by queries to the [REST API](/cms/api/rest) can be sorted and paginated.
:::tip
JavaScript query (built with the qs library):
### Example: Sort using 2 fields and set the order
Using the `sort` parameter and defining `:asc` or `:desc` on sorted fields, you can get results sorted in a particular order.
JavaScript query (built with the qs library):
## Pagination
Queries can accept `pagination` parameters. Results can be paginated:
- either by [page](#pagination-by-page) (i.e., specifying a page number and the number of entries per page)
- or by [offset](#pagination-by-offset) (i.e., specifying how many entries to skip and to return)
:::note
Pagination methods can not be mixed. Always use either `page` with `pageSize` **or** `start` with `limit`.
:::
### Pagination by page
To paginate results by page, use the following parameters:
| Parameter | Type | Description | Default |
| ----------------------- | ------- | ------------------------------------------------------------------------- | ------- |
| `pagination[page]` | Integer | Page number | 1 |
| `pagination[pageSize]` | Integer | Page size | 25 |
| `pagination[withCount]` | Boolean | Adds the total numbers of entries and the number of pages to the response | True |
JavaScript query (built with the qs library):
### Pagination by offset
To paginate results by offset, use the following parameters:
| Parameter | Type | Description | Default |
| ----------------------- | ------- | -------------------------------------------------------------- | ------- |
| `pagination[start]` | Integer | Start value (i.e. first entry to return) | 0 |
| `pagination[limit]` | Integer | Number of entries to return | 25 |
| `pagination[withCount]` | Boolean | Toggles displaying the total number of entries to the response | `true` |
:::tip
The default and maximum values for `pagination[limit]` can be [configured in the `./config/api.js`](/cms/configurations/api) file with the `api.rest.defaultLimit` and `api.rest.maxLimit` keys.
:::
JavaScript query (built with the qs library):
# Status
Source: //cms/api/rest/status
# REST API: `status`
The [REST API](/cms/api/rest) offers the ability to filter results based on their status, draft or published.
:::prerequisites
The [Draft & Publish](/cms/features/draft-and-publish) feature should be enabled.
:::
Queries can accept a `status` parameter to fetch documents based on their status:
- `published`: returns only the published version of documents (default)
- `draft`: returns only the draft version of documents
:::tip
In the response data, the `publishedAt` field is `null` for drafts.
:::
:::note
Since published versions are returned by default, passing no status parameter is equivalent to passing `status=published`.
:::
JavaScript query (built with the qs library):
# Upload files
Source: //cms/api/rest/upload
# REST API: Upload files
The [Media Library feature](/cms/features/media-library) is powered in the back-end server of Strapi by the `upload` package. To upload files to Strapi, you can either use the Media Library directly from the admin panel, or use the [REST API](/cms/api/rest), with the following available endpoints :
| Method | Path | Description |
| :----- | :---------------------- | :------------------ |
| GET | `/api/upload/files` | Get a list of files |
| GET | `/api/upload/files/:id` | Get a specific file |
| POST | `/api/upload` | Upload files |
| POST | `/api/upload?id=x` | Update fileInfo |
| DELETE | `/api/upload/files/:id` | Delete a file |
:::note Notes
- [Folders](/cms/features/media-library#organizing-assets-with-folders) are an admin panel-only feature and are not part of the Content API (REST or GraphQL). Files uploaded through REST are located in the automatically created "API Uploads" folder.
- The GraphQL API does not support uploading media files. To upload files, use the REST API or directly add files from the [Media Library](/cms/features/media-library) in the admin panel. Some GraphQL mutations to update or delete uploaded media files are still possible (see [GraphQL API documentation](/cms/api/graphql#mutations-on-media-files) for details).
:::
## Upload files
Upload one or more files to your application.
`files` is the only accepted parameter, and describes the file(s) to upload. The value(s) can be a Buffer or Stream:
:::caution
You have to send FormData in your request body.
:::
## Upload entry files
Upload one or more files that will be linked to a specific entry.
The following parameters are accepted:
| Parameter | Description |
| --------- | ----------- |
|`files` | The file(s) to upload. The value(s) can be a Buffer or Stream. |
|`path` (optional) | The folder where the file(s) will be uploaded to (only supported on strapi-provider-upload-aws-s3). |
| `refId` | The ID of the entry which the file(s) will be linked to. |
| `ref` | The unique ID (uid) of the model which the file(s) will be linked to (see more below). |
| `source` (optional) | The name of the plugin where the model is located. |
| `field` | The field of the entry which the file(s) will be precisely linked to. |
For example, given the `Restaurant` model attributes:
```json title="/src/api/restaurant/content-types/restaurant/schema.json"
{
// ...
"attributes": {
"name": {
"type": "string"
},
"cover": {
"type": "media",
"multiple": false,
}
}
// ...
}
```
The following is an example of a corresponding front-end code:
```html
```
:::caution
You have to send FormData in your request body.
:::
## Update fileInfo
Update a file in your application.
`fileInfo` is the only accepted parameter, and describes the fileInfo to update:
```js
const fileId = 50;
const newFileData = {
alternativeText: 'My new alternative text for this image!',
};
const form = new FormData();
form.append('fileInfo', JSON.stringify(newFileData));
const response = await fetch(`http://localhost:1337/api/upload?id=${fileId}`, {
method: 'post',
body: form,
});
```
## Models definition
Adding a file attribute to a [model](/cms/backend-customization/models) (or the model of another plugin) is like adding a new association.
The following example lets you upload and attach one file to the `avatar` attribute:
```json title="/src/api/restaurant/content-types/restaurant/schema.json"
{
// ...
{
"attributes": {
"pseudo": {
"type": "string",
"required": true
},
"email": {
"type": "email",
"required": true,
"unique": true
},
"avatar": {
"type": "media",
"multiple": false,
}
}
}
// ...
}
```
The following example lets you upload and attach multiple pictures to the `restaurant` content-type:
```json title="/src/api/restaurant/content-types/restaurant/schema.json"
{
// ...
{
"attributes": {
"name": {
"type": "string",
"required": true
},
"covers": {
"type": "media",
"multiple": true,
}
}
}
// ...
}
```
# Back-end customization
Source: //cms/backend-customization
:::strapi Disambiguation: Strapi back end
As a headless CMS, the Strapi software as a whole can be considered as the "back end" of your website or application.
But the Strapi software itself includes 2 different parts:
- The **back-end** part of Strapi is an HTTP server that Strapi runs. Like any HTTP server, the Strapi back end receives requests and send responses. Your content is stored in a database, and the Strapi back end interacts with the database to create, retrieve, update, and delete content.
- The **front-end** part of Strapi is called the admin panel. The admin panel presents a graphical user interface to help you structure and manage the content.
Throughout this developer documentation, 'back end' refers _exclusively_ to the back-end part of Strapi.
The [Getting Started > Admin panel page](/cms/features/admin-panel) gives an admin panel overview and the [admin panel customization section](/cms/admin-panel-customization) details the various customization options available for the admin panel.
:::
The Strapi back end runs an HTTP server based on , a back-end JavaScript framework.
Like any HTTP server, the Strapi back end receives requests and send responses. You can send requests to the Strapi back end to create, retrieve, update, or delete data through the [REST](/cms/api/rest) or [GraphQL](/cms/api/graphql) APIs.
A request can travel through the Strapi back end as follows:
1. The Strapi server receives a [request](/cms/backend-customization/requests-responses).
2. The request hits [global middlewares](/cms/backend-customization/middlewares) that are run in a sequential order.
3. The request hits a [route](/cms/backend-customization/routes). By default, Strapi generates route files for all the content-types that you create (see [REST API documentation](/cms/api/rest)), and more routes can be added and configured.
4. [Route policies](/cms/backend-customization/policies) act as a read-only validation step that can block access to a route. [Route middlewares](/cms/backend-customization/routes#middlewares) can control the request flow and mutate the request itself before moving forward.
5. [Controllers](/cms/backend-customization/controllers) execute code once a route has been reached. [Services](/cms/backend-customization/services) are optional, additional code that can be used to build custom logic reusable by controllers.
6. The code executed by the controllers and services interacts with the [models](/cms/backend-customization/models) that are a representation of the content content structure stored in the database. Interacting with the data represented by the models is handled by the [Document Service](/cms/api/document-service) and [Query Engine](/cms/api/query-engine).
7. You can implement [Document Service middlewares](/cms/api/document-service/middlewares) to control the data before it's sent to the Query Engine. The Query Engine can also use lifecycle hooks though we recommend you use Document Service middlewares unless you absolutely need to directly interact with the database.
7. The server returns a [response](/cms/backend-customization/requests-responses). The response can travel back through route middlewares and global middlewares before being sent.
Both global and route middlewares include an asynchronous callback function, `await next()`. Depending on what is returned by the middleware, the request will either go through a shorter or longer path through the back end:
* If a middleware returns nothing, the request will continue travelling through the various core elements of the back end (i.e., controllers, services, and the other layers that interact with the database).
* If a middleware returns before calling `await next()`, a response will be immediately sent, skipping the rest of the core elements. Then it will go back down the same chain it came up.
:::info
Please note that all customizations described in the pages of this section are only for the REST API. [GraphQL customizations](/cms/plugins/graphql#customization) are described in the GraphQL plugin documentation.
:::
## Interactive diagram
The following diagram represents how requests travel through the Strapi back end. You can click on any shape to jump to the relevant page in the documentation.
# Controllers
Source: //cms/backend-customization/controllers
# Controllers
Controllers are JavaScript files that contain a set of methods, called actions, reached by the client according to the requested [route](/cms/backend-customization/routes). Whenever a client requests the route, the action performs the business logic code and sends back the [response](/cms/backend-customization/requests-responses). Controllers represent the C in the model-view-controller (MVC) pattern.
In most cases, the controllers will contain the bulk of a project's business logic. But as a controller's logic becomes more and more complicated, it's a good practice to use [services](/cms/backend-customization/services) to organize the code into re-usable parts.
The diagram represents a simplified version of how a request travels through the Strapi back end, with controllers highlighted. The backend customization introduction page includes a complete, interactive diagram.
## Implementation
Controllers can be [generated or added manually](#adding-a-new-controller). Strapi provides a `createCoreController` factory function that automatically generates core controllers and allows building custom ones or [extend or replace the generated controllers](#extending-core-controllers).
### Adding a new controller
A new controller can be implemented:
- with the [interactive CLI command `strapi generate`](/cms/cli)
- or manually by creating a JavaScript file:
- in `./src/api/[api-name]/controllers/` for API controllers (this location matters as controllers are auto-loaded by Strapi from there)
- or in a folder like `./src/plugins/[plugin-name]/server/controllers/` for plugin controllers, though they can be created elsewhere as long as the plugin interface is properly exported in the `strapi-server.js` file (see [Server API for Plugins documentation](/cms/plugins-development/server-api))
Each controller action can be an `async` or `sync` function.
Every action receives a context object (`ctx`) as a parameter. `ctx` contains the [request context](/cms/backend-customization/requests-responses#ctxrequest) and the [response context](/cms/backend-customization/requests-responses#ctxresponse).
:::note
When a new [content-type](/cms/backend-customization/models#content-types) is created, Strapi builds a generic controller with placeholder code, ready to be customized.
:::
:::tip
To see a possible advanced usage for custom controllers, read the [services and controllers](/cms/backend-customization/examples/services-and-controllers) page of the backend customization examples cookbook.
:::
### Sanitization and Validation in controllers {#sanitization-and-validation-in-controllers}
:::warning
It's strongly recommended you sanitize (v4.8.0+) and/or validate (v4.13.0+) your incoming request query utilizing the new `sanitizeQuery` and `validateQuery` functions to prevent the leaking of private data.
:::
Sanitization means that the object is “cleaned” and returned.
Validation means an assertion is made that the data is already clean and throws an error if something is found that shouldn't be there.
In Strapi 5, both query parameters and input data (i.e., create and update body data) are validated. Any create and update data requests with the following invalid input will throw a `400 Bad Request` error:
- relations the user do not have permission to create
- unrecognized values that are not present on a schema
- non-writable fields and internal timestamps like `createdAt` and `createdBy` fields
- setting or updating an `id` field (except for connecting relations)
#### Sanitization when utilizing controller factories
Within the Strapi factories the following functions are exposed that can be used for sanitization and validation:
| Function Name | Parameters | Description |
|------------------|----------------------------|--------------------------------------------------------------------------------------|
| `sanitizeQuery` | `ctx` | Sanitizes the request query |
| `sanitizeOutput` | `entity`/`entities`, `ctx` | Sanitizes the output data where entity/entities should be an object or array of data |
| `sanitizeInput` | `data`, `ctx` | Sanitizes the input data |
| `validateQuery` | `ctx` | Validates the request query (throws an error on invalid params) |
| `validateInput` | `data`, `ctx` | (EXPERIMENTAL) Validates the input data (throws an error on invalid data) |
These functions automatically inherit the sanitization settings from the model and sanitize the data accordingly based on the content-type schema and any of the content API authentication strategies, such as the Users & Permissions plugin or API tokens.
:::warning
Because these methods use the model associated with the current controller, if you query data that is from another model (i.e., doing a find for "menus" within a "restaurant" controller method), you must instead use the `@strapi/utils` tools, such as `sanitize.contentAPI.query` described in [Sanitizing Custom Controllers](#sanitize-validate-custom-controllers), or else the result of your query will be sanitized against the wrong model.
:::
#### Sanitization and validation when building custom controllers {#sanitize-validate-custom-controllers}
Within custom controllers, there are 5 primary functions exposed via the `@strapi/utils` package that can be used for sanitization and validation:
| Function Name | Parameters | Description |
|------------------------------|--------------------|---------------------------------------------------------|
| `sanitize.contentAPI.input` | `data`, `schema`, `auth` | Sanitizes the request input including non-writable fields, removing restricted relations, and other nested "visitors" added by plugins |
| `sanitize.contentAPI.output` | `data`, `schema`, `auth` | Sanitizes the response output including restricted relations, private fields, passwords, and other nested "visitors" added by plugins |
| `sanitize.contentAPI.query` | `ctx.query`, `schema`, `auth` | Sanitizes the request query including filters, sort, fields, and populate |
| `validate.contentAPI.query` | `ctx.query`, `schema`, `auth` | Validates the request query including filters, sort, fields (currently not populate) |
| `validate.contentAPI.input` | `data`, `schema`, `auth` | (EXPERIMENTAL) Validates the request input including non-writable fields, removing restricted relations, and other nested "visitors" added by plugins |
:::note
Depending on the complexity of your custom controllers, you may need additional sanitization that Strapi cannot currently account for, especially when combining the data from multiple sources.
:::
### Extending core controllers {#extending-core-controllers}
Default controllers and actions are created for each content-type. These default controllers are used to return responses to API requests (e.g. when `GET /api/articles/3` is accessed, the `findOne` action of the default controller for the "Article" content-type is called). Default controllers can be customized to implement your own logic. The following code examples should help you get started.
:::tip
An action from a core controller can be replaced entirely by [creating a custom action](#adding-a-new-controller) and naming the action the same as the original action (e.g. `find`, `findOne`, `create`, `update`, or `delete`).
:::
:::tip
When extending a core controller, you do not need to re-implement any sanitization as it will already be handled by the core controller you are extending. Where possible it's strongly recommended to extend the core controller instead of creating a custom controller.
:::
Collection type examples
:::tip
The [backend customization examples cookbook](/cms/backend-customization/examples) shows how you can overwrite a default controller action, for instance for the [`create` action](/cms/backend-customization/examples/services-and-controllers#custom-controller).
:::
Single type examples
## Usage
Controllers are declared and attached to a route. Controllers are automatically called when the route is called, so controllers usually do not need to be called explicitly. However, [services](/cms/backend-customization/services) can call controllers, and in this case the following syntax should be used:
```js
// access an API controller
strapi.controller('api::api-name.controller-name');
// access a plugin controller
strapi.controller('plugin::plugin-name.controller-name');
```
:::tip
To list all the available controllers, run `yarn strapi controllers:list`.
:::
# Middlewares
Source: //cms/backend-customization/middlewares
# Middlewares customization
Globally scoped custom middlewares should be added to the [middlewares configuration file](/cms/configurations/middlewares#loading-order) or Strapi won't load them.
API level and plugin middlewares can be added into the specific router that they are relevant to like the following:
```js title="./src/api/[api-name]/routes/[collection-name].js or ./src/plugins/[plugin-name]/server/routes/index.js"
module.exports = {
routes: [
{
method: "GET",
path: "/[collection-name]",
handler: "[controller].find",
config: {
middlewares: ["[middleware-name]"],
// See the usage section below for middleware naming conventions
},
},
],
};
```
Example of a custom timer middleware
The GraphQL plugin also allows [implementing custom middlewares](/cms/plugins/graphql#middlewares), with a different syntax.
## Usage
Middlewares are called different ways depending on their scope:
- use `global::middleware-name` for application-level middlewares
- use `api::api-name.middleware-name` for API-level middlewares
- use `plugin::plugin-name.middleware-name` for plugin middlewares
:::tip
To list all the registered middlewares, run `yarn strapi middlewares:list`.
:::
### Restricting content access with an "is-owner policy"
It is often required that the author of an entry is the only user allowed to edit or delete the entry. In previous versions of Strapi, this was known as an "is-owner policy". With Strapi v4, the recommended way to achieve this behavior is to use a middleware.
Proper implementation largely depends on your project's needs and custom code, but the most basic implementation could be achieved with the following procedure:
1. From your project's folder, create a middleware with the Strapi CLI generator, by running the `yarn strapi generate` (or `npm run strapi generate`) command in the terminal.
2. Select `middleware` from the list, using keyboard arrows, and press Enter.
3. Give the middleware a name, for instance `isOwner`.
4. Choose `Add middleware to an existing API` from the list.
5. Select which API you want the middleware to apply.
6. Replace the code in the `/src/api/[your-api-name]/middlewares/isOwner.js` file with the following, replacing `api::restaurant.restaurant` in line 22 with the identifier corresponding to the API you choose at step 5 (e.g., `api::blog-post.blog-post` if your API name is `blog-post`):
```js showLineNumbers title="src/api/blog-post/middlewares/isOwner.js"
"use strict";
/**
* `isOwner` middleware
*/
module.exports = (config, { strapi }) => {
// Add your own logic here.
return async (ctx, next) => {
const user = ctx.state.user;
const entryId = ctx.params.id ? ctx.params.id : undefined;
let entry = {};
/**
* Gets all information about a given entry,
* populating every relations to ensure
* the response includes author-related information
*/
if (entryId) {
entry = await strapi.documents('api::restaurant.restaurant').findOne(
entryId,
{ populate: "*" }
);
}
/**
* Compares user id and entry author id
* to decide whether the request can be fulfilled
* by going forward in the Strapi backend server
*/
if (user.id !== entry.author.id) {
return ctx.unauthorized("This action is unauthorized.");
} else {
return next();
}
};
};
```
7. Ensure the middleware is configured to apply on some routes. In the `config` object found in the `src/api/[your-api–name]/routes/[your-content-type-name].js` file, define the methods (`create`, `read`, `update`, `delete`) for which you would like the middleware to apply, and declare the `isOwner` middleware for these routes.
For instance, if you wish to allow GET (i.e., `read` method) and POST (i.e., `create` method) requests to any user for the `restaurant` content-type in the `restaurant` API, but would like to restrict PUT (i.e., `update` method) and DELETE requests only to the user who created the entry, you could use the following code in the `src/api/restaurant/routes/restaurant.js` file:
```js title="src/api/restaurant/routes/restaurant.js"
/**
* restaurant router
*/
const { createCoreRouter } = require("@strapi/strapi").factories;
module.exports = createCoreRouter("api::restaurant.restaurant", {
config: {
update: {
middlewares: ["api::restaurant.is-owner"],
},
delete: {
middlewares: ["api::restaurant.is-owner"],
},
},
});
```
:::info
You can find more information about route middlewares in the [routes documentation](/cms/backend-customization/routes).
:::
# Models
Source: //cms/backend-customization/models
# Models
As Strapi is a headless Content Management System (CMS), creating a content structure for the content is one of the most important aspects of using the software. Models define a representation of the content structure.
There are 2 different types of models in Strapi:
- content-types, which can be collection types or single types, depending on how many entries they manage,
- and components that are content structures re-usable in multiple content-types.
If you are just starting out, it is convenient to generate some models with the [Content-type Builder](/cms/features/content-type-builder) directly in the admin panel. The user interface takes over a lot of validation tasks and showcases all the options available to create the content's content structure. The generated model mappings can then be reviewed at the code level using this documentation.
## Model creation
Content-types and components models are created and stored differently.
### Content-types
Content-types in Strapi can be created:
- with the [Content-type Builder in the admin panel](/cms/features/content-type-builder),
- or with [Strapi's interactive CLI `strapi generate`](/cms/cli#strapi-generate) command.
The content-types use the following files:
- `schema.json` for the model's [schema](#model-schema) definition. (generated automatically, when creating content-type with either method)
- `lifecycles.js` for [lifecycle hooks](#lifecycle-hooks). This file must be created manually.
These models files are stored in `./src/api/[api-name]/content-types/[content-type-name]/`, and any JavaScript or JSON file found in these folders will be loaded as a content-type's model (see [project structure](/cms/project-structure)).
:::note
In [TypeScript](/cms/typescript.md)-enabled projects, schema typings can be generated using the `ts:generate-types` command.
:::
### Components {#components-creation}
Component models can't be created with CLI tools. Use the [Content-type Builder](/cms/features/content-type-builder) or create them manually.
Components models are stored in the `./src/components` folder. Every component has to be inside a subfolder, named after the category the component belongs to (see [project structure](/cms/project-structure)).
## Model schema
The `schema.json` file of a model consists of:
- [settings](#model-settings), such as the kind of content-type the model represents or the table name in which the data should be stored,
- [information](#model-information), mostly used to display the model in the admin panel and access it through the REST and GraphQL APIs,
- [attributes](#model-attributes), which describe the content structure of the model,
- and [options](#model-options) used to defined specific behaviors on the model.
### Model settings
General settings for the model can be configured with the following parameters:
| Parameter | Type | Description |
| -------------------------------------------- | ------ | ---------------------------------------------------------------------------------------------------------------------- |
| `collectionName` | String | Database table name in which the data should be stored |
| `kind`
_Optional, only for content-types_ | String | Defines if the content-type is:
a collection type (`collectionType`)
or a single type (`singleType`)
|
```json
// ./src/api/[api-name]/content-types/restaurant/schema.json
{
"kind": "collectionType",
"collectionName": "Restaurants_v1",
}
```
### Model information
The `info` key in the model's schema describes information used to display the model in the admin panel and access it through the Content API. It includes the following parameters:
| Parameter | Type | Description |
| -------------- | ------ | ------------------------------------------------------------------------------------------------------------------------------------------- |
| `displayName` | String | Default name to use in the admin panel |
| `singularName` | String | Singular form of the content-type name. Used to generate the API routes and databases/tables collection.
Should be kebab-case. |
| `pluralName` | String | Plural form of the content-type name. Used to generate the API routes and databases/tables collection.
Should be kebab-case. |
| `description` | String | Description of the model |
```json title="./src/api/[api-name]/content-types/restaurant/schema.json"
"info": {
"displayName": "Restaurant",
"singularName": "restaurant",
"pluralName": "restaurants",
"description": ""
},
```
### Model attributes
The content structure of a model consists of a list of attributes. Each attribute has a `type` parameter, which describes its nature and defines the attribute as a simple piece of data or a more complex structure used by Strapi.
Many types of attributes are available:
- scalar types (e.g. strings, dates, numbers, booleans, etc.),
- Strapi-specific types, such as:
- `media` for files uploaded through the [Media library](/cms/features/content-type-builder#media)
- `relation` to describe a [relation](#relations) between content-types
- `customField` to describe [custom fields](#custom-fields) and their specific keys
- `component` to define a [component](#components-json) (i.e. a content structure usable in multiple content-types)
- `dynamiczone` to define a [dynamic zone](#dynamic-zones) (i.e. a flexible space based on a list of components)
- and the `locale` and `localizations` types, only used by the [Internationalization (i18n) plugin](/cms/features/internationalization)
The `type` parameter of an attribute should be one of the following values:
| Type categories | Available types |
|------|-------|
| String types |
`string`
`text`
`richtext`
`enumeration`
`email`
`password`
[`uid`](#uid-type)
|
| Date types |
`date`
`time`
`datetime`
`timestamp`
|
| Number types |
`integer`
`biginteger`
`float`
`decimal`
|
| Other generic types |
`boolean`
`json`
|
| Special types unique to Strapi |
`media`
[`relation`](#relations)
[`customField`](#custom-fields)
[`component`](#components-json)
[`dynamiczone`](#dynamic-zones)
|
| Internationalization (i18n)-related types
_Can only be used if the [i18n](/cms/features/internationalization) is enabled on the content-type_|
`locale`
`localizations`
|
#### Validations
Basic validations can be applied to attributes using the following parameters:
| Parameter | Type | Description | Default |
| -------------- | ------- | --------------------------------------------------------------------------------------------------------- | ------- |
| `required` | Boolean | If `true`, adds a required validator for this property | `false` |
| `max` | Integer | Checks if the value is greater than or equal to the given maximum | - |
| `min` | Integer | Checks if the value is less than or equal to the given minimum | - |
| `minLength` | Integer | Minimum number of characters for a field input value | - |
| `maxLength` | Integer | Maximum number of characters for a field input value | - |
| `private` | Boolean | If `true`, the attribute will be removed from the server response.
💡 This is useful to hide sensitive data. | `false` |
| `configurable` | Boolean | If `false`, the attribute isn't configurable from the Content-type Builder plugin. | `true` |
```json title="./src/api/[api-name]/content-types/restaurant/schema.json"
{
// ...
"attributes": {
"title": {
"type": "string",
"minLength": 3,
"maxLength": 99,
"unique": true
},
"description": {
"default": "My description",
"type": "text",
"required": true
},
"slug": {
"type": "uid",
"targetField": "title"
}
// ...
}
}
```
#### Database validations and settings
:::caution 🚧 This API is considered experimental.
These settings should be reserved to an advanced usage, as they might break some features. There are no plans to make these settings stable.
:::
Database validations and settings are custom options passed directly onto the `tableBuilder` Knex.js function during schema migrations. Database validations allow for an advanced degree of control for setting custom column settings. The following options are set in a `column: {}` object per attribute:
| Parameter | Type | Description | Default |
| ------------- | ------- | --------------------------------------------------------------------------------------------- | ------- |
| `name` | string | Changes the name of the column in the database | - |
| `defaultTo` | string | Sets the database `defaultTo`, typically used with `notNullable` | - |
| `notNullable` | boolean | Sets the database `notNullable`, ensures that columns cannot be null | `false` |
| `unsigned` | boolean | Only applies to number columns, removes the ability to go negative but doubles maximum length | `false` |
| `unique` | boolean | Enforces database level unique, caution when using with draft & publish feature | `false` |
| `type` | string | Changes the database type, if `type` has arguments, you should pass them in `args` | - |
| `args` | array | Arguments passed into the Knex.js function that changes things like `type` | `[]` |
```json title="./src/api/[api-name]/content-types/restaurant/schema.json"
{
// ...
"attributes": {
"title": {
"type": "string",
"minLength": 3,
"maxLength": 99,
"unique": true,
"column": {
"unique": true // enforce database unique also
}
},
"description": {
"default": "My description",
"type": "text",
"required": true,
"column": {
"defaultTo": "My description", // set database level default
"notNullable": true // enforce required at database level, even for drafts
}
},
"rating": {
"type": "decimal",
"default": 0,
"column": {
"defaultTo": 0,
"type": "decimal", // using the native decimal type but allowing for custom precision
"args": [
6,1 // using custom precision and scale
]
}
}
// ...
}
}
```
#### `uid` type
The `uid` type is used to automatically prefill the field value in the admin panel with a unique identifier (UID) (e.g. slugs for articles) based on 2 optional parameters:
- `targetField` (string): If used, the value of the field defined as a target is used to auto-generate the UID.
- `options` (string): If used, the UID is generated based on a set of options passed to
#### Custom fields
[Custom fields](/cms/features/custom-fields) extend Strapi’s capabilities by adding new types of fields to content-types. Custom fields are explicitly defined in the [attributes](#model-attributes) of a model with `type: customField`.
Custom fields' attributes also show the following specificities:
- a `customField` attribute whose value acts as a unique identifier to indicate which registered custom field should be used. Its value follows:
- either the `plugin::plugin-name.field-name` format if a plugin created the custom field
- or the `global::field-name` format for a custom field specific to the current Strapi application
- and additional parameters depending on what has been defined when registering the custom field (see [custom fields documentation](/cms/features/custom-fields)).
```json title="./src/api/[apiName]/[content-type-name]/content-types/schema.json"
{
// …
"attributes": {
"attributeName": { // attributeName would be replaced by the actual attribute name
"type": "customField",
"customField": "plugin::color-picker.color",
"options": {
"format": "hex"
}
}
}
// …
}
```
#### Components {#components-json}
Component fields create a relation between a content-type and a component structure. Components are explicitly defined in the [attributes](#model-attributes) of a model with `type: 'component'` and accept the following additional parameters:
| Parameter | Type | Description |
| ------------ | ------- | ---------------------------------------------------------------------------------------- |
| `repeatable` | Boolean | Could be `true` or `false` depending on whether the component is repeatable or not |
| `component` | String | Define the corresponding component, following this format: `.` |
```json title="./src/api/[apiName]/restaurant/content-types/schema.json"
{
"attributes": {
"openinghours": {
"type": "component",
"repeatable": true,
"component": "restaurant.openinghours"
}
}
}
```
#### Dynamic zones
Dynamic zones create a flexible space in which to compose content, based on a mixed list of [components](#components-json).
Dynamic zones are explicitly defined in the [attributes](#model-attributes) of a model with `type: 'dynamiczone'`. They also accept a `components` array, where each component should be named following this format: `.`.
```json title="./src/api/[api-name]/content-types/article/schema.json"
{
"attributes": {
"body": {
"type": "dynamiczone",
"components": ["article.slider", "article.content"]
}
}
}
```
### Model options
The `options` key is used to define specific behaviors and accepts the following parameter:
| Parameter | Type | Description |
|---------------------|------------------|--------------------------------------------------------------------------------------------------------------------------------------------------------------------------------------------------------------------------------------------------------------------------------------------------------------------|
| `privateAttributes` | Array of strings | Allows treating a set of attributes as private, even if they're not actually defined as attributes in the model. It could be used to remove them from API responses timestamps.
The `privateAttributes` defined in the model are merged with the `privateAttributes` defined in the global Strapi configuration. |
| `draftAndPublish` | Boolean | Enables the draft and publish feature.
Default value: `true` (`false` if the content-type is created from the interactive CLI). |
| `populateCreatorFields` | Boolean | Populates `createdBy` and `updatedBy` fields in responses returned by the REST API (see [guide](/cms/api/rest/guides/populate-creator-fields) for more details).
Default value: `false`. |
```json title="./src/api/[api-name]/content-types/restaurant/schema.json"
{
"options": {
"privateAttributes": ["id", "createdAt"],
"draftAndPublish": true
}
}
```
## Lifecycle hooks
Lifecycle hooks are functions that get triggered when Strapi queries are called. They are triggered automatically when managing content through the administration panel or when developing custom code using `queries`·
Lifecycle hooks can be customized declaratively or programmatically.
:::caution
Lifecycles hooks are not triggered when using directly the
Using the database layer API, it's also possible to register a subscriber and listen to events programmatically:
```js title="./src/index.js"
module.exports = {
async bootstrap({ strapi }) {
// registering a subscriber
strapi.db.lifecycles.subscribe({
models: [], // optional;
beforeCreate(event) {
const { data, where, select, populate } = event.params;
event.state = 'doStuffAfterWards';
},
afterCreate(event) {
if (event.state === 'doStuffAfterWards') {
}
const { result, params } = event;
// do something to the result
},
});
// generic subscribe for generic handling
strapi.db.lifecycles.subscribe((event) => {
if (event.action === 'beforeCreate') {
// do something
}
});
}
}
```
# Policies
Source: //cms/backend-customization/policies
# Policies
Policies are functions that execute specific logic on each request before it reaches the [controller](/cms/backend-customization/controllers). They are mostly used for securing business logic.
Each [route](/cms/backend-customization/routes) of a Strapi project can be associated to an array of policies. For example, a policy named `is-admin` could check that the request is sent by an admin user, and restrict access to critical routes.
Policies can be global or scoped. [Global policies](#global-policies) can be associated to any route in the project. Scoped policies only apply to a specific [API](#api-policies) or [plugin](#plugin-policies).
The diagram represents a simplified version of how a request travels through the Strapi back end, with policies and routes highlighted. The backend customization introduction page includes a complete, interactive diagram.
## Implementation
A new policy can be implemented:
- with the [interactive CLI command `strapi generate`](/cms/cli#strapi-generate)
- or manually by creating a JavaScript file in the appropriate folder (see [project structure](/cms/project-structure)):
- `./src/policies/` for global policies
- `./src/api/[api-name]/policies/` for API policies
- `./src/plugins/[plugin-name]/policies/` for plugin policies
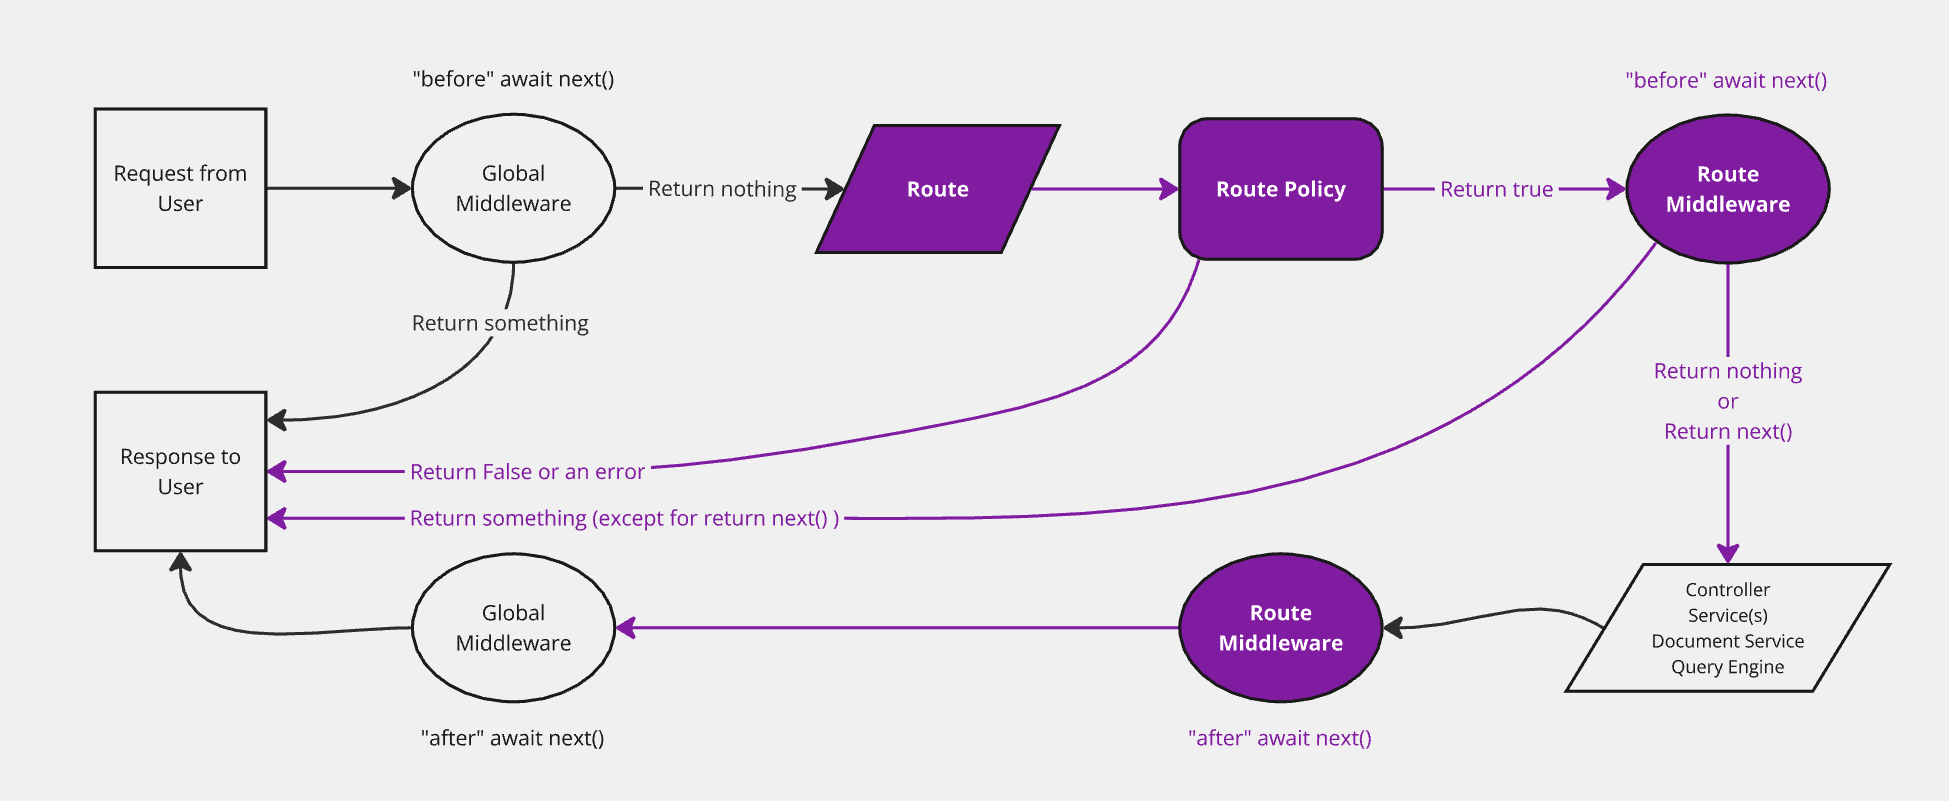
Global policy implementation example:
`policyContext` is a wrapper around the [controller](/cms/backend-customization/controllers) context. It adds some logic that can be useful to implement a policy for both REST and GraphQL.
Policies can be configured using a `config` object:
## Usage
To apply policies to a route, add them to its configuration object (see [routes documentation](/cms/backend-customization/routes#policies)).
Policies are called different ways depending on their scope:
- use `global::policy-name` for [global policies](#global-policies)
- use `api::api-name.policy-name` for [API policies](#api-policies)
- use `plugin::plugin-name.policy-name` for [plugin policies](#plugin-policies)
:::tip
To list all the available policies, run `yarn strapi policies:list`.
:::
### Global policies
Global policies can be associated to any route in a project.
### Plugin policies
Plugins can add and expose policies to an application. For example, the [Users & Permissions feature](/cms/features/users-permissions) comes with policies to ensure that the user is authenticated or has the rights to perform an action:
### API policies
API policies are associated to the routes defined in the API where they have been declared.
To use a policy in another API, reference it with the following syntax: `api::[apiName].[policyName]`:
# Requests and Responses
Source: //cms/backend-customization/requests-responses
# Requests and Responses
The Strapi back end server is based on . When you send requests through the [REST API](/cms/api/rest), a context object (`ctx`) is passed to every element of the Strapi back end (e.g., [policies](/cms/backend-customization/policies), [controllers](/cms/backend-customization/controllers), [services](/cms/backend-customization/services)).
`ctx` includes 3 main objects:
- [`ctx.request`](#ctxrequest) for information about the request sent by the client making an API request,
- [`ctx.state`](#ctxstate) for information about the state of the request within the Strapi back end,
- and [`ctx.response`](#ctxresponse) for information about the response that the server will return.
:::tip
The request's context can also be accessed from anywhere in the code with the [`strapi.requestContext` function](#accessing-the-request-context-anywhere).
:::
:::info
In addition to the concepts and parameters described in the following documentation, you might find additional information in the , and .
:::
The diagram represents a simplified version of how a request travels through the Strapi back end, with requests and responses highlighted. The backend customization introduction page includes a complete, interactive diagram.
## `ctx.request`
The `ctx.request` object contains the following parameters:
| Parameter | Description | Type |
| --------------------- | -------------------------------------------------------------------------------------------- | -------- |
| `ctx.request.body` | Parsed version of the body. | `Object` |
| `ctx.request.files` | Files sent with the request. | `Array` |
| `ctx.request.headers` | Headers sent with the request. | `Object` |
| `ctx.request.host` | Host part of the URL, including the port. | `String` |
| `ctx.request.hostname`| Host part of the URL, excluding the port. | `String` |
| `ctx.request.href` | Complete URL of the requested resource, including the protocol, domain, port (if specified), path, and query parameters. | `String` |
| `ctx.request.ip` | IP of the person sending the request.| `String` |
| `ctx.request.ips` | When `X-Forwarded-For` is present and `app.proxy` is enabled, an array of IPs is returned, ordered from upstream to downstream.
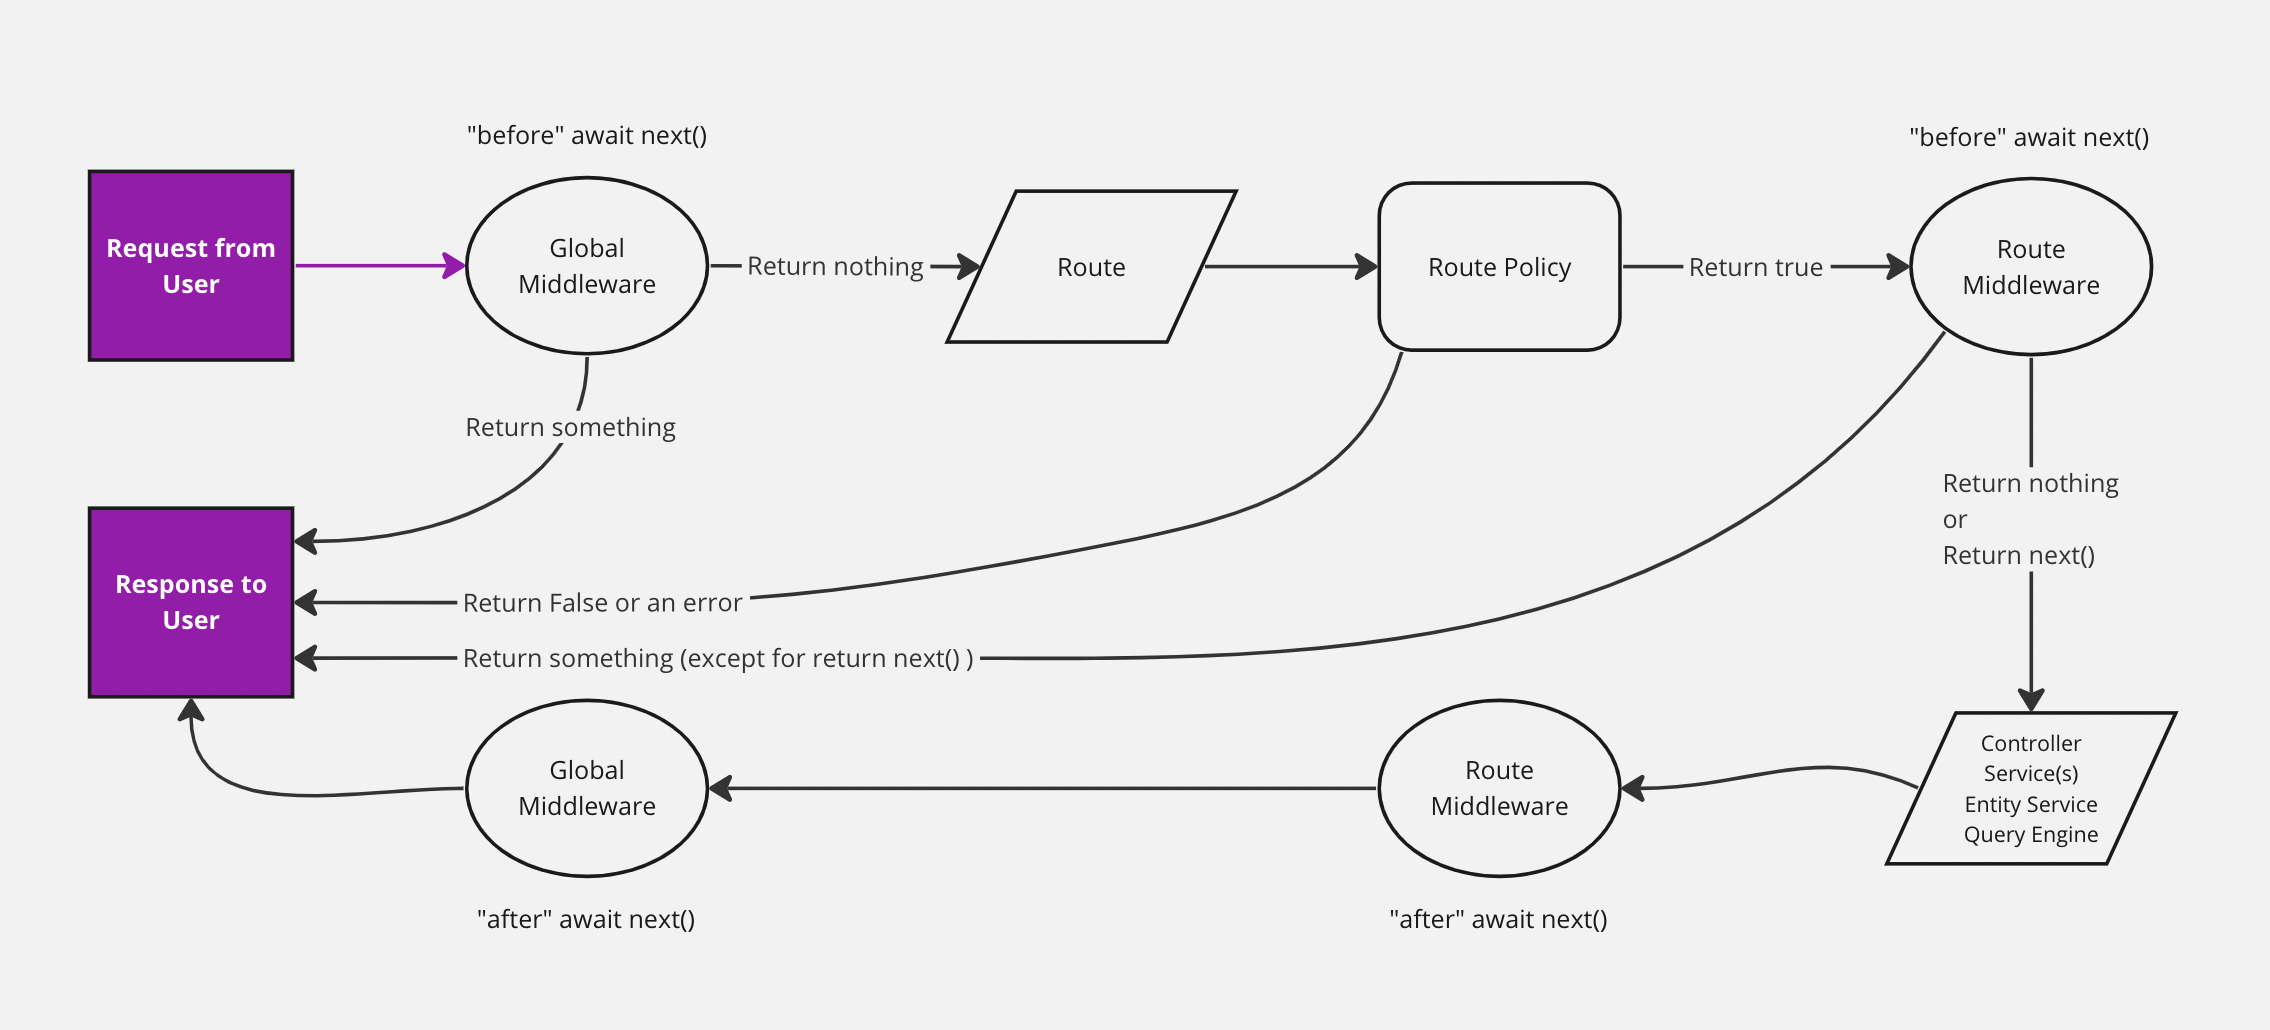
For example if the value were "client, proxy1, proxy2", you would receive the `["client", "proxy1", "proxy2"]` array. | `Array` |
| `ctx.request.method` | Request method (e.g., `GET`, `POST`). | `String` |
| `ctx.request.origin` | URL part before the first `/`. | `String` |
| `ctx.request.params` | Parameters sent in the URL.
For example, if the internal URL is `/restaurants/:id`, whatever you replace `:id` in the real request becomes accessible through `ctx.request.params.id`. | `Object` |
| `ctx.request.path` | Path of the requested resource, excluding the query parameters. | `String` |
| `ctx.request.protocol`| Protocol being used (e.g., `https` or `http`). | `String` |
| `ctx.request.query` | Strapi-specific [query parameters](#ctxrequestquery). | `Object` |
| `ctx.request.subdomains`| Subdomains included in the URL.
For example, if the domain is `tobi.ferrets.example.com`, the value is the following array: `["ferrets", "tobi"]`. | `Array` |
| `ctx.request.url` | Path and query parameters of the requested resource, excluding the protocol, domain, and port. | `String` |
Differences between protocol, origin, url, href, path, host, and hostname :
Given an API request sent to the `https://example.com:1337/api/restaurants?id=123` URL, here is what different parameters of the `ctx.request` object return:
| Parameter | Returned value |
| ---------- | ------------------------------------------------- |
| `ctx.request.href` | `https://example.com:1337/api/restaurants?id=123` |
| `ctx.request.protocol` | `https` |
| `ctx.request.host` | `localhost:1337` |
| `ctx.request.hostname` | `localhost` |
| `ctx.request.origin` | `https://example.com:1337` |
| `ctx.request.url` | `/api/restaurants?id=123` |
| `ctx.request.path` | `/api/restaurants` |
### `ctx.request.query`
`ctx.request` provides a `query` object that gives access to Strapi query parameters. The following table lists available parameters with a short description and a link to the relevant REST API documentation section (see [REST API parameters](/cms/api/rest/parameters) for more information):
| Parameter | Description | Type |
| -------------------------------------| --------------------------------------------------------------------------------------------------------------------------- | -------------------- |
| `ctx.request.query` `ctx.query` | The whole query object. | `Object` |
| `ctx.request.query.sort` | Parameters to [sort the response](/cms/api/rest/sort-pagination.md#sorting) | `String` or `Array` |
| `ctx.request.query.filters` | Parameters to [filter the response](/cms/api/rest/filters) | `Object` |
| `ctx.request.query.populate` | Parameters to [populate relations, components, or dynamic zones](/cms/api/rest/populate-select#population) | `String` or `Object` |
| `ctx.request.query.fields` | Parameters to [select only specific fields to return with the response](/cms/api/rest/populate-select#field-selection) | `Array` |
| `ctx.request.query.pagination` | Parameter to [page through entries](/cms/api/rest/sort-pagination.md#pagination) | `Object` |
| `ctx.request.query.publicationState` | Parameter to [select the Draft & Publish state](/cms/api/rest/status) | `String` |
| `ctx.request.query.locale` | Parameter to [select one or multiple locales](/cms/api/rest/locale) | `String` or `Array` |
## `ctx.state`
The `ctx.state` object gives access to the state of the request within the Strapi back end, including specific values about the [user](#ctxstateuser), [authentication](#ctxstateauth), [route](#ctxstateroute):
| Parameter | Description | Type |
| ---------------------------|---------------------------------------------------------------------------- | -------- |
| `ctx.state.isAuthenticated`| Returns whether the current user is authenticated in any way. | `Boolean` |
### `ctx.state.user`
The `ctx.state.user` object gives access to information about the user performing the request and includes the following parameters:
| Parameter | Description | Type |
| ----------| -------------------------------------------------------------------------------------------- | -------- |
| `ctx.state.user`| User's information. Only one relation is populated. | `Object` |
| `ctx.state.user.role`| The user's role | `Object` |
### `ctx.state.auth`
The `ctx.state.auth` object gives access to information related to the authentication and includes the following parameters:
| Parameter | Description | Type |
| ------------------------------| -------------------------------------------------------------------------------------------- | -------- |
| `ctx.state.auth.strategy` | Information about the currently used authentication strategy ([Users & Permissions plugin](/cms/features/users-permissions) or [API tokens](/cms/features/api-tokens)) | `Object` |
| `ctx.state.auth.strategy.name`| Name of the currently used strategy | `String` |
| `ctx.state.auth.credentials` | The user's credentials | `String` |
### `ctx.state.route`
The `ctx.state.route` object gives access to information related to the current route and includes the following parameters:
| Parameter | Description | Type |
| ----------| -------------------------------------------------------------------------------------------- | -------- |
| `ctx.state.route.method`| Method used to access the current route. | `String` |
| `ctx.state.route.path`| Path of the current route. | `String` |
| `ctx.state.route.config`| Configuration information about the current route. | `Object` |
| `ctx.state.route.handler`| Handler (controller) of the current route. | `Object` |
| `ctx.state.route.info`| Additional information about the current route, such as the apiName and the API request type. | `Object` |
| `ctx.state.route.info.apiName`| Name of the used API. | `String` |
| `ctx.state.route.info.type`| Type of the used API. | `String` |
## `ctx.response`
The `ctx.response` object gives access to information related to the response that the server will return and includes the following parameters:
| Parameter | Description | Type |
| ----------| -------------------------------------------------------------------------------------------- | -------- |
| `ctx.response.body`| Body of the response. | `Any` |
| `ctx.response.status` | Status code of the response. | `Integer` |
| `ctx.response.message`| Status message of the response.
By default, `response.message` is associated with `response.status`. | `String` |
| `ctx.response.header` `ctx.response.headers`| Header(s) sent with the response. | `Object` |
| `ctx.response.length`| header value as a number when present, or deduces it from `ctx.body` when possible; otherwise, returns `undefined`. | `Integer` |
| `ctx.response.redirect` `ctx.response.redirect(url, [alt])` | Performs a `302` redirect to the URL. The string "back" is special-cased to provide Referrer support; when Referrer is not present, alt or "/" is used.
`ctx.response.attachment([filename], [options])` | Sets header to "attachment" to signal the client to prompt for download. Optionally specify the filename of the download and some . | `Function` |
| `ctx.response.type`| header, void of parameters such as "charset". | `String` |
| `ctx.response.lastModified`| header as a Date, if it exists. | `DateTime` |
| `ctx.response.etag`| Sets the of a response including the wrapped "s. There is no corresponding `response.etag` getter. | `String` |
## Accessing the request context anywhere
Strapi exposes a way to access the current request context from anywhere in the code (e.g. lifecycle functions).
You can access the request as follows:
```js
const ctx = strapi.requestContext.get();
```
You should only use this inside of functions that will be called in the context of an HTTP request.
```js
// correct
const service = {
myFunction() {
const ctx = strapi.requestContext.get();
console.log(ctx.state.user);
},
};
// incorrect
const ctx = strapi.requestContext.get();
const service = {
myFunction() {
console.log(ctx.state.user);
},
};
```
**Example:**
```js title="./api/test/content-types/article/lifecycles.js"
module.exports = {
beforeUpdate() {
const ctx = strapi.requestContext.get();
console.log('User info in service: ', ctx.state.user);
},
};
```
:::note
Strapi uses a Node.js feature called to make the context available anywhere.
:::
# Routes
Source: //cms/backend-customization/routes
# Routes
Requests sent to Strapi on any URL are handled by routes. By default, Strapi generates routes for all the content-types (see [REST API documentation](/cms/api/rest)). Routes can be [added](#implementation) and configured:
- with [policies](#policies), which are a way to block access to a route,
- and with [middlewares](#middlewares), which are a way to control and change the request flow and the request itself.
Once a route exists, reaching it executes some code handled by a controller (see [controllers documentation](/cms/backend-customization/controllers)). To view all existing routes and their hierarchal order, you can run `yarn strapi routes:list` (see [CLI reference](/cms/cli)).
The diagram represents a simplified version of how a request travels through the Strapi back end, with routes highlighted. The backend customization introduction page includes a complete, interactive diagram.
## Implementation
Implementing a new route consists in defining it in a router file within the `./src/api/[apiName]/routes` folder (see [project structure](/cms/project-structure)).
There are 2 different router file structures, depending on the use case:
- configuring [core routers](#configuring-core-routers)
- or creating [custom routers](#creating-custom-routers).
### Configuring core routers
Core routers (i.e. `find`, `findOne`, `create`, `update`, and `delete`) correspond to [default routes](/cms/api/rest#endpoints) automatically created by Strapi when a new [content-type](/cms/backend-customization/models#model-creation) is created.
Strapi provides a `createCoreRouter` factory function that automatically generates the core routers and allows:
- passing in configuration options to each router
- and disabling some core routers to [create custom ones](#creating-custom-routers).
A core router file is a JavaScript file exporting the result of a call to `createCoreRouter` with the following parameters:
| Parameter | Description | Type |
| ----------| -------------------------------------------------------------------------------------------- | -------- |
| `prefix` | Allows passing in a custom prefix to add to all routers for this model (e.g. `/test`) | `String` |
| `only` | Core routes that will only be loaded
Anything not in this array is ignored. | `Array` | -->
| `except` | Core routes that should not be loaded
This is functionally the opposite of the `only` parameter. | `Array` |
| `config` | Configuration to handle [policies](#policies), [middlewares](#middlewares) and [public availability](#public-routes) for the route | `Object` |
Generic implementation example:
This only allows a `GET` request on the `/restaurants` path from the core `find` [controller](/cms/backend-customization/controllers) without authentication.
### Creating custom routers
Creating custom routers consists in creating a file that exports an array of objects, each object being a route with the following parameters:
| Parameter | Description | Type |
| -------------------------- | -------------------------------------------------------------------------------- | -------- |
| `method` | Method associated to the route (i.e. `GET`, `POST`, `PUT`, `DELETE` or `PATCH`) | `String` |
| `path` | Path to reach, starting with a forward-leading slash (e.g. `/articles`)| `String` |
| `handler` | Function to execute when the route is reached. Should follow this syntax: `.` | `String` |
| `config`
_Optional_ | Configuration to handle [policies](#policies), [middlewares](#middlewares) and [public availability](#public-routes) for the route
| `Object` |
Dynamic routes can be created using parameters and regular expressions. These parameters will be exposed in the `ctx.params` object. For more details, please refer to the
## Configuration
Both [core routers](#configuring-core-routers) and [custom routers](#creating-custom-routers) have the same configuration options. The routes configuration is defined in a `config` object that can be used to handle [policies](#policies) and [middlewares](#middlewares) or to [make the route public](#public-routes).
### Policies
[Policies](/cms/backend-customization/policies) can be added to a route configuration:
- by pointing to a policy registered in `./src/policies`, with or without passing a custom configuration
- or by declaring the policy implementation directly, as a function that takes `policyContext` to extend
### Middlewares
[Middlewares](/cms/backend-customization/middlewares) can be added to a route configuration:
- by pointing to a middleware registered in `./src/middlewares`, with or without passing a custom configuration
- or by declaring the middleware implementation directly, as a function that takes
### Public routes
By default, routes are protected by Strapi's authentication system, which is based on [API tokens](/cms/features/api-tokens) or on the use of the [Users & Permissions plugin](/cms/features/users-permissions).
In some scenarios, it can be useful to have a route publicly available and control the access outside of the normal Strapi authentication system. This can be achieved by setting the `auth` configuration parameter of a route to `false`:
# Services
Source: //cms/backend-customization/services
# Services
Services are a set of reusable functions. They are particularly useful to respect the "don’t repeat yourself" (DRY) programming concept and to simplify [controllers](/cms/backend-customization/controllers.md) logic.
The diagram represents a simplified version of how a request travels through the Strapi back end, with services highlighted. The backend customization introduction page includes a complete, interactive diagram.
## Implementation
Services can be [generated or added manually](#adding-a-new-service). Strapi provides a `createCoreService` factory function that automatically generates core services and allows building custom ones or [extend or replace the generated services](#extending-core-services).
### Adding a new service
A new service can be implemented:
- with the [interactive CLI command `strapi generate`](/cms/cli#strapi-generate)
- or manually by creating a JavaScript file in the appropriate folder (see [project structure](/cms/project-structure.md)):
- `./src/api/[api-name]/services/` for API services
- or `./src/plugins/[plugin-name]/services/` for [plugin services](/cms/plugins-development/server-api#services).
To manually create a service, export a factory function that returns the service implementation (i.e. an object with methods). This factory function receives the `strapi` instance:
:::strapi Document Service API
To get started creating your own services, see Strapi's built-in functions in the [Document Service API](/cms/api/document-service) documentation.
:::
Example of a custom email service (using Nodemailer)
The goal of a service is to store reusable functions. A `sendNewsletter` service could be useful to send emails from different functions in our codebase that have a specific purpose:
The service is now available through the `strapi.service('api::restaurant.restaurant').sendNewsletter(...args)` global variable. It can be used in another part of the codebase, like in the following controller:
:::note
When a new [content-type](/cms/backend-customization/models.md#content-types) is created, Strapi builds a generic service with placeholder code, ready to be customized.
:::
### Extending core services
Core services are created for each content-type and could be used by [controllers](/cms/backend-customization/controllers.md) to execute reusable logic through a Strapi project. Core services can be customized to implement your own logic. The following code examples should help you get started.
:::tip
A core service can be replaced entirely by [creating a custom service](#adding-a-new-service) and naming it the same as the core service (e.g. `find`, `findOne`, `create`, `update`, or `delete`).
:::
Collection type examplesSingle type examples
## Usage
Once a service is created, it's accessible from [controllers](/cms/backend-customization/controllers.md) or from other services:
```js
// access an API service
strapi.service('api::apiName.serviceName').FunctionName();
// access a plugin service
strapi.service('plugin::pluginName.serviceName').FunctionName();
```
In the syntax examples above, `serviceName` is the name of the service file for API services or the name used to export the service file to `services/index.js` for plugin services.
:::tip
To list all the available services, run `yarn strapi services:list`.
:::
# Webhooks
Source: //cms/backend-customization/webhooks
# Webhooks
Webhook is a construct used by an application to notify other applications that an event occurred. More precisely, webhook is a user-defined HTTP callback. Using a webhook is a good way to tell third-party providers to start some processing (CI, build, deployment ...).
The way a webhook works is by delivering information to a receiving application through HTTP requests (typically POST requests).
## User content-type webhooks
To prevent from unintentionally sending any user's information to other applications, Webhooks will not work for the User content-type.
If you need to notify other applications about changes in the Users collection, you can do so by creating [Lifecycle hooks](/cms/backend-customization/models#lifecycle-hooks) using the `./src/index.js` example.
## Available configurations
You can set webhook configurations inside the file `./config/server`.
- `webhooks`
- `defaultHeaders`: You can set default headers to use for your webhook requests. This option is overwritten by the headers set in the webhook itself.
**Example configuration**
## Securing your webhooks
Most of the time, webhooks make requests to public URLs, therefore it is possible that someone may find that URL and send it wrong information.
To prevent this from happening you can send a header with an authentication token. Using the Admin panel you would have to do it for every webhook.
Another way is to define `defaultHeaders` to add to every webhook request.
You can configure these global headers by updating the file at `./config/server`:
If you are developing the webhook handler yourself you can now verify the token by reading the headers.
## Available events
By default Strapi webhooks can be triggered by the following events:
| Name | Description |
| ----------------- | ----------------------------------------------------- |
| [`entry.create`](#entrycreate) | Triggered when a Content Type entry is created. |
| [`entry.update`](#entryupdate) | Triggered when a Content Type entry is updated. |
| [`entry.delete`](#entrydelete) | Triggered when a Content Type entry is deleted. |
| [`entry.publish`](#entrypublish) | Triggered when a Content Type entry is published.\* |
| [`entry.unpublish`](#entryunpublish) | Triggered when a Content Type entry is unpublished.\* |
| [`media.create`](#mediacreate) | Triggered when a media is created. |
| [`media.update`](#mediaupdate) | Triggered when a media is updated. |
| [`media.delete`](#mediadelete) | Triggered when a media is deleted. |
| [`review-workflows.updateEntryStage`](#review-workflowsupdateentrystage) | Triggered when content is moved between review stages (see [review workflows](/cms/features/review-workflows#configuration)). This event is only available with the edition of Strapi. |
| [`releases.publish`](#releases-publish) | Triggered when a Release is published (see [Releases](/cms/features/releases)). This event is only available with the or plan of Strapi CMS. |
\*only when `draftAndPublish` is enabled on this Content Type.
## Payloads
:::tip NOTE
Private fields and s are not sent in the payload.
:::
### Headers
When a payload is delivered to your webhook's URL, it will contain specific headers:
| Header | Description |
| ---------------- | ------------------------------------------ |
| `X-Strapi-Event` | Name of the event type that was triggered. |
### `entry.create`
This event is triggered when a new entry is created.
**Example payload**
```json
{
"event": "entry.create",
"createdAt": "2020-01-10T08:47:36.649Z",
"model": "address",
"entry": {
"id": 1,
"geolocation": {},
"city": "Paris",
"postal_code": null,
"category": null,
"full_name": "Paris",
"createdAt": "2020-01-10T08:47:36.264Z",
"updatedAt": "2020-01-10T08:47:36.264Z",
"cover": null,
"images": []
}
}
```
### `entry.update`
This event is triggered when an entry is updated.
**Example payload**
```json
{
"event": "entry.update",
"createdAt": "2020-01-10T08:58:26.563Z",
"model": "address",
"entry": {
"id": 1,
"geolocation": {},
"city": "Paris",
"postal_code": null,
"category": null,
"full_name": "Paris",
"createdAt": "2020-01-10T08:47:36.264Z",
"updatedAt": "2020-01-10T08:58:26.210Z",
"cover": null,
"images": []
}
}
```
### `entry.delete`
This event is triggered when an entry is deleted.
**Example payload**
```json
{
"event": "entry.delete",
"createdAt": "2020-01-10T08:59:35.796Z",
"model": "address",
"entry": {
"id": 1,
"geolocation": {},
"city": "Paris",
"postal_code": null,
"category": null,
"full_name": "Paris",
"createdAt": "2020-01-10T08:47:36.264Z",
"updatedAt": "2020-01-10T08:58:26.210Z",
"cover": null,
"images": []
}
}
```
### `entry.publish`
This event is triggered when an entry is published.
**Example payload**
```json
{
"event": "entry.publish",
"createdAt": "2020-01-10T08:59:35.796Z",
"model": "address",
"entry": {
"id": 1,
"geolocation": {},
"city": "Paris",
"postal_code": null,
"category": null,
"full_name": "Paris",
"createdAt": "2020-01-10T08:47:36.264Z",
"updatedAt": "2020-01-10T08:58:26.210Z",
"publishedAt": "2020-08-29T14:20:12.134Z",
"cover": null,
"images": []
}
}
```
### `entry.unpublish`
This event is triggered when an entry is unpublished.
**Example payload**
```json
{
"event": "entry.unpublish",
"createdAt": "2020-01-10T08:59:35.796Z",
"model": "address",
"entry": {
"id": 1,
"geolocation": {},
"city": "Paris",
"postal_code": null,
"category": null,
"full_name": "Paris",
"createdAt": "2020-01-10T08:47:36.264Z",
"updatedAt": "2020-01-10T08:58:26.210Z",
"publishedAt": null,
"cover": null,
"images": []
}
}
```
### `media.create`
This event is triggered when you upload a file on entry creation or through the media interface.
**Example payload**
```json
{
"event": "media.create",
"createdAt": "2020-01-10T10:58:41.115Z",
"media": {
"id": 1,
"name": "image.png",
"hash": "353fc98a19e44da9acf61d71b11895f9",
"sha256": "huGUaFJhmcZRHLcxeQNKblh53vtSUXYaB16WSOe0Bdc",
"ext": ".png",
"mime": "image/png",
"size": 228.19,
"url": "/uploads/353fc98a19e44da9acf61d71b11895f9.png",
"provider": "local",
"provider_metadata": null,
"createdAt": "2020-01-10T10:58:41.095Z",
"updatedAt": "2020-01-10T10:58:41.095Z",
"related": []
}
}
```
### `media.update`
This event is triggered when you replace a media or update the metadata of a media through the media interface.
**Example payload**
```json
{
"event": "media.update",
"createdAt": "2020-01-10T10:58:41.115Z",
"media": {
"id": 1,
"name": "image.png",
"hash": "353fc98a19e44da9acf61d71b11895f9",
"sha256": "huGUaFJhmcZRHLcxeQNKblh53vtSUXYaB16WSOe0Bdc",
"ext": ".png",
"mime": "image/png",
"size": 228.19,
"url": "/uploads/353fc98a19e44da9acf61d71b11895f9.png",
"provider": "local",
"provider_metadata": null,
"createdAt": "2020-01-10T10:58:41.095Z",
"updatedAt": "2020-01-10T10:58:41.095Z",
"related": []
}
}
```
### `media.delete`
This event is triggered only when you delete a media through the media interface.
**Example payload**
```json
{
"event": "media.delete",
"createdAt": "2020-01-10T11:02:46.232Z",
"media": {
"id": 11,
"name": "photo.png",
"hash": "43761478513a4c47a5fd4a03178cfccb",
"sha256": "HrpDOKLFoSocilA6B0_icA9XXTSPR9heekt2SsHTZZE",
"ext": ".png",
"mime": "image/png",
"size": 4947.76,
"url": "/uploads/43761478513a4c47a5fd4a03178cfccb.png",
"provider": "local",
"provider_metadata": null,
"createdAt": "2020-01-07T19:34:32.168Z",
"updatedAt": "2020-01-07T19:34:32.168Z",
"related": []
}
}
```
### `review-workflows.updateEntryStage`
This event is only available with the plan of Strapi. The event is triggered when content is moved to a new review stage (see [Review Workflows](/cms/features/review-workflows#configuration)).
**Example payload**
```json
{
"event": "review-workflows.updateEntryStage",
"createdAt": "2023-06-26T15:46:35.664Z",
"model": "model",
"uid": "uid",
"entity": {
"id": 2
},
"workflow": {
"id": 1,
"stages": {
"from": {
"id": 1,
"name": "Stage 1"
},
"to": {
"id": 2,
"name": "Stage 2"
}
}
}
}
```
### `releases.publish` {#releases-publish}
The event is triggered when a [release](/cms/features/releases) is published.
**Example payload**
```json
{
"event": "releases.publish",
"createdAt": "2024-02-21T16:45:36.877Z",
"isPublished": true,
"release": {
"id": 2,
"name": "Fall Winter highlights",
"releasedAt": "2024-02-21T16:45:36.873Z",
"scheduledAt": null,
"timezone": null,
"createdAt": "2024-02-21T15:16:22.555Z",
"updatedAt": "2024-02-21T16:45:36.875Z",
"actions": {
"count": 1
}
}
}
```
## Best practices for webhook handling
- Validate incoming requests by checking headers and payload signatures.
- Implement retries for failed webhook requests to handle transient errors.
- Log webhook events for debugging and monitoring.
- Use secure, HTTPS endpoints for receiving webhooks.
- Set up rate limiting to avoid being overwhelmed by multiple webhook requests.
# Command Line Interface
Source: //cms/cli
# Command Line Interface (CLI)
Strapi comes with a full featured Command Line Interface (CLI) which lets you scaffold and manage your project in seconds. The CLI works with both the `yarn` and `npm` package managers.
:::caution
Interactive commands such as `strapi admin:create-user` don't display prompts with `npm`. A fix for the `npm` package manager is anticipated by March 2023. In the meantime, consider using the `yarn` package manager.
:::
:::note
It is recommended to install Strapi locally only, which requires prefixing all of the following `strapi` commands with the package manager used for the project setup (e.g `npm run strapi help` or `yarn strapi help`) or a dedicated node package executor (e.g. `npx strapi help`).
To pass options with `npm` use the syntax: `npm run strapi -- --